
I’ve already published part #1 of this series – entitled JSON Query (jq) – icurl’s best friend. But you don’t need to have read it to get plenty out of this part, where you’ll find the following lessons:
- Lesson #2.1 – Meet MIM and MIT
- Lesson #2.2 – Using the Object Store Browser (visore) to find object classes and distinguished names is ACI
- Lesson #2.3 – The query-target filter
- Lesson #2.4 – Meet the target-subtree-class filter
- Lesson #2.5 – Using target-subtree-class for multiple classes
- Lesson #2.6 – Introducing rsp-subtree and rsp-subtree-class filters
- Lesson #2.7 – Reducing output volume using the rsp-prop-include filter
- Lesson #2.8 – A useful example using the rsp-subtree-include filter
- Lesson #2.9 – Getting things in order: the order-by filter
- Lesson #2.10 – Finally, the query-target-filter and rsp-subtree-filter filters
I was going to add another lesson with some practical examples, but that is going to be Part #3
Part #2 – Conquering icurl
In this part, I’ll look at getting the most out of icurl using the Cisco ACI API REST filters. Of course, jq will feature as well, but this post concentrates on getting you familiar with querying the REST API using icurl to query the ACI MIT, but the examples used here could easily be used if Postman of writing your own scripts.
Tip: |
In the examples that follow, I used http:// to invoke icurl – if you want to use https:// – then add a -k flag to the icurl command:icurl -k https://localhost/api/... etcI’ll also use a -s flag to the icurl command to suppress the output of the status information that would otherwise clutter up the output |
Lesson #2.1 – Meet MIM and MIT
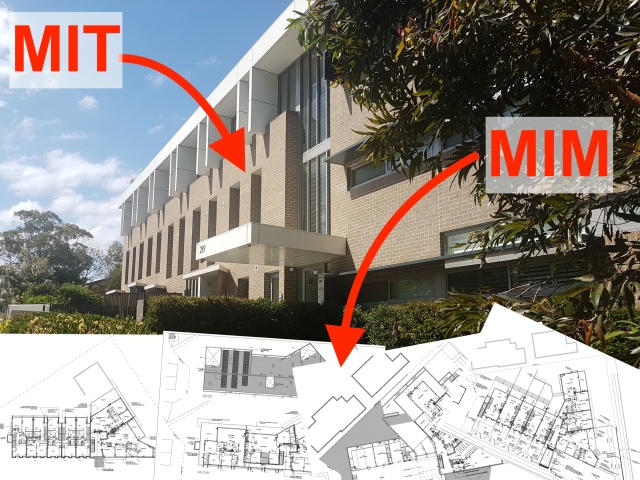
MIM is ACI’s Management Information Model – it defines all of the object classes used in ACI and you can find them all listed here, or on your local APIC at https://<your_APIC_IP>/model-doc/#/objects
When an instance of an object is created in ACI, it becomes a managed object. It, along with with all its attributes is stored in ACI’s hierarchical database, known as the MIT – the Management Information Tree.
One of the attributes that will be stored will be that managed object’s distinguished name – dn which uniquely identify the object instance in the MIT
When you use icurl, you’ll need to provide it with either an object class or a dn to query.
Example:
fvTenant is an object class – all Tenants are instances of this class and each Tenant will have a set of attributes
| Packages |
Sometimes you will see fvTenant written as fv:Tenant. This representation is in the form Package:Class, where fv represents the fabric variable package. Other packages include virtual zone (vz) where you’ll find all the contracts, and layer 1 (l1) where physical interfaces appear.
When dealing with the REST API, you’ll need to leave out the colon (:) between the package name and the class. |
You could use icurl to find all instances of object class fvTenant using this command:
icurl -s http://localhost/api/node/class/fvTenant.json
Of course, you’d probably want to pipe it into jq to make the output manageable:
icurl -s http://localhost/api/node/class/fvTenant.json |
jq '.imdata[].fvTenant.attributes | .dn, .name'
If I create a Tenant and call it Tenant17, its distinguished name will be uni/tn-Tenant17 (as defined by the Naming Rules in the MIM for fvTenant). Another attribute will be its name which will be Tenant17 of course.
Now that you know the dn for Tenant17, you could use icurl to find all attributes of that managed object (or mo) using this command:
icurl -s http://localhost/api/node/mo/uni/tn-Tenant17.json | jq
If you want to get clever with jq to make the output more succinct you could use:
icurl -s http://localhost/api/node/mo/uni/tn-Tenant17.json |
jq .imdata[].fvTenant.attributes
Meet the children and other relations
A Tenant will always have children, and each child object will reflect its parent in its dn. For instance, if Tenant17 has a VRF called Production_VRF, it’s distinguished name will be uni/tn-Tenant17/ctx-Production_VRF. The DN for a Bridge Domain called App_BD in Tenant17 will be uni/tn-Tenant17/BD-App_BD.
But that’s not the whole story. Let’s take some time out to look at object relationships in ACI.
TIME OUT – Quick lesson on object relationships in ACI |
For all the examples in this post, I’ll be using a Tenant named Tenant17, which has a VRF named Production_VRF, an Application Profile called 3Tier_AP with three EPGs named AppServers_EPG, DBServers_EPG, and WebServers_EPG which are linked to two Bridge Domains named App_BD and Web_BD, which have the subnets 10.217.11.1/24 and 10.217.12.1/24 assigned respectively. Diagrammatically the relationships look like this: From this you can see that the VRF, the BDs and the Application Profile are child objects of the Tenant, and that the Subnet is a child object of the BD, But that is not the whole story. There relationships as well: each BD is linked to the VRF and each EPG linked to a BD – via an object of class fvRsBb as you’ll see below. And there are other relationships not drawn too, such as the reverse relationships to those mentioned – the VRF to the BDs and the BDs to the EPGs. From this you can see that the VRF, the BDs and the Application Profile are child objects of the Tenant, and that the Subnet is a child object of the BD, But that is not the whole story. There relationships as well: each BD is linked to the VRF and each EPG linked to a BD – via an object of class fvRsBb as you’ll see below. And there are other relationships not drawn too, such as the reverse relationships to those mentioned – the VRF to the BDs and the BDs to the EPGs.
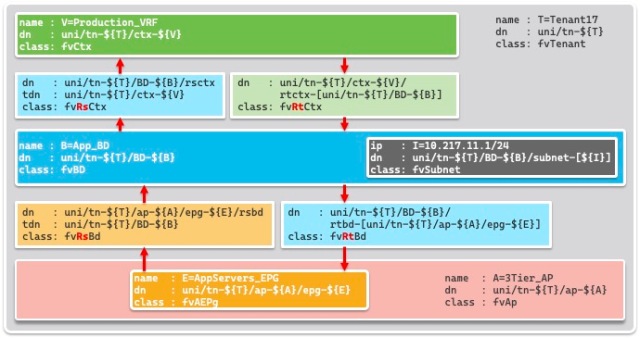
Note: Tenant17 actually has a second application profile called 2Tier_AP with two additional EPGs, another AppServers_EPG and another WebServers_EPG. You may see some references to these objects from time to time, but the bulk of the discussion is as per the diagram above. So here’s another diagram as a reference to the key relationships within a Tenant construct. I’ve used bash-style variables to keep the size of the diagram manageable, so you’ll see the the Tenant name written as T=Tenant17, then all future references where Tenant17 would have occurred have been replaced by ${T}
dn = distinguished name |
Remember, when you use icurl, you’ll need to provide it with either an object class or a dn to query. So the challenge is how to find object classes and distinguished names is ACI.
Lesson #2.2 – Using the Object Store Browser (visore) to find object classes and distinguished names is ACI
One of the reasons I prefer icurl over moquery is that it is easier to copy and paste URLs from the APIC’s Object Store Browser (a.k.a visore). This means you can use visore to fine tune a query, then copy/paste it into an icurl command. Here’s how I do that.
Let’s assume that you’d like to list the EPGs for a particular Application Profile in a specific Tenant.
In the APIC GUI, browse to the Application Profile in the Tenant in question, right click on it and choose Open in Object Store Browser

Screenshot
Now EPGs are child objects of the Application Profile, so to see the EPGs, you’ll need to click the View children MOs icon to the right of the Application Profile’s distinguished name.

Screenshot
You’ve now got visore (the original name for the Object Store Browser) to show the objects you want. All you have to do now is click the link that says Show URL and response of last query and you’ll see most of the URL you’ll need to use for icurl. Not only that, you’ll see a convenient Copy URL shortcut.

Screenshot
To issue the corresponding icurl command now, you’ll need to:
- Make sure you logged into an APIC CLI and are at the bash prompt on the APIC (otherwise it will be impossible to paste the ? character in the URL)
- Type the first part of the command i.e.
icurl -s http://localhost - Paste the remainder of the URL as copied from the Managed Object Browser.
- Add the characters
| jqto pipe into jq, so the whole command line readsicurl -s http://localhost/api/node/api/node/mo/uni/tn-Tenant17/ap-3Tier_AP.json?query-target=children | jq– the space before the pipe character|is optional - (Optional) use the lessons learned in Part #1 to make jq show just what you want – a list of the EPGs for a particular Tenant.
| Tip: |
If there is a special character in the URL you copied from the Object Store Browser, you’ll have to escape it by preceding it with a backslash. So:/api/node/mo/topology/pod-1/node-2201/sys/phys-[eth1/28].jsonwould need to be modified to: /api/node/mo/topology/pod-1/node-2201/sys/phys-\[eth1/28\].json |
Of course, the Application Profile and Tenant names will reflect your configuration, not mine. Here’s my example using jq to format the output, but I’ve split the command over multiple lines. So to make my example below cut-and-pastable, I’ve added quotes and a backslash at the end of lines where necessary.
apic1# bash
T17@apic1:~> icurl -s "http://localhost/api/node/mo/uni/\
tn-Tenant17/ap-3Tier_AP.json?query-target=children" |
jq .imdata[].fvAEPg.attributes.name
"AppServers_EPG"
"WebServers_EPG"
"DBServers_EPG"
If you are not familiar with jq, then you can leave out the fancy .imdata[].fvAEPg.attributes.name part and still find what you want – as shown below (still heavily trimmed using egrep to make the output friendly).
apic1# bash
T17@apic1:~> icurl -s "http://localhost/api/node/mo/uni/\
tn-Tenant17/ap-3Tier_AP.json?query-target=children" | jq \
| egrep "{|}|\[|\]|totalCount\":|dn\":|name\":|pcTag\":"
# The egrep portion is not necessary - it is there to make the
# output more succinct and keep it in JSON format.
{
  "totalCount": "3",
  "imdata": [
    {
      "fvAEPg": {
        "attributes": {
          "dn": "uni/tn-Tenant17/ap-3Tier_AP/epg-AppServers_EPG",
          "name": "AppServers_EPG",
          "pcTag": "49154",
        }
      }
    },
    {
      "fvAEPg": {
        "attributes": {
          "dn": "uni/tn-Tenant17/ap-3Tier_AP/epg-WebServers_EPG",
          "name": "WebServers_EPG",
          "pcTag": "49153",
        }
      }
    },
    {
      "fvAEPg": {
        "attributes": {
          "dn": "uni/tn-Tenant17/ap-3Tier_AP/epg-DBServers_EPG",
          "name": "DBServers_EPG",
          "pcTag": "49155",
        }
      }
    }
  ]
}
But the point of this lesson was to learn how the URL was constructed from visore. With that under your belt, it’s time to explore some more options
Lesson #2.3 – The query-target filter
In the previous example, you’ll have noticed that the URL included a qualifier that said query-target=children. There are 3 options for query-target. The other two are self, which really is the same as having no options, and subtree, which displays the target object, all of it’s child objects and their descendant options till the end of each branch in the tree.
I’ll relate that to the following diagram. I’ve reduced it to two EPGs to keep it simple.

This diagram shows an Application Profile with two EPGs, each related to its own Bridge Domain via the objects of class fvRtBd and fvRsBd
| Tip: |
To make the code snippets more cut-and-pasteable in the examples that follow, I’ll use bash variables for the Tenant name and the Application Profile name. So if you want to cut and paste my examples, start each session with these commands, substituting your Tenant and Application Profile names:TMOUT=0 |
If I execute the query using no query-target,
apic1# bash
T17@apic1:~> T=Tenant17 ; A=3Tier_AP
T17@apic1:~> icurl -s "http://localhost/api/node/mo/\
uni/tn-${T}/ap-${A}.json" | jq
Show result
{
  "totalCount": "1",
  "imdata": [
    {
      "fvAp": {
        "attributes": {
          "annotation": "",
          "childAction": "",
          "descr": "",
          "dn": "uni/tn-Tenant17/ap-3Tier_AP",
          "extMngdBy": "",
          "lcOwn": "local",
          "modTs": "2024-04-20T07:45:56.725+10:00",
          "monPolDn": "uni/tn-common/monepg-default",
          "name": "3Tier_AP",
          "nameAlias": "",
          "ownerKey": "",
          "ownerTag": "",
          "prio": "unspecified",
          "status": "",
          "uid": "13040",
          "userdom": ":all:common:T18_SecDom:"
        }
      }
    }
  ]
}
or query-target=self…
T17@apic1:~> T=Tenant17 ; A=3Tier_AP
T17@apic1:~> icurl -s "http://localhost/api/node/mo/\
uni/tn-${T}/ap-${A}.json?query-target=self" | jq
Show result
{
  "totalCount": "1",
  "imdata": [
    {
      "fvAp": {
        "attributes": {
          "annotation": "",
          "childAction": "",
          "descr": "",
          "dn": "uni/tn-Tenant17/ap-3Tier_AP",
          "extMngdBy": "",
          "lcOwn": "local",
          "modTs": "2024-04-20T07:45:56.725+10:00",
          "monPolDn": "uni/tn-common/monepg-default",
          "name": "3Tier_AP",
          "nameAlias": "",
          "ownerKey": "",
          "ownerTag": "",
          "prio": "unspecified",
          "status": "",
          "uid": "13040",
          "userdom": ":all:common:T18_SecDom:"
        }
      }
    }
  ]
}
…then I’ll see just the attributes of the Application Profile. No EPGs and no child objects.
If I execute the query using query-target=children…
T17@apic1:~> T=Tenant17 ; A=3Tier_AP
T17@apic1:~> icurl -s "http://localhost/api/node/mo/\
uni/tn-${T}/ap-${A}.json?query-target=children" | jq
Show (abbreviated) result
#Abbreviated using: egrep "{|}|\[|\]|totalCount\":|dn\":|name\":"
{
  "totalCount": "3",
  "imdata": [
    {
      "fvAEPg": {
        "attributes": {
          "dn": "uni/tn-Tenant17/ap-3Tier_AP/epg-WebServers_EPG",
          "name": "WebServers_EPG",
        }
      }
    },
    {
      "fvAEPg": {
        "attributes": {
          "dn": "uni/tn-Tenant17/ap-3Tier_AP/epg-AppServers_EPG",
          "name": "AppServers_EPG",
        }
      }
    },
    {
      "fvAEPg": {
        "attributes": {
          "dn": "uni/tn-Tenant17/ap-3Tier_AP/epg-DBServers_EPG",
          "name": "DBServers_EPG",
        }
      }
    }
  ]
}
…then I’ll see the attributes of just the EPGs (and ESGs if you have any) – the child objects of the Application Profile. I won’t even see the the attributes of the Application Profile – as seen in the example in Lesson #2.2
But if I execute the query using query-target=subtree…
T17@apic1:~> T=Tenant17 ; A=3Tier_AP
T17@apic1:~> icurl -s "http://localhost/api/node/mo/\
uni/tn-${T}/ap-${A}.json?query-target=subtree" | jq
Show (abbreviated) result
#Abbreviated using: egrep "{|}|: \[|\]$|totalCount\":|dn\":|name\":"
{
  "totalCount": "27",
  "imdata": [
    {
      "fvAp": {
        "attributes": {
          "dn": "uni/tn-Tenant17/ap-3Tier_AP",
          "name": "3Tier_AP",
        }
      }
    },
    {
      "fvAEPg": {
        "attributes": {
          "dn": "uni/tn-Tenant17/ap-3Tier_AP/epg-WebServers_EPG",
          "name": "WebServers_EPG",
        }
      }
    },
    {
      "fvAEPg": {
        "attributes": {
          "dn": "uni/tn-Tenant17/ap-3Tier_AP/epg-AppServers_EPG",
          "name": "AppServers_EPG",
        }
      }
    },
    {
      "fvAEPg": {
        "attributes": {
          "dn": "uni/tn-Tenant17/ap-3Tier_AP/epg-DBServers_EPG",
          "name": "DBServers_EPG",
        }
      }
    },
    {
      "fvRsBd": {
        "attributes": {
          "dn": "uni/tn-Tenant17/ap-3Tier_AP/epg-WebServers_EPG/rsbd",
        }
      }
    },
    {
      "fvRsCons": {
        "attributes": {
          "dn": "uni/tn-Tenant17/ap-3Tier_AP/epg-WebServers_EPG/rscons-AppServices_Ct",
        }
      }
    },
    {
      "fvRsCons": {
        "attributes": {
          "dn": "uni/tn-Tenant17/ap-3Tier_AP/epg-WebServers_EPG/rscons-MgmtServices_Ct",
        }
      }
    },
    {
      "fvRsCustQosPol": {
        "attributes": {
          "dn": "uni/tn-Tenant17/ap-3Tier_AP/epg-WebServers_EPG/rscustQosPol",
        }
      }
    },
    {
      "fvRsDomAtt": {
        "attributes": {
          "dn": "uni/tn-Tenant17/ap-3Tier_AP/epg-WebServers_EPG/rsdomAtt-[uni/phys-T17:MappedVLANs_PhysDom]",
        }
      }
    },
    {
      "fvRsPathAtt": {
        "attributes": {
          "dn": "uni/tn-Tenant17/ap-3Tier_AP/epg-WebServers_EPG/rspathAtt-[topology/pod-1/paths-2201/extpaths-191/pathep-[eth1/27]]",
        }
      }
    },
    {
      "fvRsPathAtt": {
        "attributes": {
          "dn": "uni/tn-Tenant17/ap-3Tier_AP/epg-WebServers_EPG/rspathAtt-[topology/pod-1/paths-2202/pathep-[eth1/27]]",
        }
      }
    },
    {
      "fvRsPathAtt": {
        "attributes": {
          "dn": "uni/tn-Tenant17/ap-3Tier_AP/epg-WebServers_EPG/rspathAtt-[topology/pod-1/paths-2202/extpaths-192/pathep-[eth1/27]]",
        }
      }
    },
    {
      "fvRsPathAtt": {
        "attributes": {
          "dn": "uni/tn-Tenant17/ap-3Tier_AP/epg-WebServers_EPG/rspathAtt-[topology/pod-1/protpaths-2201-2202/pathep-[T17:L2201..2202:1:47_VPCIPG]]",
        }
      }
    },
    {
      "fvRsProv": {
        "attributes": {
          "dn": "uni/tn-Tenant17/ap-3Tier_AP/epg-WebServers_EPG/rsprov-MgmtServices_Ct",
        }
      }
    },
    {
      "fvRsBd": {
        "attributes": {
          "dn": "uni/tn-Tenant17/ap-3Tier_AP/epg-AppServers_EPG/rsbd",
        }
      }
    },
    {
      "fvRsCons": {
        "attributes": {
          "dn": "uni/tn-Tenant17/ap-3Tier_AP/epg-AppServers_EPG/rscons-MgmtServices_Ct",
        }
      }
    },
    {
      "fvRsCons": {
        "attributes": {
          "dn": "uni/tn-Tenant17/ap-3Tier_AP/epg-AppServers_EPG/rscons-DBServices_Ct",
        }
      }
    },
    {
      "fvRsCustQosPol": {
        "attributes": {
          "dn": "uni/tn-Tenant17/ap-3Tier_AP/epg-AppServers_EPG/rscustQosPol",
        }
      }
    },
    {
      "fvRsDomAtt": {
        "attributes": {
          "dn": "uni/tn-Tenant17/ap-3Tier_AP/epg-AppServers_EPG/rsdomAtt-[uni/phys-T17:MappedVLANs_PhysDom]",
        }
      }
    },
    {
      "fvRsPathAtt": {
        "attributes": {
          "dn": "uni/tn-Tenant17/ap-3Tier_AP/epg-AppServers_EPG/rspathAtt-[topology/pod-1/paths-2201/pathep-[eth1/27]]",
        }
      }
    },
    {
      "fvRsProv": {
        "attributes": {
          "dn": "uni/tn-Tenant17/ap-3Tier_AP/epg-AppServers_EPG/rsprov-MgmtServices_Ct",
        }
      }
    },
    {
      "fvRsProv": {
        "attributes": {
          "dn": "uni/tn-Tenant17/ap-3Tier_AP/epg-AppServers_EPG/rsprov-AppServices_Ct",
        }
      }
    },
    {
      "fvRsBd": {
        "attributes": {
          "dn": "uni/tn-Tenant17/ap-3Tier_AP/epg-DBServers_EPG/rsbd",
        }
      }
    },
    {
      "fvRsCustQosPol": {
        "attributes": {
          "dn": "uni/tn-Tenant17/ap-3Tier_AP/epg-DBServers_EPG/rscustQosPol",
        }
      }
    },
    {
      "fvRsPathAtt": {
        "attributes": {
          "dn": "uni/tn-Tenant17/ap-3Tier_AP/epg-DBServers_EPG/rspathAtt-[topology/pod-1/paths-2202/pathep-[eth1/27]]",
        }
      }
    },
    {
      "fvRsPathAtt": {
        "attributes": {
          "dn": "uni/tn-Tenant17/ap-3Tier_AP/epg-DBServers_EPG/rspathAtt-[topology/pod-1/paths-2201/extpaths-191/pathep-[eth1/27]]",
        }
      }
    },
    {
      "fvRsProv": {
        "attributes": {
          "dn": "uni/tn-Tenant17/ap-3Tier_AP/epg-DBServers_EPG/rsprov-DBServices_Ct",
        }
      }
    },
    {
      "fvCollectionCont": {
        "attributes": {
          "dn": "uni/tn-Tenant17/ap-3Tier_AP/epg-AppServers_EPG/rsprov-AppServices_Ct/collectionDn-[uni/tn-Tenant17/brc-AppServices_Ct]",
          "name": "",
        }
      }
    },
    {
      "fvCollectionCont": {
        "attributes": {
          "dn": "uni/tn-Tenant17/ap-3Tier_AP/epg-AppServers_EPG/rsprov-MgmtServices_Ct/collectionDn-[uni/tn-Tenant17/brc-MgmtServices_Ct]",
          "name": "",
        }
      }
    },
    {
      "fvCollectionCont": {
        "attributes": {
          "dn": "uni/tn-Tenant17/ap-3Tier_AP/epg-AppServers_EPG/rscons-DBServices_Ct/collectionDn-[uni/tn-common/brc-DBServices_Ct]",
          "name": "",
        }
      }
    },
    {
      "fvCollectionCont": {
        "attributes": {
          "dn": "uni/tn-Tenant17/ap-3Tier_AP/epg-WebServers_EPG/rscons-MgmtServices_Ct/collectionDn-[uni/tn-Tenant17/brc-MgmtServices_Ct]",
          "name": "",
        }
      }
    },
    {
      "fvSubnetBDDefCont": {
        "attributes": {
          "dn": "uni/tn-Tenant17/ap-3Tier_AP/epg-WebServers_EPG/rsbd/subnetBddefDn-[uni/bd-[uni/tn-Tenant17/BD-Web_BD]-isSvc-no]",
          "name": "",
        }
      }
    },
    {
      "fvRsGraphDef": {
        "attributes": {
          "dn": "uni/tn-Tenant17/ap-3Tier_AP/epg-DBServers_EPG/rsgraphDef-[uni/tn-common/brc-DBServices_Ct/graphcont]",
        }
      }
    },
    {
      "fvCollectionCont": {
        "attributes": {
          "dn": "uni/tn-Tenant17/ap-3Tier_AP/epg-AppServers_EPG/rscons-MgmtServices_Ct/collectionDn-[uni/tn-Tenant17/brc-MgmtServices_Ct]",
          "name": "",
        }
      }
    },
    {
      "fvCollectionCont": {
        "attributes": {
          "dn": "uni/tn-Tenant17/ap-3Tier_AP/epg-DBServers_EPG/rsprov-DBServices_Ct/collectionDn-[uni/tn-common/brc-DBServices_Ct]",
          "name": "",
        }
      }
    },
    {
      "fvCollectionCont": {
        "attributes": {
          "dn": "uni/tn-Tenant17/ap-3Tier_AP/epg-WebServers_EPG/rsprov-MgmtServices_Ct/collectionDn-[uni/tn-Tenant17/brc-MgmtServices_Ct]",
          "name": "",
        }
      }
    },
    {
      "fvSubnetBDDefCont": {
        "attributes": {
          "dn": "uni/tn-Tenant17/ap-3Tier_AP/epg-AppServers_EPG/rsbd/subnetBddefDn-[uni/bd-[uni/tn-Tenant17/BD-App_BD]-isSvc-no]",
          "name": "",
        }
      }
    },
    {
      "fvSubnetBDDefCont": {
        "attributes": {
          "dn": "uni/tn-Tenant17/ap-3Tier_AP/epg-DBServers_EPG/rsbd/subnetBddefDn-[uni/bd-[uni/tn-Tenant17/BD-App_BD]-isSvc-no]",
          "name": "",
        }
      }
    },
    {
      "fvCollectionCont": {
        "attributes": {
          "dn": "uni/tn-Tenant17/ap-3Tier_AP/epg-WebServers_EPG/rscons-AppServices_Ct/collectionDn-[uni/tn-Tenant17/brc-AppServices_Ct]",
          "name": "",
        }
      }
    }
  ]
}
…then I’ll see the attributes for:
- the Application Profile
- both EPGs
- and the objects of class fvRsBd
- plus a lot of other related objects not shown in the diagram, including
- objects of class fvDomAtt (link to the Physical Domain)
- objects of class fvRsCons (consumed contracts)
- objects of class fvRsProv (Provided contracts)
- objects of class fvRsPattAtt (Static Paths)
- and more
BUT I will not see
- the Bridge Domains, or
- the objects of class fvRtBd
If I wanted to see the fvRtBd objects, I’d need to query the Bridge Domain – e.g.
T17@apic1:~> T=Tenant17 ;  B=App_BD
T17@apic1:~> icurl -s "http://localhost/api/node/mo/\
uni/tn-${T}/BD-${B}.json?query-target=children" | jq
Show (abbreviated) result
#Abbreviated using:  egrep "{|}|: \[|\]$|totalCount\":|dn\":|ip\":"
{
  "totalCount": "9",
  "imdata": [
    {
      "fvRsBDToNdP": {
        "attributes": {
          "dn": "uni/tn-Tenant17/BD-App_BD/rsBDToNdP",
        }
      }
    },
    {
      "fvRsBdToEpRet": {
        "attributes": {
          "dn": "uni/tn-Tenant17/BD-App_BD/rsbdToEpRet",
        }
      }
    },
    {
      "fvRsCtx": {
        "attributes": {
          "dn": "uni/tn-Tenant17/BD-App_BD/rsctx",
        }
      }
    },
    {
      "fvRsIgmpsn": {
        "attributes": {
          "dn": "uni/tn-Tenant17/BD-App_BD/rsigmpsn",
        }
      }
    },
    {
      "fvRsMldsn": {
        "attributes": {
          "dn": "uni/tn-Tenant17/BD-App_BD/rsmldsn",
        }
      }
    },
    {
      "fvRtBd": {
        "attributes": {
          "dn": "uni/tn-Tenant17/BD-App_BD/rtbd-[uni/tn-Tenant17/ap-3Tier_AP/epg-AppServers_EPG]",
        }
      }
    },
    {
      "fvRtBd": {
        "attributes": {
          "dn": "uni/tn-Tenant17/BD-App_BD/rtbd-[uni/tn-Tenant17/ap-3Tier_AP/epg-DBServers_EPG]",
        }
      }
    },
    {
      "fvRtBd": {
        "attributes": {
          "dn": "uni/tn-Tenant17/BD-App_BD/rtbd-[uni/tn-Tenant17/ap-2Tier_AP/epg-AppServers_EPG]",
        }
      }
    },
    {
      "fvSubnet": {
        "attributes": {
          "dn": "uni/tn-Tenant17/BD-App_BD/subnet-[10.217.11.1/24]",
          "ip": "10.217.11.1/24",
        }
      }
    }
  ]
}
Recap:
Querying a dn with
query-target=selfor no query-target gives just the objectquery-target=childrengives just the child objects, including the relationship objectsquery-target=subtreegive the target object, plus it’s children, and it’s children’s children and so on – but with all hierarchy of objects removed – child objects are NOT nested inside their parent
So to see ALL the mos for Tenant17, you could use
T17@apic1:~> T=Tenant17 ; A=3Tier_AP
T17@apic1:~> icurl -s "http://localhost/api/node/mo/uni/\
tn-${T}.json?query-target=subtree" | jq
Show (HEAVILY abbreviated) result
#Abbreviated using: egrep "totalCount\":|\"dn\":"
  "totalCount": "116",
          "dn": "uni/tn-Tenant17",
          "dn": "uni/tn-Tenant17/domain-T17_SecDom",
          "dn": "uni/tn-Tenant17/ap-3Tier_AP",
          "dn": "uni/tn-Tenant17/ap-2Tier_AP",
          "dn": "uni/tn-Tenant17/BD-Web_BD",
          "dn": "uni/tn-Tenant17/BD-App_BD",
          "dn": "uni/tn-Tenant17/ctx-Production_VRF",
          "dn": "uni/tn-Tenant17/eptags",
          "dn": "uni/tn-Tenant17/rsTenantMonPol",
          "dn": "uni/tn-Tenant17/out-ProductionVRF_OSPF.L3Out",
          "dn": "uni/tn-Tenant17/svcCont",
          "dn": "uni/tn-Tenant17/brc-MgmtServices_Ct",
          "dn": "uni/tn-Tenant17/brc-AppServices_Ct",
          "dn": "uni/tn-Tenant17/flt-MgmtServices_Fltr",
          "dn": "uni/tn-Tenant17/flt-AppServices_Fltr",
          "dn": "uni/tn-Tenant17/ap-3Tier_AP/epg-WebServers_EPG",
          "dn": "uni/tn-Tenant17/ap-3Tier_AP/epg-AppServers_EPG",
          "dn": "uni/tn-Tenant17/ap-3Tier_AP/epg-DBServers_EPG",
          "dn": "uni/tn-Tenant17/ap-2Tier_AP/epg-WebServers_EPG",
          "dn": "uni/tn-Tenant17/ap-2Tier_AP/epg-AppServers_EPG",
          "dn": "uni/tn-Tenant17/BD-Web_BD/rsBDToNdP",
          "dn": "uni/tn-Tenant17/BD-Web_BD/rsBDToOut-ProductionVRF_OSPF.L3Out",
          "dn": "uni/tn-Tenant17/BD-Web_BD/rsbdToEpRet",
          "dn": "uni/tn-Tenant17/BD-Web_BD/rsctx",
          "dn": "uni/tn-Tenant17/BD-Web_BD/rsigmpsn",
          "dn": "uni/tn-Tenant17/BD-Web_BD/rsmldsn",
          "dn": "uni/tn-Tenant17/BD-Web_BD/rtbd-[uni/tn-Tenant17/ap-3Tier_AP/epg-WebServers_EPG]",
          "dn": "uni/tn-Tenant17/BD-Web_BD/rtbd-[uni/tn-Tenant17/ap-2Tier_AP/epg-WebServers_EPG]",
          "dn": "uni/tn-Tenant17/BD-Web_BD/subnet-[10.217.12.1/24]",
          "dn": "uni/tn-Tenant17/BD-App_BD/rsBDToNdP",
          "dn": "uni/tn-Tenant17/BD-App_BD/rsbdToEpRet",
          "dn": "uni/tn-Tenant17/BD-App_BD/rsctx",
          "dn": "uni/tn-Tenant17/BD-App_BD/rsigmpsn",
          "dn": "uni/tn-Tenant17/BD-App_BD/rsmldsn",
          "dn": "uni/tn-Tenant17/BD-App_BD/rtbd-[uni/tn-Tenant17/ap-3Tier_AP/epg-AppServers_EPG]",
          "dn": "uni/tn-Tenant17/BD-App_BD/rtbd-[uni/tn-Tenant17/ap-3Tier_AP/epg-DBServers_EPG]",
          "dn": "uni/tn-Tenant17/BD-App_BD/rtbd-[uni/tn-Tenant17/ap-2Tier_AP/epg-AppServers_EPG]",
          "dn": "uni/tn-Tenant17/BD-App_BD/subnet-[10.217.11.1/24]",
          "dn": "uni/tn-Tenant17/ctx-Production_VRF/rsbgpCtxPol",
          "dn": "uni/tn-Tenant17/ctx-Production_VRF/rsctxToEpRet",
          "dn": "uni/tn-Tenant17/ctx-Production_VRF/rsctxToExtRouteTagPol",
          "dn": "uni/tn-Tenant17/ctx-Production_VRF/rsospfCtxPol",
          "dn": "uni/tn-Tenant17/ctx-Production_VRF/rsvrfValidationPol",
          "dn": "uni/tn-Tenant17/ctx-Production_VRF/rtctx-[uni/tn-Tenant17/BD-App_BD]",
          "dn": "uni/tn-Tenant17/ctx-Production_VRF/rtctx-[uni/tn-Tenant17/BD-Web_BD]",
          "dn": "uni/tn-Tenant17/ctx-Production_VRF/rtl3extEctx-[uni/tn-Tenant17/out-ProductionVRF_OSPF.L3Out]",
          "dn": "uni/tn-Tenant17/ctx-Production_VRF/any",
          "dn": "uni/tn-Tenant17/out-ProductionVRF_OSPF.L3Out/instP-10.217.10.0:24_L3EPG",
          "dn": "uni/tn-Tenant17/out-ProductionVRF_OSPF.L3Out/lnodep-ProductionVRF_OSPF.L3Out_nodeProfile",
          "dn": "uni/tn-Tenant17/out-ProductionVRF_OSPF.L3Out/rsectx",
          "dn": "uni/tn-Tenant17/out-ProductionVRF_OSPF.L3Out/rsl3DomAtt",
          "dn": "uni/tn-Tenant17/out-ProductionVRF_OSPF.L3Out/rtfvBDToOut-[uni/tn-Tenant17/BD-Web_BD]",
          "dn": "uni/tn-Tenant17/out-ProductionVRF_OSPF.L3Out/ospfExtP",
          "dn": "uni/tn-Tenant17/brc-MgmtServices_Ct/rtfvCons-[uni/tn-Tenant17/ap-3Tier_AP/epg-WebServers_EPG]",
          "dn": "uni/tn-Tenant17/brc-MgmtServices_Ct/rtfvCons-[uni/tn-Tenant17/ap-3Tier_AP/epg-AppServers_EPG]",
          "dn": "uni/tn-Tenant17/brc-MgmtServices_Ct/rtfvProv-[uni/tn-Tenant17/ap-3Tier_AP/epg-WebServers_EPG]",
          "dn": "uni/tn-Tenant17/brc-MgmtServices_Ct/rtfvProv-[uni/tn-Tenant17/ap-3Tier_AP/epg-AppServers_EPG]",
          "dn": "uni/tn-Tenant17/brc-MgmtServices_Ct/subj-MgmtServices_Subj",
          "dn": "uni/tn-Tenant17/brc-AppServices_Ct/rtfvCons-[uni/tn-Tenant17/ap-3Tier_AP/epg-WebServers_EPG]",
          "dn": "uni/tn-Tenant17/brc-AppServices_Ct/rtfvProv-[uni/tn-Tenant17/ap-3Tier_AP/epg-AppServers_EPG]",
          "dn": "uni/tn-Tenant17/brc-AppServices_Ct/subj-AppServices_Subj",
          "dn": "uni/tn-Tenant17/flt-MgmtServices_Fltr/e-TCP22..23",
          "dn": "uni/tn-Tenant17/flt-MgmtServices_Fltr/rtsubjFiltAtt-[uni/tn-Tenant17/brc-MgmtServices_Ct/subj-MgmtServices_Subj]",
          "dn": "uni/tn-Tenant17/flt-AppServices_Fltr/e-TCP5000",
          "dn": "uni/tn-Tenant17/flt-AppServices_Fltr/rtsubjFiltAtt-[uni/tn-Tenant17/brc-AppServices_Ct/subj-AppServices_Subj]",
          "dn": "uni/tn-Tenant17/ap-3Tier_AP/epg-WebServers_EPG/rsbd",
          "dn": "uni/tn-Tenant17/ap-3Tier_AP/epg-WebServers_EPG/rscons-AppServices_Ct",
          "dn": "uni/tn-Tenant17/ap-3Tier_AP/epg-WebServers_EPG/rscons-MgmtServices_Ct",
          "dn": "uni/tn-Tenant17/ap-3Tier_AP/epg-WebServers_EPG/rscustQosPol",
          "dn": "uni/tn-Tenant17/ap-3Tier_AP/epg-WebServers_EPG/rsdomAtt-[uni/phys-T17:MappedVLANs_PhysDom]",
          "dn": "uni/tn-Tenant17/ap-3Tier_AP/epg-WebServers_EPG/rspathAtt-[topology/pod-1/paths-2201/extpaths-191/pathep-[eth1/27]]",
          "dn": "uni/tn-Tenant17/ap-3Tier_AP/epg-WebServers_EPG/rspathAtt-[topology/pod-1/paths-2202/pathep-[eth1/27]]",
          "dn": "uni/tn-Tenant17/ap-3Tier_AP/epg-WebServers_EPG/rspathAtt-[topology/pod-1/paths-2202/extpaths-192/pathep-[eth1/27]]",
          "dn": "uni/tn-Tenant17/ap-3Tier_AP/epg-WebServers_EPG/rspathAtt-[topology/pod-1/protpaths-2201-2202/pathep-[T17:L2201..2202:1:47_VPCIPG]]",
          "dn": "uni/tn-Tenant17/ap-3Tier_AP/epg-WebServers_EPG/rsprov-MgmtServices_Ct",
          "dn": "uni/tn-Tenant17/ap-3Tier_AP/epg-AppServers_EPG/rsbd",
          "dn": "uni/tn-Tenant17/ap-3Tier_AP/epg-AppServers_EPG/rscons-MgmtServices_Ct",
          "dn": "uni/tn-Tenant17/ap-3Tier_AP/epg-AppServers_EPG/rscons-DBServices_Ct",
          "dn": "uni/tn-Tenant17/ap-3Tier_AP/epg-AppServers_EPG/rscustQosPol",
          "dn": "uni/tn-Tenant17/ap-3Tier_AP/epg-AppServers_EPG/rsdomAtt-[uni/phys-T17:MappedVLANs_PhysDom]",
          "dn": "uni/tn-Tenant17/ap-3Tier_AP/epg-AppServers_EPG/rspathAtt-[topology/pod-1/paths-2201/pathep-[eth1/27]]",
          "dn": "uni/tn-Tenant17/ap-3Tier_AP/epg-AppServers_EPG/rsprov-MgmtServices_Ct",
          "dn": "uni/tn-Tenant17/ap-3Tier_AP/epg-AppServers_EPG/rsprov-AppServices_Ct",
          "dn": "uni/tn-Tenant17/ap-3Tier_AP/epg-DBServers_EPG/rsbd",
          "dn": "uni/tn-Tenant17/ap-3Tier_AP/epg-DBServers_EPG/rscustQosPol",
          "dn": "uni/tn-Tenant17/ap-3Tier_AP/epg-DBServers_EPG/rspathAtt-[topology/pod-1/paths-2202/pathep-[eth1/27]]",
          "dn": "uni/tn-Tenant17/ap-3Tier_AP/epg-DBServers_EPG/rspathAtt-[topology/pod-1/paths-2201/extpaths-191/pathep-[eth1/27]]",
          "dn": "uni/tn-Tenant17/ap-3Tier_AP/epg-DBServers_EPG/rsprov-DBServices_Ct",
          "dn": "uni/tn-Tenant17/ap-2Tier_AP/epg-WebServers_EPG/rsbd",
          "dn": "uni/tn-Tenant17/ap-2Tier_AP/epg-WebServers_EPG/rscustQosPol",
          "dn": "uni/tn-Tenant17/ap-2Tier_AP/epg-WebServers_EPG/rsdomAtt-[uni/phys-T17:MappedVLANs_PhysDom]",
          "dn": "uni/tn-Tenant17/ap-2Tier_AP/epg-WebServers_EPG/rsdomAtt-[uni/vmmp-VMware/dom-T17:vC_VMM.Dom]",
          "dn": "uni/tn-Tenant17/ap-2Tier_AP/epg-AppServers_EPG/rsbd",
          "dn": "uni/tn-Tenant17/ap-2Tier_AP/epg-AppServers_EPG/rscons-Any.IP_Ct",
          "dn": "uni/tn-Tenant17/ap-2Tier_AP/epg-AppServers_EPG/rscustQosPol",
          "dn": "uni/tn-Tenant17/ap-2Tier_AP/epg-AppServers_EPG/rsdomAtt-[uni/phys-T17:MappedVLANs_PhysDom]",
          "dn": "uni/tn-Tenant17/ap-2Tier_AP/epg-AppServers_EPG/rsdomAtt-[uni/vmmp-VMware/dom-T17:vC_VMM.Dom]",
          "dn": "uni/tn-Tenant17/ap-2Tier_AP/epg-AppServers_EPG/rtinfraFuncToEpg-[uni/infra/attentp-T17:HostLinks_AAEP/gen-default]",
          "dn": "uni/tn-Tenant17/ctx-Production_VRF/any/rsanyToCons-DNS_Ct",
          "dn": "uni/tn-Tenant17/out-ProductionVRF_OSPF.L3Out/instP-10.217.10.0:24_L3EPG/rscustQosPol",
          "dn": "uni/tn-Tenant17/out-ProductionVRF_OSPF.L3Out/instP-10.217.10.0:24_L3EPG/extsubnet-[10.217.10.0/24]",
          "dn": "uni/tn-Tenant17/out-ProductionVRF_OSPF.L3Out/lnodep-ProductionVRF_OSPF.L3Out_nodeProfile/lifp-ProductionVRF_OSPF.L3Out_interfaceProfile",
          "dn": "uni/tn-Tenant17/out-ProductionVRF_OSPF.L3Out/lnodep-ProductionVRF_OSPF.L3Out_nodeProfile/rsnodeL3OutAtt-[topology/pod-1/node-2201]",
          "dn": "uni/tn-Tenant17/brc-MgmtServices_Ct/subj-MgmtServices_Subj/rssubjFiltAtt-icmp",
          "dn": "uni/tn-Tenant17/brc-MgmtServices_Ct/subj-MgmtServices_Subj/rssubjFiltAtt-MgmtServices_Fltr",
          "dn": "uni/tn-Tenant17/brc-AppServices_Ct/subj-AppServices_Subj/rssubjFiltAtt-AppServices_Fltr",
          "dn": "uni/tn-Tenant17/ap-2Tier_AP/epg-WebServers_EPG/rsdomAtt-[uni/vmmp-VMware/dom-T17:vC_VMM.Dom]/sec",
          "dn": "uni/tn-Tenant17/ap-2Tier_AP/epg-AppServers_EPG/rsdomAtt-[uni/vmmp-VMware/dom-T17:vC_VMM.Dom]/sec",
          "dn": "uni/tn-Tenant17/out-ProductionVRF_OSPF.L3Out/lnodep-ProductionVRF_OSPF.L3Out_nodeProfile/lifp-ProductionVRF_OSPF.L3Out_interfaceProfile/rsArpIfPol",
          "dn": "uni/tn-Tenant17/out-ProductionVRF_OSPF.L3Out/lnodep-ProductionVRF_OSPF.L3Out_nodeProfile/lifp-ProductionVRF_OSPF.L3Out_interfaceProfile/rsegressQosDppPol",
          "dn": "uni/tn-Tenant17/out-ProductionVRF_OSPF.L3Out/lnodep-ProductionVRF_OSPF.L3Out_nodeProfile/lifp-ProductionVRF_OSPF.L3Out_interfaceProfile/rsingressQosDppPol",
          "dn": "uni/tn-Tenant17/out-ProductionVRF_OSPF.L3Out/lnodep-ProductionVRF_OSPF.L3Out_nodeProfile/lifp-ProductionVRF_OSPF.L3Out_interfaceProfile/rslIfPCustQosPol",
          "dn": "uni/tn-Tenant17/out-ProductionVRF_OSPF.L3Out/lnodep-ProductionVRF_OSPF.L3Out_nodeProfile/lifp-ProductionVRF_OSPF.L3Out_interfaceProfile/rsNdIfPol",
          "dn": "uni/tn-Tenant17/out-ProductionVRF_OSPF.L3Out/lnodep-ProductionVRF_OSPF.L3Out_nodeProfile/lifp-ProductionVRF_OSPF.L3Out_interfaceProfile/rspathL3OutAtt-[topology/pod-1/paths-2201/pathep-[eth1/10]]",
          "dn": "uni/tn-Tenant17/out-ProductionVRF_OSPF.L3Out/lnodep-ProductionVRF_OSPF.L3Out_nodeProfile/lifp-ProductionVRF_OSPF.L3Out_interfaceProfile/ospfIfP",
          "dn": "uni/tn-Tenant17/out-ProductionVRF_OSPF.L3Out/lnodep-ProductionVRF_OSPF.L3Out_nodeProfile/lifp-ProductionVRF_OSPF.L3Out_interfaceProfile/ospfIfP/rsIfPol",
          "dn": "uni/tn-Tenant17/ctx-Production_VRF/cep-38:0E:4D:48:8D:F5/ip-[10.217.1.1]/node-2201",
          "dn": "uni/tn-Tenant17/ap-3Tier_AP/epg-AppServers_EPG/rsprov-AppServices_Ct/collectionDn-[uni/tn-Tenant17/brc-AppServices_Ct]",
          "dn": "uni/tn-Tenant17/ap-3Tier_AP/epg-AppServers_EPG/rsprov-MgmtServices_Ct/collectionDn-[uni/tn-Tenant17/brc-MgmtServices_Ct]",
          "dn": "uni/tn-Tenant17/ap-3Tier_AP/epg-AppServers_EPG/rscons-DBServices_Ct/collectionDn-[uni/tn-common/brc-DBServices_Ct]",
          "dn": "uni/tn-Tenant17/ap-3Tier_AP/epg-DBServers_EPG/rsbd/subnetBddefDn-[uni/bd-[uni/tn-Tenant17/BD-App_BD]-isSvc-no]",
          "dn": "uni/tn-Tenant17/brc-AppServices_Ct/dirass/prov-[uni/tn-Tenant17/ap-3Tier_AP/epg-AppServers_EPG]-any-no",
          "dn": "uni/tn-Tenant17/brc-AppServices_Ct/dirass/cons-[uni/tn-Tenant17/ap-3Tier_AP/epg-WebServers_EPG]-any-no",
          "dn": "uni/tn-Tenant17/ctx-Production_VRF/any/rsanyToCons-DNS_Ct/collectionDn-[uni/tn-common/brc-DNS_Ct]",
          "dn": "uni/tn-Tenant17/brc-MgmtServices_Ct/dirass/cons-[uni/tn-Tenant17/ap-3Tier_AP/epg-AppServers_EPG]-any-no",
          "dn": "uni/tn-Tenant17/brc-MgmtServices_Ct/dirass/cons-[uni/tn-Tenant17/ap-3Tier_AP/epg-WebServers_EPG]-any-no",
          "dn": "uni/tn-Tenant17/out-ProductionVRF_OSPF.L3Out/instP-10.217.10.0:24_L3EPG/configOutDef",
          "dn": "uni/tn-Tenant17/out-ProductionVRF_OSPF.L3Out/instP-10.217.10.0:24_L3EPG/sharedServiceAlloc",
          "dn": "uni/tn-Tenant17/ap-2Tier_AP/epg-AppServers_EPG/rtinfraFuncToEpg-[uni/infra/attentp-T17:HostLinks_AAEP/preprov-T17:vC_VMM.Dom]",
          "dn": "uni/tn-Tenant17/out-ProductionVRF_OSPF.L3Out/instP-10.217.10.0:24_L3EPG/sharedServiceAlloc/by-[topology/pod-1/node-2201]",
          "dn": "uni/tn-Tenant17/ap-2Tier_AP/epg-WebServers_EPG/rtinfraFuncToEpg-[uni/infra/attentp-T17:HostLinks_AAEP/preprov-T17:vC_VMM.Dom]",
          "dn": "uni/tn-Tenant17/ap-2Tier_AP/epg-AppServers_EPG/rsbd/subnetBddefDn-[uni/bd-[uni/tn-Tenant17/BD-App_BD]-isSvc-no]",
          "dn": "uni/tn-Tenant17/ap-2Tier_AP/epg-AppServers_EPG/rscons-Any.IP_Ct/collectionDn-[uni/tn-common/brc-Any.IP_Ct]",
          "dn": "uni/tn-Tenant17/brc-MgmtServices_Ct/dirass/prov-[uni/tn-Tenant17/ap-3Tier_AP/epg-WebServers_EPG]-any-no",
          "dn": "uni/tn-Tenant17/ap-3Tier_AP/epg-WebServers_EPG/rsprov-MgmtServices_Ct/collectionDn-[uni/tn-Tenant17/brc-MgmtServices_Ct]",
          "dn": "uni/tn-Tenant17/ap-3Tier_AP/epg-AppServers_EPG/rscons-MgmtServices_Ct/collectionDn-[uni/tn-Tenant17/brc-MgmtServices_Ct]",
          "dn": "uni/tn-Tenant17/ctx-Production_VRF/bgpdomainid/cons-[uni/tn-Tenant17/ctx-Production_VRF]",
          "dn": "uni/tn-Tenant17/ap-3Tier_AP/epg-WebServers_EPG/rsbd/subnetBddefDn-[uni/bd-[uni/tn-Tenant17/BD-Web_BD]-isSvc-no]",
          "dn": "uni/tn-Tenant17/ctx-Production_VRF/bgpdomainid",
          "dn": "uni/tn-Tenant17/ap-2Tier_AP/epg-WebServers_EPG/rsbd/subnetBddefDn-[uni/bd-[uni/tn-Tenant17/BD-Web_BD]-isSvc-no]",
          "dn": "uni/tn-Tenant17/ap-3Tier_AP/epg-DBServers_EPG/rsprov-DBServices_Ct/collectionDn-[uni/tn-common/brc-DBServices_Ct]",
          "dn": "uni/tn-Tenant17/ctx-Production_VRF/cep-38:0E:4D:48:8D:F5/rscEpToPathEp-[topology/pod-1/paths-2201/pathep-[eth1/10]]",
          "dn": "uni/tn-Tenant17/ctx-Production_VRF/cep-38:0E:4D:48:8D:F5/ip-[10.217.1.1]",
          "dn": "uni/tn-Tenant17/brc-MgmtServices_Ct/dirass/prov-[uni/tn-Tenant17/ap-3Tier_AP/epg-AppServers_EPG]-any-no",
          "dn": "uni/tn-Tenant17/ap-3Tier_AP/epg-AppServers_EPG/rsbd/subnetBddefDn-[uni/bd-[uni/tn-Tenant17/BD-App_BD]-isSvc-no]",
          "dn": "uni/tn-Tenant17/flt-MgmtServices_Fltr/rsRevRFltPAtt",
          "dn": "uni/tn-Tenant17/ap-3Tier_AP/epg-DBServers_EPG/rsgraphDef-[uni/tn-common/brc-DBServices_Ct/graphcont]",
          "dn": "uni/tn-Tenant17/ap-3Tier_AP/epg-WebServers_EPG/rscons-AppServices_Ct/collectionDn-[uni/tn-Tenant17/brc-AppServices_Ct]",
          "dn": "uni/tn-Tenant17/brc-AppServices_Ct/dirass",
          "dn": "uni/tn-Tenant17/out-ProductionVRF_OSPF.L3Out/encap-[vlan-2571]",
          "dn": "uni/tn-Tenant17/ap-3Tier_AP/epg-WebServers_EPG/rscons-MgmtServices_Ct/collectionDn-[uni/tn-Tenant17/brc-MgmtServices_Ct]",
          "dn": "uni/tn-Tenant17/out-ProductionVRF_OSPF.L3Out/rsoutToBDPublicSubnetHolder-[bdps-[uni/tn-Tenant17/BD-Web_BD]-isSvc-no]",
          "dn": "uni/tn-Tenant17/brc-MgmtServices_Ct/dirass",
          "dn": "uni/tn-Tenant17/flt-AppServices_Fltr/rsFwdRFltPAtt",
          "dn": "uni/tn-Tenant17/ctx-Production_VRF/cep-38:0E:4D:48:8D:F5",
          "dn": "uni/tn-Tenant17/flt-AppServices_Fltr/rsRevRFltPAtt",
          "dn": "uni/tn-Tenant17/flt-MgmtServices_Fltr/rsFwdRFltPAtt",
Time for another example.
We now have the knowledge to produce a query that lists the EPGs for a particular Application Profile. But suppose we wanted to know which Bridge Domains were linked to each EPG within that Application Profile?
The object that holds that information is fvRsBd. You could figure this out by:
- looking at the diagrams above, or
- using the Object Store Browser (visore) to examine the child objects of an EPG
- using icurl to examine the child objects of an EPG like below
T17@apic1:~> E=AppServers_EPG ; #edit for your own EPG name
T17@apic1:~> T=Tenant17 ; A=3Tier_AP
T17@apic1:~> icurl -s "http://localhost/api/node/mo/\
uni/tn-${T}/ap-${A}/epg-${E}.json?\
query-target=children" | jq '.imdata[].fvRsBd.attributes | values'

# To see all the child objects, remove the
# '.imdata[].fvRsBd.attributes | values' filter after jq

}
    "annotation": "",
    "childAction": "",
    "dn": "uni/tn-Tenant17/ap-3Tier_AP/epg-AppServers_EPG/rsbd",
    "extMngdBy": "",
    "forceResolve": "yes",
    "lcOwn": "local",
    "modTs": "2024-04-20T07:45:56.725+10:00",
    "monPolDn": "uni/tn-common/monepg-default",
    "rType": "mo",
    "state": "formed",
    "stateQual": "none",
    "status": "",
    "tCl": "fvBD",
    "tContextDn": "",
    "tDn": "uni/tn-Tenant17/BD-App_BD",
    "tRn": "BD-App_BD",
    "tType": "name",
    "tnFvBDName": "App_BD",
    "uid": "0",
    "userdom": "all"
  }
Here you’ll find three attributes containing values that show the related Bridge Domain. The most convenient is tnFvBDName
Recall that we are trying to find which Bridge Domains are linked to each EPG within an Application Profile.
If I use the query-target=children option, then I’ll have to query each EPG in turn – for three EPGs, that will be three queries. And I could get fancy and put that in a bashfor loop, but why not just query the Application Profile with the query-target=subtree option which will show the fvRsBd object for each EPG in the Application Profile?
Like this:
T17@apic1:~> T=Tenant17 ; A=3Tier_AP
T17@apic1:~> icurl -s "http://localhost/api/node/mo/\
uni/tn-${T}/ap-${A}.json?query-target=subtree" | jq

# and buried in the potentially hundreds of lines of output,
# you'll find something like (with the irrelevant attributes removed)
# You could try adding an egrep filter like
# egrep "{|}|\[|\]|totalCount\":|dn\":|tnFvBDName\":"
# but it won't help much because you'll have many many dn": hits
{
  "totalCount": "27",
  "imdata": [
...<huge snip>...
    {
      "fvRsBd": {
        "attributes": {
          "dn": "uni/tn-Tenant17/ap-3Tier_AP/epg-WebServers_EPG/rsbd",
          "tnFvBDName": "Web_BD",
        }
      }
    },
...<huge snip>...
    {
      "fvRsBd": {
        "attributes": {
          "dn": "uni/tn-Tenant17/ap-3Tier_AP/epg-AppServers_EPG/rsbd",
          "tnFvBDName": "App_BD",
        }
      }
    },
...<huge snip>...
    {
      "fvRsBd": {
        "attributes": {
          "dn": "uni/tn-Tenant17/ap-3Tier_AP/epg-DBServers_EPG/rsbd",
          "tnFvBDName": "App_BD",
        }
      }
     ,
...<huge snip>...
  ]
}
Of course, using jq you could filter the output to just what you want (icurl -s "http://localhost/api/node/mo/uni/tn-${T}/ap-${A}.json?query-target=subtree" | jq '.imdata[].fvRsBd.attributes | .dn, .tnFvBDName | values' would do the job), but the point of this post is to get the most out of icurl and the API, and indeed we can isolate just those objects of class fvRsBd using another filter – target-subtree-class. Which means it time to …
Lesson #2.4 – Meet the target-subtree-class filter
We will need to combine two modifiers, and this requires the use of the & character to join the two – like query-target=subtree&target-subtree-class=fvRsBd. And now you have a & character in the query, you’ll have to be careful to enclose the URL in double quotes so bash doesn’t see it as a directive to run a process in the background.
T17@apic1:~> T=Tenant17 ; A=3Tier_AP
T17@apic1:~> icurl -s "http://localhost/api/node/mo/\
uni/tn-${T}/ap-${A}.json?\
query-target=subtree\
&target-subtree-class=fvRsBd" | jq \
| egrep "{|}|\[|\]|totalCount\":|dn\":|tnFvBDName\":"

# No huge snips, just the irrelevant attributes removed
# using the optional egrep filter
{
  "totalCount": "3",
  "imdata": [
    {
      "fvRsBd": {
        "attributes": {
          "dn": "uni/tn-Tenant17/ap-3Tier_AP/epg-WebServers_EPG/rsbd",
          "tnFvBDName": "Web_BD",
        }
      },
    {
      "fvRsBd": {
        "attributes": {
          "dn": "uni/tn-Tenant17/ap-3Tier_AP/epg-AppServers_EPG/rsbd",
          "tnFvBDName": "App_BD",
        }
      },
    {
      "fvRsBd": {
        "attributes": {
          "dn": "uni/tn-Tenant17/ap-3Tier_AP/epg-DBServers_EPG/rsbd",
          "tnFvBDName": "App_BD",
        }
      },
  ]
}
There – much more succinct. And if you were using the API in say a python program, you’d be easily able to display those relevant attributes in a table.
However, I’m not 100% happy with the fact that the EPG name is part of the dn attribute of each fvRsBd object. Now I know that the fvAEPg object has a name attribute that would give me the actual name of the EPG.
So let’s see what happens when you want to have multiple classes in the target-subtree-class qualifier.
Lesson #2.5 – Using target-subtree-class for multiple classes
The syntax is not that intuitive – because what we want is target-subtree-class=fvAEPg OR target-subtree-class=fvRsBd. However, the syntax to achieve this is
target-subtree-class=fvAEPg&target-subtree-class=fvRsBd – which can be simplified to
target-subtree-class=fvAEPg,fvRsBd
This will give me the names the three EPGs, and the names of the Bridge Domains, as shown here:
T17@apic1:~> T=Tenant17 ; A=3Tier_AP
T17@apic1:-> icurl -s "http://localhost/api/node/mo/\
uni/tn-${T}/ap-${A}.json?\
query-target=subtree\
&target-subtree-class=fvAEPg,fvRsBd" | jq \
| egrep "{|}|\[|\]|totalCount\":|name\":|tnFvBDName\":"
# No huge snips, but LOTS of irrelevant attributes removed
# using the optional egrep filter
{
  "totalCount": "6",
  "imdata": [
    {
      "fvAEPg": {
        "attributes": {
          "name": "WebServers_EPG",
        }
      }
    },
    {
      "fvAEPg": {
        "attributes": {
          "name": "AppServers_EPG",
        }
      }
    },
    {
      "fvAEPg": {
        "attributes": {
          "name": "DBServers_EPG",
        }
      }
    },
    {
      "fvRsBd": {
        "attributes": {
          "tnFvBDName": "Web_BD",
        }
      }
    },
    {
      "fvRsBd": {
        "attributes": {
          "tnFvBDName": "App_BD",
        }
      }
    },
    {
      "fvRsBd": {
        "attributes": {
          "tnFvBDName": "App_BD",
        }
      }
    }
  ]
}
But I’m still not 100% satisfied, because I can’t be 100% sure that the first EPG shown is linked to the first BD shown. I need to find a way to make the EPG and BD relationship linked.
And to do that, we’ll need to look at another at two more REST API filters.
Lesson #2.6 – Introducing rsp-subtree and rsp-subtree-class filters
To get the fvRsBd object and therefore the tnFvBDName attribute nested under the fvAEPg object, you’ll need to cast your mind back to lesson 2.2. But never mind I’ll remind you.
This query…
T17@apic1:~> T=Tenant17 ; A=3Tier_AP
T17@apic1:~> icurl -s "http://localhost/api/node/mo/\
uni/tn-${T}/ap-${A}.json?\
query-target=children" | jq
Show (abbreviated) result
#Abbreviated using: egrep "{|}|\[|\]|totalCount\":|dn\":|name\":|pcTag\":"
{
  "totalCount": "3",
  "imdata": [
    {
      "fvAEPg": {
        "attributes": {
          "dn": "uni/tn-Tenant17/ap-3Tier_AP/epg-AppServers_EPG",
          "name": "AppServers_EPG",
          "pcTag": "49154",
        }
      }
    },
    {
      "fvAEPg": {
        "attributes": {
          "dn": "uni/tn-Tenant17/ap-3Tier_AP/epg-WebServers_EPG",
          "name": "WebServers_EPG",
          "pcTag": "49153",
        }
      }
    },
    {
      "fvAEPg": {
        "attributes": {
          "dn": "uni/tn-Tenant17/ap-3Tier_AP/epg-DBServers_EPG",
          "name": "DBServers_EPG",
          "pcTag": "49155",
        }
      }
    }
  ]
}
…would show only (but all) the EPGs in the Application Profile – because the only child objects in an Application Profile are EPGs (and ESGs), there is no need for any target-subtree-class=fvAEPg filter, but I could add it if I wanted, which I’d do if any ESGs had been configured.
This query…
T17@apic1:~> T=Tenant17 ; A=3Tier_AP ; E1=AppServers_EPG
T17@apic1:~> icurl -s "http://localhost/api/node/mo/\
uni/tn-${T}/ap-${A}/epg-${E1}.json?\
query-target=children" | jq
Show (abbreviated) result
#Abbreviated using: egrep "{|}|\[|\]|totalCount\":|dn\":|tnFvBDName\":"
{
  "totalCount": "8",
  "imdata": [
    {
      "fvRsBd": {
        "attributes": {
          "dn": "uni/tn-Tenant17/ap-3Tier_AP/epg-AppServers_EPG/rsbd",
          "tnFvBDName": "App_BD",
        }
      }
    },
    {
      "fvRsCons": {
        "attributes": {
          "dn": "uni/tn-Tenant17/ap-3Tier_AP/epg-AppServers_EPG/rscons-MgmtServices_Ct",
        }
      }
    },
    {
      "fvRsCons": {
        "attributes": {
          "dn": "uni/tn-Tenant17/ap-3Tier_AP/epg-AppServers_EPG/rscons-DBServices_Ct",
        }
      }
    },
    {
      "fvRsCustQosPol": {
        "attributes": {
          "dn": "uni/tn-Tenant17/ap-3Tier_AP/epg-AppServers_EPG/rscustQosPol",
        }
      }
    },
    {
      "fvRsDomAtt": {
        "attributes": {
          "dn": "uni/tn-Tenant17/ap-3Tier_AP/epg-AppServers_EPG/rsdomAtt-[uni/phys-T17:MappedVLANs_PhysDom]",
        }
      }
    },
    {
      "fvRsPathAtt": {
        "attributes": {
          "dn": "uni/tn-Tenant17/ap-3Tier_AP/epg-AppServers_EPG/rspathAtt-[topology/pod-1/paths-2201/pathep-[eth1/27]]",
          "tDn": "topology/pod-1/paths-2201/pathep-[eth1/27]",
        }
      }
    },
    {
      "fvRsProv": {
        "attributes": {
          "dn": "uni/tn-Tenant17/ap-3Tier_AP/epg-AppServers_EPG/rsprov-MgmtServices_Ct",
        }
      }
    },
    {
      "fvRsProv": {
        "attributes": {
          "dn": "uni/tn-Tenant17/ap-3Tier_AP/epg-AppServers_EPG/rsprov-AppServices_Ct",
        }
      }
    }
  ]
}
…would show the child objects for the AppServers_EPG. Although an EPG doesn’t have any contained children (like an Application Profile) it has many relationships, many more that just the fvRsBd object we looked at earlier, so to contain the output to just the fvRsBd object, you’d need this query…
T17@apic1:~> icurl -s "http://localhost/api/node/mo/\
uni/tn-${T}/ap-${A}/epg-${E1}.json?\
query-target=children\
&target-subtree-class=fvRsBd" | jq
Show (abbreviated) result
#Abbreviated using: egrep "{|}|\[|\]|totalCount\":|dn\":|tnFvBDName\":"
{
  "totalCount": "1",
  "imdata": [
    {
      "fvRsBd": {
        "attributes": {
          "dn": "uni/tn-Tenant17/ap-3Tier_AP/epg-AppServers_EPG/rsbd",
          "tnFvBDName": "App_BD",
        }
      }
    }
  ]
}
But of course that only shows the Bridge Domain for one EPG. If we want to look at the child objects of all the EPGs in an Application Profile in a nested fashion, we need to query the Application Profile and use thersp-subtree=children filter. Like this…
T17@apic1:~> icurl -s "http://localhost/api/node/mo/\
uni/tn-${T}/ap-${A}.json?\
query-target=children\
&target-subtree-class=fvAEPg\
&rsp-subtree=children" | jq
Show (abbreviated) result
#Abbreviated using: egrep "{|}|: \[|\]$|totalCount\":|dn\":|tnFvBDName\":"
{
  "totalCount": "3",
  "imdata": [
    {
      "fvAEPg": {
        "attributes": {
          "dn": "uni/tn-Tenant17/ap-3Tier_AP/epg-WebServers_EPG",
        },
        "children": [
          {
            "fvRsProv": {
              "attributes": {
              }
            }
          },
          {
            "fvRsPathAtt": {
              "attributes": {
              }
            }
          },
          {
            "fvRsPathAtt": {
              "attributes": {
              }
            }
          },
          {
            "fvRsPathAtt": {
              "attributes": {
              }
            }
          },
          {
            "fvRsPathAtt": {
              "attributes": {
              }
            }
          },
          {
            "fvRsDomAtt": {
              "attributes": {
              }
            }
          },
          {
            "fvRsCons": {
              "attributes": {
              }
            }
          },
          {
            "fvRsCons": {
              "attributes": {
              }
            }
          },
          {
            "fvRsCustQosPol": {
              "attributes": {
              }
            }
          },
          {
            "fvRsBd": {
              "attributes": {
                "tnFvBDName": "Web_BD",
              }
            }
          }
        ]
      }
    },
    {
      "fvAEPg": {
        "attributes": {
          "dn": "uni/tn-Tenant17/ap-3Tier_AP/epg-AppServers_EPG",
        },
        "children": [
          {
            "fvRsProv": {
              "attributes": {
              }
            }
          },
          {
            "fvRsProv": {
              "attributes": {
              }
            }
          },
          {
            "fvRsPathAtt": {
              "attributes": {
              }
            }
          },
          {
            "fvRsDomAtt": {
              "attributes": {
              }
            }
          },
          {
            "fvRsCons": {
              "attributes": {
              }
            }
          },
          {
            "fvRsCons": {
              "attributes": {
              }
            }
          },
          {
            "fvRsCustQosPol": {
              "attributes": {
              }
            }
          },
          {
            "fvRsBd": {
              "attributes": {
                "tnFvBDName": "App_BD",
              }
            }
          }
        ]
      }
    },
    {
      "fvAEPg": {
        "attributes": {
          "dn": "uni/tn-Tenant17/ap-3Tier_AP/epg-DBServers_EPG",
        },
        "children": [
          {
            "fvRsGraphDef": {
              "attributes": {
              }
            }
          },
          {
            "fvRsProv": {
              "attributes": {
              }
            }
          },
          {
            "fvRsPathAtt": {
              "attributes": {
              }
            }
          },
          {
            "fvRsPathAtt": {
              "attributes": {
              }
            }
          },
          {
            "fvRsCustQosPol": {
              "attributes": {
              }
            }
          },
          {
            "fvRsBd": {
              "attributes": {
                "tnFvBDName": "App_BD",
              }
            }
          }
        ]
      }
    }
  ]
}
…but that displays ALL the child objects of each EPG. Remember, we only want the fvRsBd object which holds the tnFvBDName attribute. And to restrict the classes displayed in the subtree, we’ll need to add a rsp-subtree-class=fvRsBd filter. Like this…
T17@apic1:~> icurl -s "http://localhost/api/node/mo/\
uni/tn-${T}/ap-${A}.json?\
query-target=children\
&target-subtree-class=fvAEPg\
&rsp-subtree=children\
&rsp-subtree-class=fvRsBd"| jq \
| egrep "{|}|\[|\]|totalCount\":|name\":|tnFvBDName\":"
# Remember, the egrep is just to keep the output manageable.
{
  "totalCount": "3",
  "imdata": [
    {
      "fvAEPg": {
        "attributes": {
          "name": "WebServers_EPG",
        },
        "children": [
          {
            "fvRsBd": {
              "attributes": {
                "tnFvBDName": "Web_BD",
              }
            }
          }
        ]
      }
    },
    {
      "fvAEPg": {
        "attributes": {
          "name": "AppServers_EPG",
        },
        "children": [
          {
            "fvRsBd": {
              "attributes": {
                "tnFvBDName": "App_BD",
              }
            }
          }
        ]
      }
    },
    {
      "fvAEPg": {
        "attributes": {
          "name": "DBServers_EPG",
        },
        "children": [
          {
            "fvRsBd": {
              "attributes": {
                "tnFvBDName": "App_BD",
              }
            }
          }
        ]
      }
    }
  ]
}
Which gives a beautiful result! Each EPG followed by the Bridge Domain it is liked to.
Challenge: See if you can modify the query above to include the name of the Application Profile (class fvAp) too!
Don’t peek at the answer below before you’ve had a try yourself!
T17@apic1:~> icurl -s "http://localhost/api/node/mo/\
uni/tn-${T}/ap-${A}.json?\
query-target=subtree\
&target-subtree-class=fvAp,fvAEPg\
&rsp-subtree=children\
&rsp-subtree-class=fvRsBd"| jq
Show (abbreviated) result
#Abbreviated using: egrep "{|}|\[|\]|totalCount\":|name\":|dn\":|tnFvBDName\":"
{
  "totalCount": "4",
  "imdata": [
    {
      "fvAp": {
        "attributes": {
          "dn": "uni/tn-Tenant17/ap-3Tier_AP",
          "name": "3Tier_AP",
        }
      }
    },
    {
      "fvAEPg": {
        "attributes": {
          "dn": "uni/tn-Tenant17/ap-3Tier_AP/epg-WebServers_EPG",
          "name": "WebServers_EPG",
        },
        "children": [
          {
            "fvRsBd": {
              "attributes": {
                "tnFvBDName": "Web_BD",
              }
            }
          }
        ]
      }
    },
    {
      "fvAEPg": {
        "attributes": {
          "dn": "uni/tn-Tenant17/ap-3Tier_AP/epg-AppServers_EPG",
          "name": "AppServers_EPG",
        },
        "children": [
          {
            "fvRsBd": {
              "attributes": {
                "tnFvBDName": "App_BD",
              }
            }
          }
        ]
      }
    },
    {
      "fvAEPg": {
        "attributes": {
          "dn": "uni/tn-Tenant17/ap-3Tier_AP/epg-DBServers_EPG",
          "name": "DBServers_EPG",
        },
        "children": [
          {
            "fvRsBd": {
              "attributes": {
                "tnFvBDName": "App_BD",
              }
            }
          }
        ]
      }
    }
  ]
}
TIME OUT – Confused about query-target=children and
|
The options for each of these filters seem to overlap. Recall:
So a query like the following. using T17@apic1:~> icurl -s "http://localhost/api/node/mo/\ uni/tn-${T}/ap-${A}.json?query-target=children" | jq | egrep "fv|name\"" "fvAEPg": { "name": "WebServers_EPG", "fvAEPg": { "name": "AppServers_EPG", "fvAEPg": { "name": "DBServers_EPG", But the following query using T17@apic1:~> icurl -s "http://localhost/api/node/mo/\ uni/tn-${T}/ap-${A}.json?rsp-subtree=children" | jq | egrep "fv|name\"" "fvAP": { "name: "3Tier_AP", "fvAEPg": { "name": "WebServers_EPG", "fvAEPg": { "name": "AppServers_EPG", "fvAEPg": { "name": "DBServers_EPG", |
No doubt you have noticed that the output from these queries is often many lines long, and I’ve used egrep extensively to abbreviate the output for this post.
Guess what? There are a couple of REST API filters that you can use to help calm the volume of output of your queries!
Lesson #2.7 – Reducing output volume using the rsp-prop-include filter
The ACI REST API has two ways to reduce the output using the rsp-prop-include filter.
rsp-prop-include=naming-only strips all attributes except those you have named, and rsp-prop-include=config-only strips timestamps and other system attributes.
But first, get a measure of how many lies are produced by the last command by piping it into wc -l
T17@apic1:~> T=Tenant17 ; A=3Tier_AP
T17@apic1:~> icurl -s "http://localhost/api/node/mo/\
uni/tn-${T}/ap-${A}.json?\
query-target=subtree\
&target-subtree-class=fvAp,fvAEPg\
&rsp-subtree=children\
&rsp-subtree-class=fvRsBd"| jq | wc -l
222
Make a note of now many lines in the output – as you can see, my result was 222
Now try out each of the filters, and after observing the format of the output, do the line count. Here’s my result for the rsp-prop-include=naming-only filter.
T17@apic1:~> icurl -s "http://localhost/api/node/mo/\
uni/tn-${T}/ap-${A}.json?\
query-target=subtree\
&target-subtree-class=fvAp,fvAEPg\
&rsp-subtree=children\
&rsp-subtree-class=fvRsBd\
&rsp-prop-include=naming-only"| jq
{
  "totalCount": "4",
  "imdata": [
    { "fvAp": {
        "attributes": {
          "dn": "uni/tn-Tenant17/ap-3Tier_AP,
          "name": "3Tier_AP",
    },
    {
      "fvAEPg": {
        "attributes": {
          "dn": "uni/tn-Tenant17/ap-3Tier_AP/epg-WebServers_EPG",
          "name": "WebServers_EPG",
        },
        "children": [
          {
            "fvRsBd": {
              "attributes": {}
            }
          }
        ]
      }
    },
    {
      "fvAEPg": {
        "attributes": {
          "dn": "uni/tn-Tenant17/ap-3Tier_AP/AppServers_EPG",
          "name": "AppServers_EPG",
        },
        "children": [
          {
            "fvRsBd": {
              "attributes": {}
            }
          }
        ]
      }
    },
    {
      "fvAEPg": {
        "attributes": {
          "dn": "uni/tn-Tenant17/ap-3Tier_AP/DBServers_EPG",
          "name": "DBServers_EPG",
        },
        "children": [
          {
            "fvRsBd": {
              "attributes": {}
            }
          }
        ]
      }
    }
  ]
}
As you can see, this output is similar to the output I showed in the last example in 2.6, but there are two big differences:
- the dn attribute value is displayed for the AP and EPGs, because it is based on a name created for the EPG
- the tnFvBDName attribute is missing, because it a relational value – NOT based on a name created for the EPG
For the record, the output above is only 58 lines, mostly braces or brackets and commas.
Using the same query with the rsp-prop-include=config-only filter is much more inclusive, but reduces the output on my system from 222 lines to 119, so still a pretty good saving.
T17@apic1:~> icurl -s "http://localhost/api/node/mo/\
uni/tn-${T}/ap-${A}.json?\
query-target=subtree\
&target-subtree-class=fvAp,fvAEPg\
&rsp-subtree=children\
&rsp-subtree-class=fvRsBd\
&rsp-prop-include=config-only"| jq | wc -l
119
Personally, I prefer to filter the output using jq or even egrep, but if you are writing code, then reducing the size of the dictionary/array you are working with can be useful.
Lesson #2.8 – A useful example using the rsp-subtree-include filter
Let’s say you need to get a list of all the EPGs that consume a contract – any contract at all.
The following would give a list of all the EPGs and all the contracts consumed by all EPGs. You’ll find the name of the contract in the fvRsCons child object of the EPGs.
T17@apic1:~> icurl -s "http://localhost/api/node/class/\
fvAEPg.json?\
rsp-prop-include=naming-only\
&query-target=subtree\
&target-subtree-class=fvAEPg\
&rsp-subtree=children\
&rsp-subtree-class=fvRsCons" | jq
Show result
{
  "totalCount": "13",
  "imdata": [
    {
      "fvAEPg": {
        "attributes": {
          "dn": "uni/tn-Tenant10/ap-2Tier_AP/epg-WebServers_EPG",
          "name": "WebServers_EPG"
        },
        "children": [
          {
            "fvRsCons": {
              "attributes": {
                "tnVzBrCPName": "AppServices_Ct"
              }
            }
          }
        ]
      }
    },
    {
      "fvAEPg": {
        "attributes": {
          "dn": "uni/tn-Tenant10/ap-2Tier_AP/epg-AppServers_EPG",
          "name": "AppServers_EPG"
        }
      }
    },
    {
      "fvAEPg": {
        "attributes": {
          "dn": "uni/tn-Tenant18/ap-3Tier_AP/epg-WebServers_EPG",
          "name": "WebServers_EPG"
        },
        "children": [
          {
            "fvRsCons": {
              "attributes": {
                "tnVzBrCPName": "MgmtServices_Ct"
              }
            }
          },
          {
            "fvRsCons": {
              "attributes": {
                "tnVzBrCPName": "AppServices_Ct"
              }
            }
          }
        ]
      }
    },
    {
      "fvAEPg": {
        "attributes": {
          "dn": "uni/tn-Tenant18/ap-3Tier_AP/epg-DBServers_EPG",
          "name": "DBServers_EPG"
        }
      }
    },
    {
      "fvAEPg": {
        "attributes": {
          "dn": "uni/tn-Tenant18/ap-3Tier_AP/epg-AppServers_EPG",
          "name": "AppServers_EPG"
        },
        "children": [
          {
            "fvRsCons": {
              "attributes": {
                "tnVzBrCPName": "MgmtServices_Ct"
              }
            }
          },
          {
            "fvRsCons": {
              "attributes": {
                "tnVzBrCPName": "DBServices_Ct"
              }
            }
          }
        ]
      }
    },
    {
      "fvAEPg": {
        "attributes": {
          "dn": "uni/tn-Tenant17/ap-3Tier_AP/epg-WebServers_EPG",
          "name": "WebServers_EPG"
        },
        "children": [
          {
            "fvRsCons": {
              "attributes": {
                "tnVzBrCPName": "MgmtServices_Ct"
              }
            }
          },
          {
            "fvRsCons": {
              "attributes": {
                "tnVzBrCPName": "AppServices_Ct"
              }
            }
          }
        ]
      }
    },
    {
      "fvAEPg": {
        "attributes": {
          "dn": "uni/tn-Tenant17/ap-3Tier_AP/epg-AppServers_EPG",
          "name": "AppServers_EPG"
        },
        "children": [
          {
            "fvRsCons": {
              "attributes": {
                "tnVzBrCPName": "DBServices_Ct"
              }
            }
          },
          {
            "fvRsCons": {
              "attributes": {
                "tnVzBrCPName": "MgmtServices_Ct"
              }
            }
          }
        ]
      }
    },
    {
      "fvAEPg": {
        "attributes": {
          "dn": "uni/tn-Tenant17/ap-3Tier_AP/epg-DBServers_EPG",
          "name": "DBServers_EPG"
        }
      }
    },
    {
      "fvAEPg": {
        "attributes": {
          "dn": "uni/tn-Tenant17/ap-2Tier_AP/epg-WebServers_EPG",
          "name": "WebServers_EPG"
        }
      }
    },
    {
      "fvAEPg": {
        "attributes": {
          "dn": "uni/tn-Tenant17/ap-2Tier_AP/epg-AppServers_EPG",
          "name": "AppServers_EPG"
        },
        "children": [
          {
            "fvRsCons": {
              "attributes": {
                "tnVzBrCPName": "Any.IP_Ct"
              }
            }
          }
        ]
      }
    },
    {
      "fvAEPg": {
        "attributes": {
          "dn": "uni/tn-infra/ap-access/epg-default",
          "name": "default"
        }
      }
    },
    {
      "fvAEPg": {
        "attributes": {
          "dn": "uni/tn-infra/ap-ave-ctrl/epg-ave-ctrl",
          "name": "ave-ctrl"
        }
      }
    },
    {
      "fvAEPg": {
        "attributes": {
          "dn": "uni/tn-common/ap-SharedServices_AP/epg-SharedServices_EPG",
          "name": "SharedServices_EPG"
        }
      }
    }
  ]
}
But this query has a big problem – it lists ALL the EPGs – not JUST those that consume contracts! So if you have EPGs that don’t consume any contracts, the EPG still gets listed. In my lab this is 13 EPGs.
To exclude the EPGs that do not consume any contract, I can use the rsp-subtree-include=required filter.
T17@apic1:~> icurl -s "http://localhost/api/node/class/\
fvAEPg.json?\
rsp-prop-include=naming-only\
&query-target=subtree\
&target-subtree-class=fvAEPg\
&rsp-subtree=children\
&rsp-subtree-class=fvRsCons\
&rsp-subtree-include=required" | jq
Show (abbreviated) result
{
  "totalCount": "6",
  "imdata": [
    {
      "fvAEPg": {
        "attributes": {
          "dn": "uni/tn-Tenant10/ap-2Tier_AP/epg-WebServers_EPG",
          "name": "WebServers_EPG"
        },
        "children": [
          {
            "fvRsCons": {
              "attributes": {
                "tnVzBrCPName": "AppServices_Ct"
              }
            }
          }
        ]
      }
    },
    {
      "fvAEPg": {
        "attributes": {
          "dn": "uni/tn-Tenant18/ap-3Tier_AP/epg-WebServers_EPG",
          "name": "WebServers_EPG"
        },
        "children": [
          {
            "fvRsCons": {
              "attributes": {
                "tnVzBrCPName": "MgmtServices_Ct"
              }
            }
          },
          {
            "fvRsCons": {
              "attributes": {
                "tnVzBrCPName": "AppServices_Ct"
              }
            }
          }
        ]
      }
    },
    {
      "fvAEPg": {
        "attributes": {
          "dn": "uni/tn-Tenant18/ap-3Tier_AP/epg-AppServers_EPG",
          "name": "AppServers_EPG"
        },
        "children": [
          {
            "fvRsCons": {
              "attributes": {
                "tnVzBrCPName": "MgmtServices_Ct"
              }
            }
          },
          {
            "fvRsCons": {
              "attributes": {
                "tnVzBrCPName": "DBServices_Ct"
              }
            }
          }
        ]
      }
    },
    {
      "fvAEPg": {
        "attributes": {
          "dn": "uni/tn-Tenant17/ap-3Tier_AP/epg-WebServers_EPG",
          "name": "WebServers_EPG"
        },
        "children": [
          {
            "fvRsCons": {
              "attributes": {
                "tnVzBrCPName": "MgmtServices_Ct"
              }
            }
          },
          {
            "fvRsCons": {
              "attributes": {
                "tnVzBrCPName": "AppServices_Ct"
              }
            }
          }
        ]
      }
    },
    {
      "fvAEPg": {
        "attributes": {
          "dn": "uni/tn-Tenant17/ap-3Tier_AP/epg-AppServers_EPG",
          "name": "AppServers_EPG"
        },
        "children": [
          {
            "fvRsCons": {
              "attributes": {
                "tnVzBrCPName": "DBServices_Ct"
              }
            }
          },
          {
            "fvRsCons": {
              "attributes": {
                "tnVzBrCPName": "MgmtServices_Ct"
              }
            }
          }
        ]
      }
    },
    {
      "fvAEPg": {
        "attributes": {
          "dn": "uni/tn-Tenant17/ap-2Tier_AP/epg-AppServers_EPG",
          "name": "AppServers_EPG"
        },
        "children": [
          {
            "fvRsCons": {
              "attributes": {
                "tnVzBrCPName": "Any.IP_Ct"
              }
            }
          }
        ]
      }
    }
  ]
}
That reduces the count (in my lab) to just 6 EPGs that consume contracts. Recall from the last example that my lab has 13 EPGs
To exclude the EPGs that do not provide any contract, the query is almost identical – just swapping the fvRsCons with fvRsProv
T17@apic1:~> icurl -s "http://localhost/api/node/class/\
fvAEPg.json?\
rsp-prop-include=naming-only\
&query-target=subtree\
&target-subtree-class=fvAEPg\
&rsp-subtree=children\
&rsp-subtree-class=fvRsProv\
&rsp-subtree-include=required" | jq
Show result
{
  "totalCount": "7",
  "imdata": [
    {
      "fvAEPg": {
        "attributes": {
          "dn": "uni/tn-Tenant10/ap-2Tier_AP/epg-AppServers_EPG",
          "name": "AppServers_EPG"
        },
        "children": [
          {
            "fvRsProv": {
              "attributes": {
                "tnVzBrCPName": "AppServices_Ct"
              }
            }
          }
        ]
      }
    },
    {
      "fvAEPg": {
        "attributes": {
          "dn": "uni/tn-Tenant18/ap-3Tier_AP/epg-WebServers_EPG",
          "name": "WebServers_EPG"
        },
        "children": [
          {
            "fvRsProv": {
              "attributes": {
                "tnVzBrCPName": "MgmtServices_Ct"
              }
            }
          }
        ]
      }
    },
    {
      "fvAEPg": {
        "attributes": {
          "dn": "uni/tn-Tenant18/ap-3Tier_AP/epg-AppServers_EPG",
          "name": "AppServers_EPG"
        },
        "children": [
          {
            "fvRsProv": {
              "attributes": {
                "tnVzBrCPName": "AppServices_Ct"
              }
            }
          },
          {
            "fvRsProv": {
              "attributes": {
                "tnVzBrCPName": "MgmtServices_Ct"
              }
            }
          }
        ]
      }
    },
    {
      "fvAEPg": {
        "attributes": {
          "dn": "uni/tn-Tenant17/ap-3Tier_AP/epg-WebServers_EPG",
          "name": "WebServers_EPG"
        },
        "children": [
          {
            "fvRsProv": {
              "attributes": {
                "tnVzBrCPName": "MgmtServices_Ct"
              }
            }
          }
        ]
      }
    },
    {
      "fvAEPg": {
        "attributes": {
          "dn": "uni/tn-Tenant17/ap-3Tier_AP/epg-AppServers_EPG",
          "name": "AppServers_EPG"
        },
        "children": [
          {
            "fvRsProv": {
              "attributes": {
                "tnVzBrCPName": "AppServices_Ct"
              }
            }
          },
          {
            "fvRsProv": {
              "attributes": {
                "tnVzBrCPName": "MgmtServices_Ct"
              }
            }
          }
        ]
      }
    },
    {
      "fvAEPg": {
        "attributes": {
          "dn": "uni/tn-Tenant17/ap-3Tier_AP/epg-DBServers_EPG",
          "name": "DBServers_EPG"
        },
        "children": [
          {
            "fvRsProv": {
              "attributes": {
                "tnVzBrCPName": "DBServices_Ct"
              }
            }
          }
        ]
      }
    },
    {
      "fvAEPg": {
        "attributes": {
          "dn": "uni/tn-common/ap-SharedServices_AP/epg-SharedServices_EPG",
          "name": "SharedServices_EPG"
        },
        "children": [
          {
            "fvRsProv": {
              "attributes": {
                "tnVzBrCPName": "DNS_Ct"
              }
            }
          }
        ]
      }
    }
  ]
}
And in my lab that is 7 of those 13 EPGs that provide contracts.
Challenge:
See if you can modify the query to show a list of all EPGs that either consume or provide a contract. No peeking at the answer below until you’ve had an attempt yourself!
T17@apic1:~> icurl -s "http://localhost/api/node/class/\
fvAEPg.json?\
rsp-prop-include=naming-only\
&query-target=subtree\
&target-subtree-class=fvAEPg\
&rsp-subtree=children\
&rsp-subtree-class=fvRsCons,clearfvRsProv\
&rsp-subtree-include=required" | jq
Show result
{
  "totalCount": "9",
  "imdata": [
    {
      "fvAEPg": {
        "attributes": {
          "dn": "uni/tn-Tenant10/ap-2Tier_AP/epg-WebServers_EPG",
          "name": "WebServers_EPG"
        },
        "children": [
          {
            "fvRsCons": {
              "attributes": {
                "tnVzBrCPName": "AppServices_Ct"
              }
            }
          }
        ]
      }
    },
    {
      "fvAEPg": {
        "attributes": {
          "dn": "uni/tn-Tenant10/ap-2Tier_AP/epg-AppServers_EPG",
          "name": "AppServers_EPG"
        },
        "children": [
          {
            "fvRsProv": {
              "attributes": {
                "tnVzBrCPName": "AppServices_Ct"
              }
            }
          }
        ]
      }
    },
    {
      "fvAEPg": {
        "attributes": {
          "dn": "uni/tn-Tenant18/ap-3Tier_AP/epg-WebServers_EPG",
          "name": "WebServers_EPG"
        },
        "children": [
          {
            "fvRsProv": {
              "attributes": {
                "tnVzBrCPName": "MgmtServices_Ct"
              }
            }
          },
          {
            "fvRsCons": {
              "attributes": {
                "tnVzBrCPName": "MgmtServices_Ct"
              }
            }
          },
          {
            "fvRsCons": {
              "attributes": {
                "tnVzBrCPName": "AppServices_Ct"
              }
            }
          }
        ]
      }
    },
    {
      "fvAEPg": {
        "attributes": {
          "dn": "uni/tn-Tenant18/ap-3Tier_AP/epg-AppServers_EPG",
          "name": "AppServers_EPG"
        },
        "children": [
          {
            "fvRsProv": {
              "attributes": {
                "tnVzBrCPName": "AppServices_Ct"
              }
            }
          },
          {
            "fvRsProv": {
              "attributes": {
                "tnVzBrCPName": "MgmtServices_Ct"
              }
            }
          },
          {
            "fvRsCons": {
              "attributes": {
                "tnVzBrCPName": "MgmtServices_Ct"
              }
            }
          },
          {
            "fvRsCons": {
              "attributes": {
                "tnVzBrCPName": "DBServices_Ct"
              }
            }
          }
        ]
      }
    },
    {
      "fvAEPg": {
        "attributes": {
          "dn": "uni/tn-Tenant17/ap-3Tier_AP/epg-WebServers_EPG",
          "name": "WebServers_EPG"
        },
        "children": [
          {
            "fvRsProv": {
              "attributes": {
                "tnVzBrCPName": "MgmtServices_Ct"
              }
            }
          },
          {
            "fvRsCons": {
              "attributes": {
                "tnVzBrCPName": "MgmtServices_Ct"
              }
            }
          },
          {
            "fvRsCons": {
              "attributes": {
                "tnVzBrCPName": "AppServices_Ct"
              }
            }
          }
        ]
      }
    },
    {
      "fvAEPg": {
        "attributes": {
          "dn": "uni/tn-Tenant17/ap-3Tier_AP/epg-AppServers_EPG",
          "name": "AppServers_EPG"
        },
        "children": [
          {
            "fvRsProv": {
              "attributes": {
                "tnVzBrCPName": "AppServices_Ct"
              }
            }
          },
          {
            "fvRsProv": {
              "attributes": {
                "tnVzBrCPName": "MgmtServices_Ct"
              }
            }
          },
          {
            "fvRsCons": {
              "attributes": {
                "tnVzBrCPName": "DBServices_Ct"
              }
            }
          },
          {
            "fvRsCons": {
              "attributes": {
                "tnVzBrCPName": "MgmtServices_Ct"
              }
            }
          }
        ]
      }
    },
    {
      "fvAEPg": {
        "attributes": {
          "dn": "uni/tn-Tenant17/ap-3Tier_AP/epg-DBServers_EPG",
          "name": "DBServers_EPG"
        },
        "children": [
          {
            "fvRsProv": {
              "attributes": {
                "tnVzBrCPName": "DBServices_Ct"
              }
            }
          }
        ]
      }
    },
    {
      "fvAEPg": {
        "attributes": {
          "dn": "uni/tn-Tenant17/ap-2Tier_AP/epg-AppServers_EPG",
          "name": "AppServers_EPG"
        },
        "children": [
          {
            "fvRsCons": {
              "attributes": {
                "tnVzBrCPName": "Any.IP_Ct"
              }
            }
          }
        ]
      }
    },
    {
      "fvAEPg": {
        "attributes": {
          "dn": "uni/tn-common/ap-SharedServices_AP/epg-SharedServices_EPG",
          "name": "SharedServices_EPG"
        },
        "children": [
          {
            "fvRsProv": {
              "attributes": {
                "tnVzBrCPName": "DNS_Ct"
              }
            }
          }
        ]
      }
    }
  ]
}
Which turns out to be 9 EPGs in my lab, because there are two EPGs that consume a contract but don’t provide one, hence the number is two greater than the number of provider EPGs, and one EPG that provides a contract but doesn’t consume one, making the total 3 less than the 12 EPGs in the lab.
But. Although the output is pretty cool – it’s not in any order.
Lesson #2.9 – Getting things in order: the order-by filter
To put the output above in order of the dn of the fvAEPg class, you just need to add a filter of order-by=fvAEPg.dn in the appropriate place. Like this
T17@apic1:~> icurl -s "http://localhost/api/node/class/\
fvAEPg.json?\
rsp-prop-include=naming-only\
&query-target=subtree\
&target-subtree-class=fvAEPg\
&order-by=fvAEPg.dn|asc\
&rsp-subtree=children\
&rsp-subtree-class=fvRsCons,fvRsProv\
&rsp-subtree-include=required" | jq
Show result
{
  "totalCount": "9",
  "imdata": [
    {
      "fvAEPg": {
        "attributes": {
          "dn": "uni/tn-Tenant10/ap-2Tier_AP/epg-AppServers_EPG",
          "name": "AppServers_EPG"
        },
        "children": [
          {
            "fvRsProv": {
              "attributes": {
                "tnVzBrCPName": "AppServices_Ct"
              }
            }
          }
        ]
      }
    },
    {
      "fvAEPg": {
        "attributes": {
          "dn": "uni/tn-Tenant10/ap-2Tier_AP/epg-WebServers_EPG",
          "name": "WebServers_EPG"
        },
        "children": [
          {
            "fvRsCons": {
              "attributes": {
                "tnVzBrCPName": "AppServices_Ct"
              }
            }
          }
        ]
      }
    },
    {
      "fvAEPg": {
        "attributes": {
          "dn": "uni/tn-Tenant17/ap-2Tier_AP/epg-AppServers_EPG",
          "name": "AppServers_EPG"
        },
        "children": [
          {
            "fvRsCons": {
              "attributes": {
                "tnVzBrCPName": "Any.IP_Ct"
              }
            }
          }
        ]
      }
    },
    {
      "fvAEPg": {
        "attributes": {
          "dn": "uni/tn-Tenant17/ap-3Tier_AP/epg-AppServers_EPG",
          "name": "AppServers_EPG"
        },
        "children": [
          {
            "fvRsProv": {
              "attributes": {
                "tnVzBrCPName": "AppServices_Ct"
              }
            }
          },
          {
            "fvRsProv": {
              "attributes": {
                "tnVzBrCPName": "MgmtServices_Ct"
              }
            }
          },
          {
            "fvRsCons": {
              "attributes": {
                "tnVzBrCPName": "DBServices_Ct"
              }
            }
          },
          {
            "fvRsCons": {
              "attributes": {
                "tnVzBrCPName": "MgmtServices_Ct"
              }
            }
          }
        ]
      }
    },
    {
      "fvAEPg": {
        "attributes": {
          "dn": "uni/tn-Tenant17/ap-3Tier_AP/epg-DBServers_EPG",
          "name": "DBServers_EPG"
        },
        "children": [
          {
            "fvRsProv": {
              "attributes": {
                "tnVzBrCPName": "DBServices_Ct"
              }
            }
          }
        ]
      }
    },
    {
      "fvAEPg": {
        "attributes": {
          "dn": "uni/tn-Tenant17/ap-3Tier_AP/epg-WebServers_EPG",
          "name": "WebServers_EPG"
        },
        "children": [
          {
            "fvRsProv": {
              "attributes": {
                "tnVzBrCPName": "MgmtServices_Ct"
              }
            }
          },
          {
            "fvRsCons": {
              "attributes": {
                "tnVzBrCPName": "MgmtServices_Ct"
              }
            }
          },
          {
            "fvRsCons": {
              "attributes": {
                "tnVzBrCPName": "AppServices_Ct"
              }
            }
          }
        ]
      }
    },
    {
      "fvAEPg": {
        "attributes": {
          "dn": "uni/tn-Tenant18/ap-3Tier_AP/epg-AppServers_EPG",
          "name": "AppServers_EPG"
        },
        "children": [
          {
            "fvRsProv": {
              "attributes": {
                "tnVzBrCPName": "AppServices_Ct"
              }
            }
          },
          {
            "fvRsProv": {
              "attributes": {
                "tnVzBrCPName": "MgmtServices_Ct"
              }
            }
          },
          {
            "fvRsCons": {
              "attributes": {
                "tnVzBrCPName": "MgmtServices_Ct"
              }
            }
          },
          {
            "fvRsCons": {
              "attributes": {
                "tnVzBrCPName": "DBServices_Ct"
              }
            }
          }
        ]
      }
    },
    {
      "fvAEPg": {
        "attributes": {
          "dn": "uni/tn-Tenant18/ap-3Tier_AP/epg-WebServers_EPG",
          "name": "WebServers_EPG"
        },
        "children": [
          {
            "fvRsProv": {
              "attributes": {
                "tnVzBrCPName": "MgmtServices_Ct"
              }
            }
          },
          {
            "fvRsCons": {
              "attributes": {
                "tnVzBrCPName": "MgmtServices_Ct"
              }
            }
          },
          {
            "fvRsCons": {
              "attributes": {
                "tnVzBrCPName": "AppServices_Ct"
              }
            }
          }
        ]
      }
    },
    {
      "fvAEPg": {
        "attributes": {
          "dn": "uni/tn-common/ap-SharedServices_AP/epg-SharedServices_EPG",
          "name": "SharedServices_EPG"
        },
        "children": [
          {
            "fvRsProv": {
              "attributes": {
                "tnVzBrCPName": "DNS_Ct"
              }
            }
          }
        ]
      }
    }
  ]
}
The above filter will sort in alphabetical order. If I wanted to reverse the order, the filter would be order-by=fvAEPg.dn|desc
The output from the past few examples runs into many many lines in my lab, so for the purposes of illustration, instead of listing all EPGs in the system (by querying the fvAEPg class), I’ll restrict the output to just a single Tenant by using a new filter.
Lesson #2.10 – Finally, the query-target-filter and rsp-subtree-filter filters
It is quite confusing having two options for specifying user defined filters for the API. In many cases, you could use either. In the example below the target of the query is the fvAEPg class, but the target subtree is also the fvAEPg class, so you could use either query-target-filter=wcard(fvAEPg.dn,\"tn-${T}\") orrsp-subtree-filter=wcard(fvAEPg.dn,\"tn-${T}\") in the example below and each would work equally well.
T17@apic1:~> T=Tenant17
T17@apic1:~> icurl -s "http://localhost/api/node/class/\
fvAEPg.json?\
rsp-prop-include=naming-only\
&query-target=subtree\
&target-subtree-class=fvAEPg\
&order-by=fvAEPg.dn\
&query-target-filter=wcard(fvAEPg.dn,\"tn-${T}\")\
&rsp-subtree=children\
&rsp-subtree-class=fvRsCons,fvRsProv\
&rsp-subtree-include=required" | jq
{
  "totalCount":  "4",
  "imdata": [
     {
      "fvAEPg": {
        "attributes": {
          "dn":  "uni/tn-Tenant17/ap-2Tier_AP/epg-AppServers_EPG",
          "name":  "AppServers_EPG"
        },
        "children": [
          {
            "fvRsCons": {
              "attributes": {
                "tnVzBrCPName":  "Any.IP_Ct"
              }
            }
          }
        ]
       }
     },
     {
      "fvAEPg": {
        "attributes": {
          "dn":  "uni/tn-Tenant17/ap-3Tier_AP/epg-AppServers_EPG",
          "name":  "AppServers_EPG"
        },
        "children": [
          {
            "fvRsProv": {
              "attributes": {
                "tnVzBrCPName":  "AppServices_Ct"
              }
            }
          },
          {
            "fvRsProv": {
              "attributes": {
                "tnVzBrCPName":  "MgmtServices_Ct"
              }
            }
          },
          {
            "fvRsCons": {
              "attributes": {
                "tnVzBrCPName":  "DBServices_Ct"
              }
            }
          },
          {
            "fvRsCons": {
              "attributes": {
                "tnVzBrCPName":  "MgmtServices_Ct"
              }
            }
          }
        ]
      }
    },
    {
      "fvAEPg": {
        "attributes": {
          "dn":  "uni/tn-Tenant17/ap-3Tier_AP/epg-DBServers_EPG",
          "name":  "DBServers_EPG"
        },
        "children": [
          {
            "fvRsProv": {
              "attributes": {
                "tnVzBrCPName":  "DBServices_Ct"
              }
            }
          }
        ]
      }
    },
    {
      "fvAEPg": {
        "attributes": {
          "dn":  "uni/tn-Tenant17/ap-3Tier_AP/epg-WebServers_EPG",
          "name":  "WebServers_EPG"
        },
        "children": [
          {
            "fvRsProv": {
              "attributes": {
                "tnVzBrCPName":  "MgmtServices_Ct"
              }
            }
          },
          {
            "fvRsCons": {
              "attributes": {
                "tnVzBrCPName":  "MgmtServices_Ct"
              }
            }
          },
          {
            "fvRsCons": {
              "attributes": {
                "tnVzBrCPName":  "AppServices_Ct"
              }
            }
          }
        ]
      }
    }
  ]
}
The output is just as pretty as the previous examples, and the EPGs are in alphabetical order.
But to get back to the distinction between the query-target-filter and rsp-subtree-filter filters, note that in the output of the previous example, there are three different contract names mentioned. If I wanted to filter so that only EPGs that consumed the MgmtServices_Ct contract were shown, I’d need to use the rsp-subtree-filter filter.
T17@apic1:~> T=Tenant17
T17@apic1:~> icurl -s "http://localhost/api/node/class/\
fvAEPg.json?\
rsp-prop-include=naming-only\
&query-target=subtree\
&target-subtree-class=fvAEPg\
&order-by=fvAEPg.dn\
&query-target-filter=wcard(fvAEPg.dn,\"tn-${T}\")\
&rsp-subtree=children\
&rsp-subtree-class=fvRsCons,fvRsProv\
&rsp-subtree-include=required\
&rsp-subtree-filter=eq(fvRsCons.tnVzBrCPName,\"MgmtServices_Ct\")" | jq
{
  "totalCount":  "2",
  "imdata": [
    {
      "fvAEPg": {
        "attributes": {
          "dn":  "uni/tn-Tenant17/ap-3Tier_AP/epg-AppServers_EPG",
          "name":  "AppServers_EPG"
        },
          {
            "fvRsCons": {
              "attributes": {
                "tnVzBrCPName":  "MgmtServices_Ct"
              }
            }
          }
        ]
      }
    },
    {
      "fvAEPg": {
        "attributes": {
          "dn":  "uni/tn-Tenant17/ap-3Tier_AP/epg-WebServers_EPG",
          "name":  "WebServers_EPG"
        },
        "children": [
          {
            "fvRsCons": {
              "attributes": {
                "tnVzBrCPName":  "MgmtServices_Ct"
              }
            }
          }
        ]
      }
    }
  ]
}
And if I wanted to see all EPGs that either provided or consumed the MgmtServices_Ct contract, the filter would need to change to:
rsp-subtree-filter=or(eq(fvRsCons.tnVzBrCPName,\"MgmtServices_Ct\"), eq(fvRsProv.tnVzBrCPName,\"MgmtServices_Ct\"))
Filters can get extremely complicated! Sometimes you can avoid complication by making sure you target the correct object or class to begin with. For instance, in the first example used in this lesson, instead of using a query-target-filter, I could just have easily queried the dn of the Tenant and got exactly the same result, without using the extra filter, like this. No query-target-filter required!
T17@apic1:~> T=Tenant17
T17@apic1:~> icurl -s "http://localhost/api/node/mo/\
uni/tn-${T}.json?\
rsp-prop-include=naming-only\
&query-target=subtree\
&target-subtree-class=fvAEPg\
&order-by=fvAEPg.dn\
&rsp-subtree=children\
&rsp-subtree-class=fvRsCons,fvRsProv\
&rsp-subtree-include=required" | jq
Show result
{
  "totalCount":  "4",
  "imdata": [
     {
      "fvAEPg": {
        "attributes": {
          "dn":  "uni/tn-Tenant17/ap-2Tier_AP/epg-AppServers_EPG",
          "name":  "AppServers_EPG"
        },
        "children": [
          {
            "fvRsCons": {
              "attributes": {
                "tnVzBrCPName":  "Any.IP_Ct"
              }
            }
          }
        ]
       }
     },
     {
      "fvAEPg": {
        "attributes": {
          "dn":  "uni/tn-Tenant17/ap-3Tier_AP/epg-AppServers_EPG",
          "name":  "AppServers_EPG"
        },
        "children": [
          {
            "fvRsProv": {
              "attributes": {
                "tnVzBrCPName":  "AppServices_Ct"
              }
            }
          },
          {
            "fvRsProv": {
              "attributes": {
                "tnVzBrCPName":  "MgmtServices_Ct"
              }
            }
          },
          {
            "fvRsCons": {
              "attributes": {
                "tnVzBrCPName":  "DBServices_Ct"
              }
            }
          },
          {
            "fvRsCons": {
              "attributes": {
                "tnVzBrCPName":  "MgmtServices_Ct"
              }
            }
          }
        ]
      }
    },
    {
      "fvAEPg": {
        "attributes": {
          "dn":  "uni/tn-Tenant17/ap-3Tier_AP/epg-DBServers_EPG",
          "name":  "DBServers_EPG"
        },
        "children": [
          {
            "fvRsProv": {
              "attributes": {
                "tnVzBrCPName":  "DBServices_Ct"
              }
            }
          }
        ]
      }
    },
    {
      "fvAEPg": {
        "attributes": {
          "dn":  "uni/tn-Tenant17/ap-3Tier_AP/epg-WebServers_EPG",
          "name":  "WebServers_EPG"
        },
        "children": [
          {
            "fvRsProv": {
              "attributes": {
                "tnVzBrCPName":  "MgmtServices_Ct"
              }
            }
          },
          {
            "fvRsCons": {
              "attributes": {
                "tnVzBrCPName":  "MgmtServices_Ct"
              }
            }
          },
          {
            "fvRsCons": {
              "attributes": {
                "tnVzBrCPName":  "AppServices_Ct"
              }
            }
          }
        ]
      }
    }
  ]
}
Conclusion
icurl is a useful tool for exploring the Cisco ACI APIC API, and many types of useful information can be extracted. Hopefully this short series of lessons will help you master techniques that will allow you to do much more with the API.
RedNectar
