
“Do you have the latest version?”
“Well, mine’s version 2.0. What’s yours?”
“Mine’s version 2.0 too”
“Well, why are they different?”
We’ve all had that conversation or similar right?
So why not implement a way of improving version numbering in Word documents? I’ll show you several tips to make versioning better, even completely automated if you want.
Hello! MS has a built in field that records the revision number.
Yes, MS Word does indeed have a built in field (called REVNUM) that gets updated every time the document is saved.
So one solution to the problem above is to include REVNUM field on the front page of each document. If you always create documents from standard templates (you should) then the field can be added to the template. So your front page may end up looking like this:

And I’ll use that field later too, but REVNUM just doesn’t work as well as it should – like when MS Word has locked up or you’ve had to use auto-recovery, or you’ve had to use Save As… for some other reason. The REVNUM number goes back to 2 in these cases. And it doesn’t convey the same meaning as version – where a particular version of a document may go through several revisions and saves.
What I’m suggesting is a more manual method which has the version number recorded in one location but displayed on multiple pages. The trick is to automate the process so the same version number is consistent. This involves two stages
Stage 1: Create a document revision table
Stage 2: Create a field that displays the largest version number in the revision table
Here’s how.
TIP: |
You are going to find following this tutorial much easier if you configure MS Word to Show Bookmarks. [Must be done with a document opened] Windows: File > Options > Advanced > Show Document Content > [x] Show Bookmarks macOS: Word > Preferences > View > Show in Document > [x] Bookmarks |
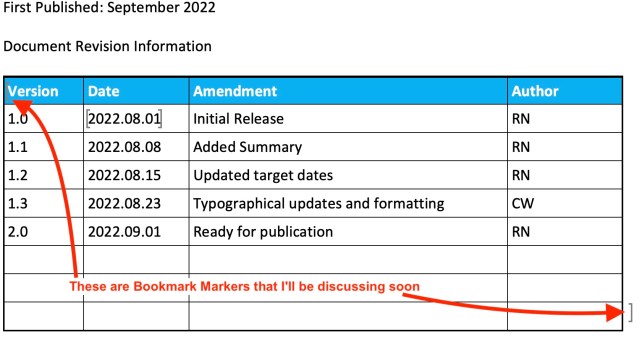
Stage 1: Create a document revision table
It might looks something like this:
Now, if everyone is diligent at filling in the table, that might be all you need. But I suggest should do a bit more than just that.
Stage 2: Display the version and revision number on the front page
The trick here is to extract the largest Version number from the table mentioned above. And this is where those Bookmark markers come in.
Step 1: Create a bookmark for the table
Select your the whole table in word and select Insert > Bookmark (or hit Ctrl|Cmd+Shift+F5) and give the bookmark a name such as DocRevisionInfoTable

Once you’ve added the bookmark, you’ll see those markers appear at the beginning and end of the table (if you’ve turned on the option to Show Bookmarks)
The challenge now is to somehow extract the latest version number and display it somewhere else – like the front page of your document.
Step 2: Add a field to the front page to display largest Version Number
Now that you have the Document Revision Table in a bookmark, you can use a calculation to extract the largest number in the first column of the table. It works like this:
Get your cursor where you want the version number to appear – I usually place it after the word Version that I’ve typed in the footer area of the front page
Navigate to Insert > Field and enter the following text
=MAX(DocRevisionInfoTable A:A) \#"#.0#"
and click OK

And there you have it! Every time you add a new version number to the table, the field on the front page will be updated when you print the file or update the fields.
Step 3: Add Revision Number and Print Date
The above method is not foolproof – because the table only gets updated when someone manually adds a new version number, so I suggest that it’s also a good idea to add some more fields to the front page as well, so your front page looks something like the one above. Specifically I’ve added PRINTDATE and REVNUM to the front page to make it look like the one above – or, if you show field codes – looks like:
For my purposes, the month is close enough for the PrintDate – but you could change the format to include the date and time if you wanted. For instance, if you change the PRINTDATE format string to
"MMMM yyyy dd, hh:mm:ss"
The resulting page will end up with a footer looking like:

In my case, PRINTDATE works well, because I print documents to .pdf before I distribute them. But if you distribute MS Word documents in (ugh) .docx format you might prefer to used the LastSavedTime document property instead of PRINTDATE. It works in much the same way – and would look like this:

Of course, if anyone has re-saved, or done a Save As… then your versioning has gone out the window – hence my disgust at the thought of distributing documents in a form where they can easily changed, perhaps inadvertently.
My advice is to stick with the PRINTDATE method and only distribute documents via .pdf
And that’s about as automated as you can get! Hopefully no-more arguments
RedNectar
