
I did some work using external hypervisors recently, and came to realise that I did not understand what the GNS3 Hypervisor Manager’s role was. So I explored a little, and this is what I found
- The Hypervisor Manager manages images that are bound to the IP address specified under GNS3 Preferences, Dynamips settings, [Hypervisor Manager] tab in the IP/host binding field, according to the rules that are specified under that tab.
- External images are not managed by these rules.
- You can’t mix IOS images that are managed by the Hypervisor Manager with IOS images that are bound to External Hypervisors in the same topology – to see why, read on
- If you want to link local IOS instances with External IOS instances you will have to set up your local IP address as an External Hypervisor
Here are the details
The Hypervisor Manager gets mentioned in two places in GNS3
1. In GNS3 Preferences, Dynamips settings, has a [Hypervisor Manager] tab – where there is also an option to:
[x] Use Hypervisor Manager when importing
and
2. under
Edit | IOS images and hypervisors, under the IOS Images tab where there is an option to
[x]Use the hypervisor manager
Now the Hypervisor Manager is the bit of software in GNS3 that spawns local dynamips processes as needed – based on the settings under GNS3 Preferences, Dynamips settings, [Hypervisor Manager] tab. If the [x] Use Hypervisor Manager when importing option is checked, then what will happen is that the Hypervisor Manager will spawn a new instance of dynamips every time either (a) an new IOS image is used in your topology (providing the [x] Allocate a new hypervisor per IOS image is set, or you have used enough of the same router image to pass the Memory limit per hypervisor.)

The first instance of a dynamips hypervisor gets spawned the moment you add your first IOS router to your topology – that’s why it sometimes takes a little while for the first router image to “drop” onto the workspace. It will listen for messages on the Base port number specified under GNS3 Preferences, Dynamips settings, [Dynamips] tab, and when that instance of dynamips needs to create a UDP tunnel, it will do so using the base UDP port shown on the same page.
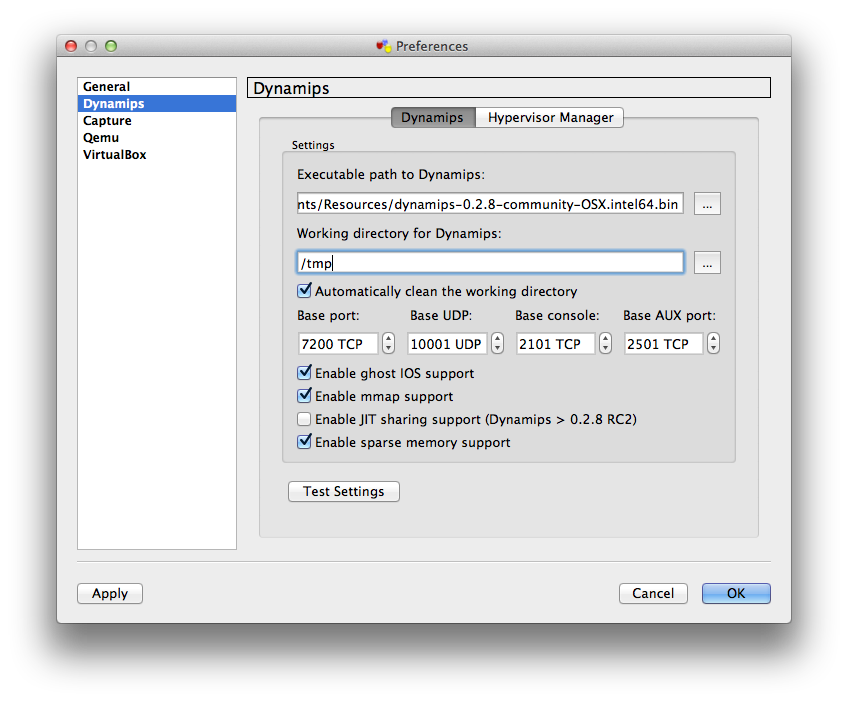
When a new hypervisor instance is spawned, it will use the next available port number after the Base port, and when that instance of dynamips needs to create a UDP tunnel, it won’t be able to use the same UDP port number as the original hypervisor, so it begins using UDP ports 100 greater than the base UDP port (or greater by whatever number is specified in the UDP incrementation field under the [Hypervisor Manager] tab).
A good way to see this in action is to issue a debug 1 command in the GNS3 Management Console window, then add a couple of routers (of different types, or until the Memory limit per hypervisor is reached) and watch the output. You will see new hypervisors being spawned by the Hypervisor Manager as needed.
BTW – if you DIDN’T have the [x] Use Hypervisor Manager when importing option in GNS3 Preferences, Dynamips settings, [Hypervisor Manager] tab – then you would not see multiple hypervisors being spawned, all IOS images would be under the control of a single Dynamips hypervisor running on port 7200.The other thing you can see in the GNS3 Management Console window is the UDP port allocation. Just link any two routers in your topology and see which UPD ports get allocated.
12:14:27: DEBUG (1): sending to dynamips at 127.0.0.1:7200 -> nio create_udp nio_udp0 10001 127.0.0.1 10002
12:14:27: DEBUG (1): returned -> ["100-NIO 'nio_udp0' created"]
12:14:27: DEBUG (1): sending to dynamips at 127.0.0.1:7200 -> nio create_udp nio_udp1 10002 127.0.0.1 10001
12:14:27: DEBUG (1): returned -> ["100-NIO 'nio_udp1' created"]
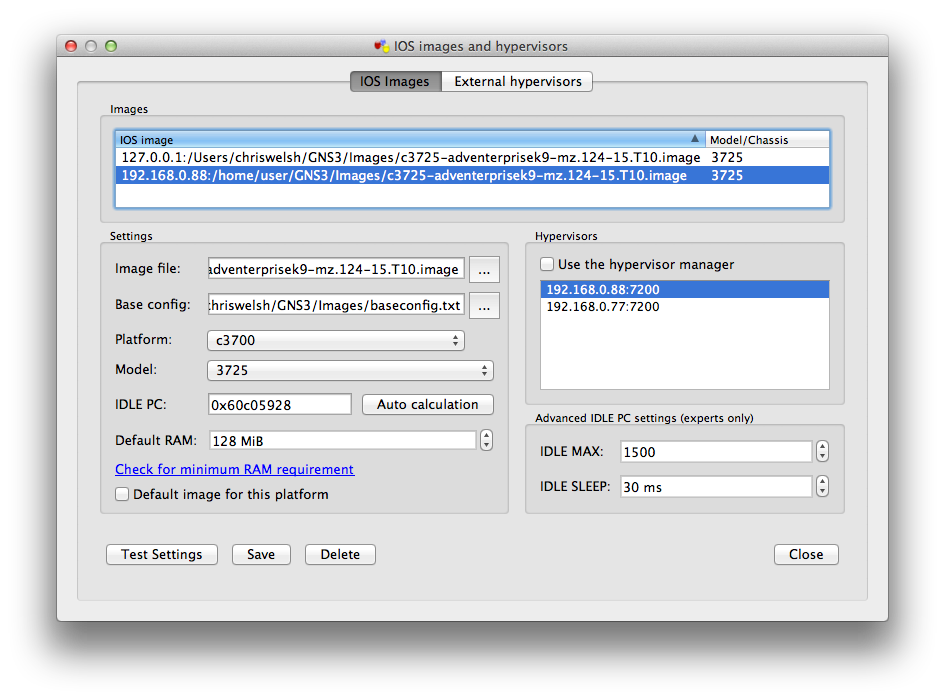
Now the Hypervisor Manager can only spawn Dynamips instances on the computer you are running GNS3 on. But GNS3 has the ability to orchestrate and manage connections between hypervisors on multiple computers. This is where the Edit | IOS images and hypervisors, [External hypervisors] tab comes in. Here you can tell GNS3 the locations where other copies of Dynamips are running – sitting ready to be told what IOS images to load and run. And under the Edit | IOS images and hypervisors, [IOS Images] tab you can specify what images exist on those External Hypervisors – but when you do, you will have to uncheck the [ ] Use the hypervisor manager option and select the External hypervisor(s) you wish use this image with. [Be careful – it is easy to select MULTIPLE External Hypervisors, and you don’t want to do that just yet.] GNS3 will now include these images in the list of available images when you drag a router of that kind onto your Workspace – (but only if you do NOT have a default image for the particular IOS you want to use – so make sure that you uncheck the [ ] Default image for this platform option for all instances of that router model IOS you have.)
There is one more thing you have to be aware of. If you want to create a connection between an image running on one of these External Hypervisors, and an image running on your local computer, the Hypervisor Manager will need to set up one of those UDP tunnels you saw earlier between the IP address of the External Hypervisor, and your local hypervisor. The trick is to realise that the Hypervisor Manager has to send a message to the External Hypervisor saying “Send UDP packets to xxxx address.”
And just what address is xxxx? Well, it is the address that is associated with your local hypervisor of course. You can see the address when you look at the list of IOS Images displayed in the Edit | IOS images and hypervisors, [IOS Images] tab – as shown above.
Notice that the local images are bound to the IP address of 127.0.0.1. Now if the Hypervisor Manager uses this address as the xxxx in the message like:
create_udp nio_udp0 10001 127.0.0.1 10002
to the External Hypervisor, it is NOT going to work – the External Hypervisor will see 127.0.0.1 as its own loopback address and will NOT be able to determine the correct address to send UDP packets to.
Moral of this part of the story: You can’t have a topology that mixes images that are bound to 127.0.0.1 with images that are bound to an external address. The external devices just won’t be able to interpret your 127.0.0.1 address correctly.
So the final piece of this logic is that IF you want to connect remote devices to local devices, you will have to somehow get a local IOS image bound to the IP address of your outgoing interface BEFORE you add the local images to the topology.
This can be achieved in two ways.
One way is to change this IP/host binding the local hypervisor uses. This can be done under the GNS3 Preferences, Dynamips settings, [Hypervisor Manager] tab. You could set the IP/host binding address here to the IP address of your outgoing interface, then add another copy of your local IOS image back in the Edit | IOS images and hypervisors, [IOS Images] tab. This is fine if you have a static IP address and never move your computer. But if you have a laptop or use DHCP, then this is not a good idea, because once you change this address, any new image you add will be bound to this IP address.
The better way to achieve exactly the same result is to set up your local IP address as an External Hypervisor in the Edit | IOS images and hypervisors, [External hypervisors] tab. Simply add your own local IP address as if it were an external hypervisor. In the illustration below, my local IP is 192.168.0.100 – the hypervisors on 192.168.0.77 and 192.168.0.88 are external, but GNS3 is not going to know the difference.

In fact, you can see that I have added two hypervisors on my local address, one on port 7200, the other on port 7201. Now when I go back to the Edit | IOS images and hypervisors, [IOS Images] tab, I can add say a 3725 image to one of these addresses, and a 7200 image to the other.
So in summary, you should now be able to see that:
- The Hypervisor Manager manages images that are bound to the IP address specified under GNS3 Preferences, Dynamips settings, [Hypervisor Manager] tab in the IP/host binding field, according to the rules that are specified under that tab.
- External images are not managed by these rules.
- You can’t mix IOS images that are managed by the Hypervisor Manager with IOS images that are bound to External Hypervisors in the same topology.
- If you want to link local IOS instances with External IOS instances you will have to set up your local IP address as an External Hypervisor
If you want to explore further, you should experiment with selecting multiple External Hypervisors and linking them to a single image, then see what happens.
Happy hunting
RedNectar
This is because before I start using images linked to these hypervisors, I will need to add images
the Hypervisor Manager will no longer use the rules about Memory usage limit per hypervisor and [x] Allocate a new image per hypervisor

Great post… I also learned about something called VIRL from Cisco.. Found it fantastic to watch but dunno when the download would be available… http://www.ebrahma.com/2013/07/cisco-virl-virtual-internet-routing-lab/
this is the link to VIRL
Thanks. I’m anxious to see just how much computing power it requires.
Pingback: Look at GNS3 – New Version « Cisco Skills