
If you are new to GNS3, you may not realise what a difference your choice of Terminal Application can make to your productivity. If you then use the same terminal application when you are at the coalface configuring routers, you may find some features invaluable.
In this article, I’ll tell you my favourite features for a terminal application to use with GNS3, then see how each of the terminal applications supported natively in GNS3 measure up to these features for Linux, OS X and Windows, and summarise all the applications in a comparison table in my conclusion.
As it turns out, there is only one application that meets all of my criteria, and it is free!
GNS3 TIP: If you want to change your Terminal Settings in GNS3, it is a four step process:
|
My Favourite Features
For me, there are seven features that I like to see in a GNS3 terminal application, especially when working more than a few routers. Note that I have only considered features that are relevant to GNS3 use – there may be other great features that are useful when using serial console connections or for using the many and varies features of ssh that I have not considered. For each feature listed below, I have placed a number in parentheses which represent the points I award each feature if present.
- Broadcast input. If I have ten sessions going, I want to be able to enter a command like show ip route into all ten sessions at once – this can be invaluable by providing a simultaneous snapshot of the state of all these routers at a given time – far better than typing the same command ten times over, once to each session – by which time you have lost any sense of a simultaneous view from all routers. (2) And I want to be still able to use the all important ? and <Tab> keys while typing the command, in case I’ve forgotten the syntax (2).
- Multiple tabs. I hate having ten or twelve copies of the same application open if I have that many terminal sessions running at one. And I often do. (3)
- Tiled windows/panes. Sometimes I like to have more than one window pane open in a particular tab, especially if I am comparing the configuration of two routers. (2)
- Transparency. It can be very helpful to have your session sitting in a semi-transparent window with your network diagram or GNS3 topology visible behind your terminal console session. (2)
- Unlimited Scrollback. (Or at least very large) I hate it when I open a terminal application and start scrolling back to see what has happened earlier, only to find that the scrollback buffer is only a few hundred lines. (1)
- Search. With a large scrollback buffer full of information, I need to be able to perform a search of this information at the press of a hotkey. (1)
- Single-click copy-and-paste. I like to be able to highlight a section of text in the terminal and know that it is copied, then to be able to paste it with a single right-click or middle-click. (1)
But finding an application with all of these features is not as easy as you might think. Here is a run down of all the Terminal Applications that are supported natively from within GNS3 grouped by operating system.
Linux Terminal Applications
GNS3 supports six Linux Terminal Applications, but Mate Terminal has exactly the same features as Gnome terminal, so I’ll deal with them together. The default application for Linux when GNS3 is installed is xterm, so I’ll deal with it first. The others are in alphabetical order.
xterm
xterm is about as un-exciting as a client can get – and Linux Mint doesn’t even bother including it in the default install. It does support it’s own sudden-death single-click copy-and-paste where middle-click will paste the highlighted text, so it gets a point.
Score 1/14
Gnome-Terminal/MATE-Terminal
Essentially the same application, both Gnome-Terminal and MATE-Terminal can be configured as a replacement for xterm. Both have slightly better customisation features than xterm, but although multiple tabs are supported, it doesn’t allow the launching of multiple tabs from GNS3 – I’ve wasted several hours trying! The search feature is easy to use, and the scrollback can be configured as unlimited, although the default is just 512 lines. Transparency is also supported. You will find Gnome-Terminal already installed on Debian/Ubuntu systems using the Gnome desktop, and MATE-Terminal pre-installed on Linux Mint running on the MATE desktop.
Copy and paste is achieved using the xterm style middle-button single-click copy-and-paste.

Gnome terminal supports transparency, but not multiple tabs in a way that GNS3 can use them.
Score: 5/14
Konsole
Konsole scores well – it supports the ability to send keyboard input (one character at a time) to selected tabs, but is a but fiddly to set up – two mouse clicks at least – more if you actually want to select which tabs are to receive the input. It also supports multiple tabs as well as a feature called split-view, which gives it multiple panes. Transparency works as well as unlimited scrollback, single-click copy-and-paste, and the search function is a brilliant live search that highlights all occurrences of the search term as you type.
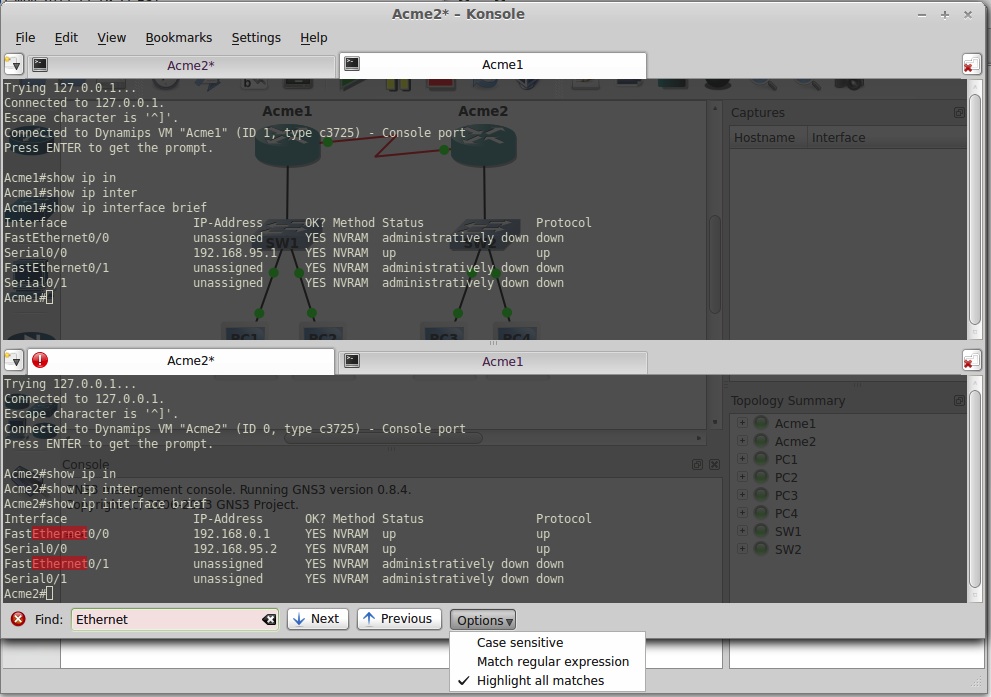
Konsole showing split screens and transparency – notice the console session is transparent, but the menus are still visible. The ! in the red circle at the top of Acme2 console indicates that all commands typed into this console are duplicated on all other tabs. The live search options are also shown.
In my opinion, Konsole is the best of all the Linux based terminals. The biggest drawback of Konsole is the fact that it is a KDE based application, rather than a Gnome based application, so if you are using a Gnome desktop environment the Konsole install is a hefty download and runs several more background processes than it would on a KDE environment.
Score: 13/14 – I only awarded 1/2 for Broadcast input because it is so difficult to turn on.
PuTTY
The Linux install of PuTTY gives one window per device, similar to the default xterm console application. It must be installed before it can be summoned by GNS3, but PuTTY is easily installed on Ubuntu or Linux Mint from the Software Center/Manager.
The main trick to getting the most out of PuTTY is to know that you can press <Ctrl>+Right-Click to bring up a menu where you can choose Change Settings to bring up the PuTTY Reconfiguration dialogue. Because it is so similar to the Windows version, it is very popular with folk who have to work across Linux and Windows platforms.
| Tip: The key to understanding how to save settings in PuTTY (in Linux or Windows) is to remember that after you have fine-tuned your settings, you must return to the PuTTY Reconfiguration dialogue, and with the Session category selected, click on the Default Settings in the Saved Sessions list, and click Save. |
Luckily, if you start PuTTY with the correct parameters, you don’t need to configure it. And GNS3 has a suggested start command complete with suitable parameters. But you won’t get many of my favourite features in PuTTY – in fact the only items that score are the unlimited scrollback and single-click copy-and-paste which leaves it with a paltry score of 2/14 which seems a bit mean for such a rock-solid reliable application.
Score: 2/14
Secure CRT
SecureCRT is a commercial program and the only application supported on all three OS flavours, but if you are serious about study you may consider forking out the reasonable license price. SecureCRT can be downloaded for a trial before you purchase from http://www.vandyke.com/products/securecrt/.
SecureCRT features a multi-session tabbed interface with extensive session management and customisation features. Customisation options include toolbars, menus, keymaps, button bar, and login scripts, as well as fonts, cursors, and colour schemes. Since version 7.1, tiled windows are also supported.
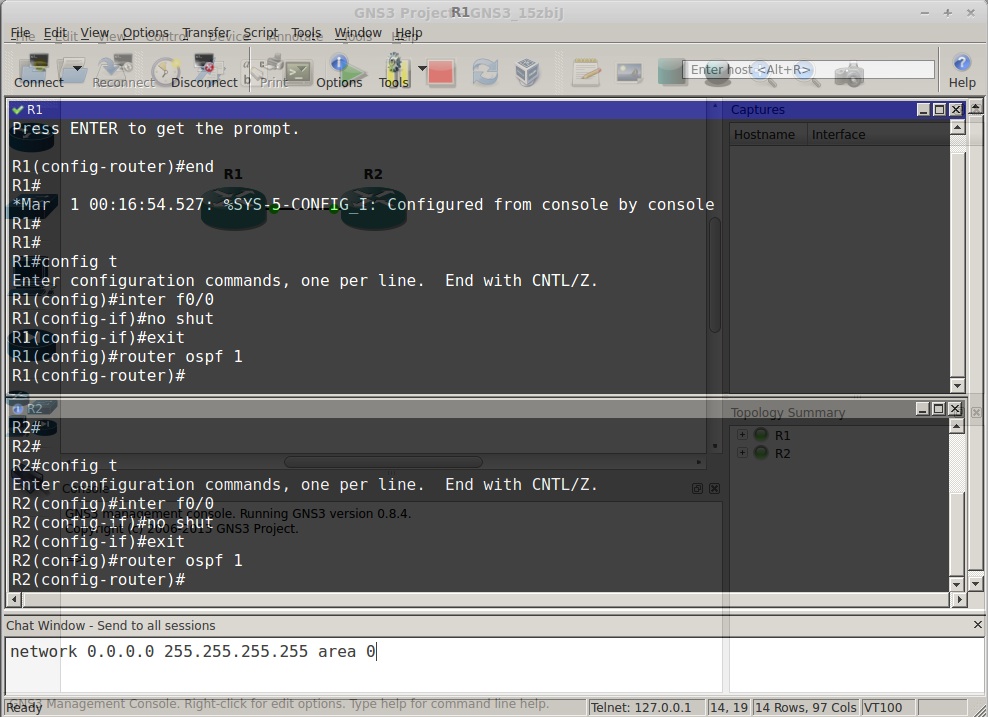
SecureCRT has a feature called Send chat, which allows you to send the same command to multiple routers at once – although you can’t use it to send individual characters like <Ctrl>+z or <Space> – and it is fiddly to set up (you have to know (a) to open the chat window and (b) that you need to right-click in the chat window to turn on the option to Send chat to all sessions)
SecureCRT showing transparency – note how the title bar is also transparent making it hard to see (compared to Konsole above). The Chat window can be used to configure multiple routers at once – in this case the router consoles are arranged in window panes rather than tabs.
Transparency is supported, but turning on transparency makes the whole SecureCRT window transparent – menus and toolbars as well as the actual console sessions, so I find it a little less useful than the same feature in Konsole or Gnome terminal – so I’ve only awarded 1/2 for transparency. 128000 lines of scrollback is large enough to earn a point, find works, and single-click copy-and-paste can be configured, giving it a 2nd place ranking behind Konsole for Linux Terminal Applications.
Score: 11/14
OS X (Macintosh) Terminal Applications
Only three applications are supported natively for OS X, then default being the native OS X Terminal application, so I’ll deal with it first.
Terminal
The native OS X Terminal application is basic, and supports transparency, unlimited scrollback, search, and single-click copy and paste. The application supports tabs too, but not in a way that can be made use of by GNS3 (if someone is clever enough to write an applescript to open multiple tabs, please let us know on the GNS3 Forum).
Score: 5/14
iTerm2
By far the most versatile and exciting of all of the console applications supported natively by GNS3, this free program can be downloaded from http://www.iterm2.com. iTerm2 was so named because the original developers of iTerm abandoned the project – but to set up iTerm2 you have to select iTerm as the terminal application in GNS3. Unfortunately, it only works on OS X, so if you don’t have a Macintosh, you’ll have to be content with something else. iTerm2 is actively being developed and new features are appearing regularly. Among my favourite features include the ability to turn transparency on and off with a hotkey, and the versatility to be able to use split panes and tabs, but the killer feature for me is not just the ability to send input to all tabs/panes simultaneously (character by character rather than line by line), but the fact that while sending input to multiple terminals simultaneously, the screen background changes slightly to remind you that you could do some real damage while entering commands to multiple consoles!
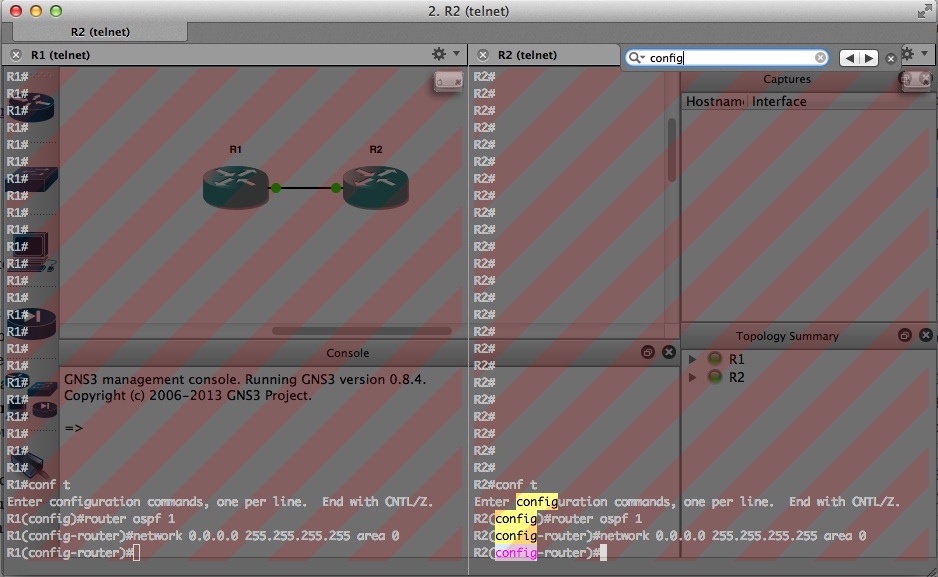
iTerm2 allows both a tabbed and a tiled pane interface. The oblique lines indicate that all keystrokes are being sent to all sessions. In the right-hand pane, there has been a search initiated for the word config – hence all occurrences of the word are highlighted. Transparency can be turned on and off in a single keystroke, and leaves the window heading and tab headings visible.
The search feature is function is a live search that highlights all occurrences of the search term as you type, similar to Konsole, and it supports and single-click copy-and-paste as well as unlimited scrollback to make it the only application to get a perfect score.
Score 14/14
Secure CRT
SecureCRT on OS X essentially supports the same features as on Linux and Windows, which makes it a great application if you wish to use the same application across multiple operating systems. The OS X version has the same features and faults as the Linux version, so gets the same score.
Score: 11/14
Windows Terminal Applications
When you install GNS3 on Windows, you will get the option of installing PuTTY and SuperPutty as part of the “all-in-one” install. By default (for the v0.8.4 release) a GNS3 customised version of PuTTY will be installed, but if you want SuperPutty you have to make sure you select the SupperPutty option during GNS3 installation. If you do choose to install SuperPutty, it will become your default terminal application, otherwise, PuTTY will be your default.
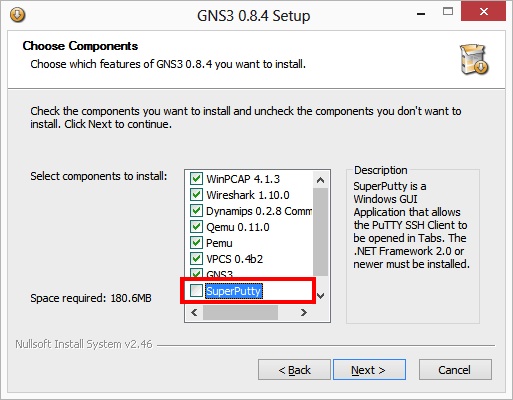
During Windows install of GNS3, make sure you check the SuperPutty option – it is not selected by default.
There are other emulators you can select from, here’s how they score. I’ll deal with the default PuTTY and SuperPutty first, then the others in turn.
PuTTY
Old, tried, true and free, PuTTY is an old favourite amongst networking professionals. But tricky to configure. (See my earlier tips).
The copy of Windows PuTTY that comes with GNS3 is especially compiled for GNS3 with some extra options. You can see these options if you click on the PuTTY icon and select About PuTTY.
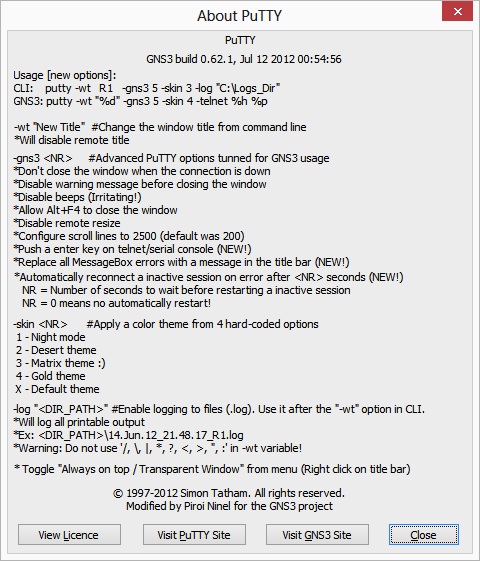
GNS3 version of PuTTY has extra options like -skin and transparent windows.
One of the GNS3 extensions gives PuTTY the ability to support transparent windows, so this version of PuTTY gets one more point than the Linux version. which has no way to broadcast input, no tabs, no tiling of window panes, no transparency, and no search function.
Score: 3/14
SuperPutty
The first run of SuperPutty will have you download and install the .NET3.5 framework (if it is not already installed on your system), so getting started with SuperPutty can take a while. And don’t forget, you have to have remembered to check the SupperPutty box during your original GNS3 install if you want to use SupperPutty.
SuperPutty is actually a Windows GUI application that allows the PuTTY application to be opened in tabs, and has been know to struggle to keep up with multiple tabs. Given that it is a “wrapper” for another application, this is hardly surprising. The “wrapper” paradigm also means that some other things – particularly changing settings – don’t work as smoothly as an integrated application.
SuperPutty greatest feature is that it allows you to move windows around, so you can have windows side by side if you wish. It also has a great Command toolbar, which allows you to send the same command to multiple routers at once – although you can’t use it to send individual characters like <Ctrl>+z or <Space>. And it supports all the other features that come with the GNS3 customised version of PuTTY, although configuring transparency must be done through the SuperPutty preferences. Configuring transparency through the embedded PuTTY sessions has no effect. Like SecureCRT, the whole window becomes transparent – menus and toolbars as well as the actual console sessions, so I find it a little less useful than the same feature in other applications like iTerm2 (OS X) or Konsole (Linux) – so I will only award 1/2 for transparency.
Moving windows around is easy when you know how, but the interface offers no help. You can click on a tab heading, and move the window. If you are not careful, you will move the tab to a brand new window (which is nice if that’s what you want). If you wanted to change the arrangement above so that R1 and R2 were side by side, you could click on the R2 tab and move it over the R1 pane, and a screen-snapper tool would come into view. The secret is that you must move your pointer over the window indicator before your window movement will snap into place – as shown below.
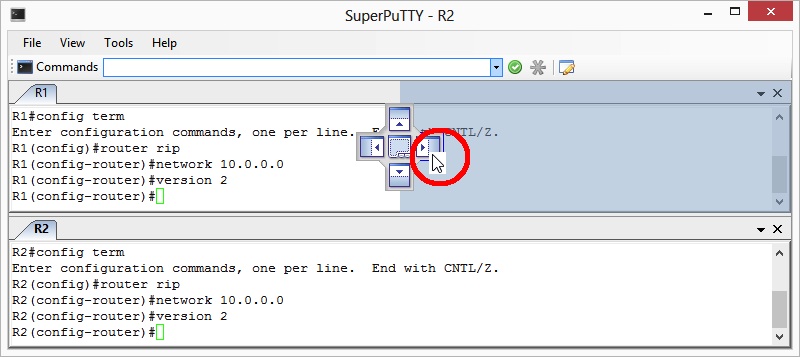
SuperPutty – showing the “Snap” action for moving tiled windows around. Note the Command toolbar where commands can be sent to all window panes/tabs.
Score: 10/14
SecureCRT
SecureCRT on Windows essentially supports the same features as on Linux and OS X, which makes it a great application if you wish to use the same application across multiple operating systems. The Windows version has the same features and faults as the Linux version, so gets the same score.
Score: 11/14
TeraTerm
There are a few variations of TeraTerm – one known as TeraTerm Pro is free, but not open source. The latest open source version of TeraTerm can be downloaded from http://en.sourceforge.jp/projects/ttssh2/ and TeraTerm Pro from http://www.ayera.com/teraterm/. For use with GNS3, you will find the most important difference between the versions is that the open source version has the option to support a tabbed interface, and is still being developed. TeraTermPro files are dated 2002. From a GNS3 perspective, both are configured by choosing the TeraTerm option from the dropdown – which means you can’t have both versions installed simultaneously. I’ll deal with each version separately.
[Note: With GNS3 0.8.4, there is a bug in the setup for the TeraTerm application. See this post on the GNS3 forum to see how to fix it]
TeraTerm (open source)
The open source TeraTerm is downloaded as a regular install file – during setup make sure the Collector option is checked, otherwise you won’t get a tabbed interface. You also have to make sure you choose the option to run Collector at the end of the install to get tabs.

Make sure you select Collector when you install TeraTerm if you want to use tabs.
The tabs are not integrated into teraterm – like SuperPutty, then Collector program acts as an external program to “collect” multiple teraterm sessions. By default, the tabs are placed UNDER the windows, but this can be changed to the top, left or right side. As you can see – moving them to the top does not work quite as well as SuperPutty. I only awarded 2/3 for the tabbed interface. There was an option to tile windows side-by-side, but it didn’t work with Collector running.
TeraTerm showing the rather crude tabs.
Probably the greatest feature is the Broadcast command option – you can send characters one character at a time (realtime mode) or type a whole command before submitting it – and you can select which sessions you send the command to.

TeraTerm’s Broadcast input is by far its best feature.
Although well hidden (click Setup | Additional settings … | [Visual] tab and change the Alpha blend value) teraterm does support transparency, but turning on transparency makes the whole TeraTerm window transparent – menus and toolbars as well as the actual console sessions (although at least NOT the Collector tabs), so I’ve only awarded 1/2 for transparency. I also had problems with not being able to turn the transparency off as well – so the whole idea is very messy.
Single-click copy-and-paste is standard, and the scrollback buffer is can give me 106100 lines so I awarded the point for unlimited scrollback, but there is no search facility.
Score: 9/14
TeraTerm Pro
Installing TeraTerm Pro is much more difficult than other applications as it comes as a .zip file – you will have to unzip it yourself, and to make it work with GNS3, put all the files in a new directory called teraterm under C:\Program Files (x86)\ (or if you are working with a 32 bit version of Windows, C:\Program Files\).
Although a solid ssh and serial console client, for GNS3 use, it really has no advanced features. 10000 lines of scrollback and single-click cut-and-paste are the only points it scores.
Score: 2/14
Windows Telnet Client
If you wish to use the native Windows telnet client, then you will have to actually enable it before you can use it.
| Tip: To enable Windows Telnet Client in Windows 7 or 8, open up a command prompt (press <ÿ+r>, type cmd, press <Enter>) and then issue the command: pkgmgr /iu:”TelnetClient”. Wait a couple of minutes before testing. |
Once enabled, you will end up with one window open for every router you configure in your topology. Since you can configure the Windows command terminal to do single-right-click-copy and single-right-click-paste, I’ll give it the point for single-click copy-and-paste, and similarly a point for unlimited scrollback, although it is only 9999 lines.
Score: 2/14
Conclusion
As you can see, there is only one application that really stands out. It is iTerm2, and runs on Macintosh OS X. For Macintosh users, if you haven’t installed iTerm2 yet, do yourself a favour and download it from iterm2.com
For Windows, although SuperPutty and TeraTerm with Collector (the open source version) both score well, they are both applications that provide wrappers around other applications – and they lack the polish of SecureCRT. So if you are a Windows user, do yourself a favour and buy a copy of SecureCRT. But if you can’t afford it, SuperPutty‘s excellent window tiling mechanism puts it a little ahead of TeraTerm.
In the Linux world, Konsole is the best, but if you have a licence for SecureCRT, you might prefer to use it.
I’ve summarised all the features in a handy comparison table below for a more succinct view of all the applications.
| App [Score] |
OS | B’cast input | Multi-tab | Tiled panes | Trans-parency | Scroll Back | Search | 1-click C/P |
| xterm [1] | | 1 | ||||||
| Gnome/ MATE Terminal [5] |
| * | 2 | 1 | 1 | 1 | ||
| Konsole [13] |
| 1+2 | 3 | 2 | 2 | 1 | 1 | 1 |
| PuTTY (Linux) [2] |
| 1 | 1 | |||||
| SecureCRT [11] |
ÿ | 2 | 3 | 2 | 1 | 1 | 1 | 1 |
| OS X Terminal [5] |
| * | 2 | 1 | 1 | 1 | ||
| iTerm2 [14] |
| 2+2 | 3 | 2 | 2 | 1 | 1 | 1 |
| PuTTY (GNS3) [3] ** |
ÿ | 1 | 1 | 1 | ||||
| SuperPutty [10] |
ÿ | 2 | 3 | 2 | 1 | 1 | 1 | |
| TeraTerm [9] |
ÿ | 2+2 | 2 | 1 | 1 | 1 | ||
| TeraTerm Pro [2] |
ÿ | 1 | 1 | |||||
| Telnet Client [2] |
ÿ | 1 | 1 |
Notes:
Broadcast Input scores get a +2 if character-by-characrter input is supported – very handy for entering single character commands like ? or <Ctrl>+c
Transparency scored only 1 if the transparency included the Menus and Toolbars
Scrollback scored a point if it was possible to configure 9999 or more lines of scrollback
* Gnome/MATE Terminal and OS X Terminal support tabs, but not in a way that GNS3 can use.
** GNS3 has it’s own compiled version of PuTTY for Windows that supports Transparency as well as other features.
