I had a problem. The ESXi server I was supplied with had limited disk space, and I had to create 10 clone VMs from a master VM of around 40GB to run a class. Creating multiple copies of the master would have more than exhausted the disk space I had.
So instead, I created a single snapshot of the master, then took 10 copies of the original .vmx file and the much smaller snapshot delta file, and changed each of the 10 copied .vmx files so that the scsi0:0.fileName attribute pointed to the original master file, (changed a couple of other attributes too) and edited the delta snapshot file so its path to its parent file also pointed to the original master file.
After creating my set of linked clones, the total additional space required for 10 linked clones was less than 11GB, yet each clone was a fully functioning copy of the original 40GB parent. Total space saved, approximately 390GB!
Now to be honest, I didn’t do all that by hand. I used a script to do it for me, and here is where I stood on the shoulders of giants. The process would have been impossible without the help of:
- Ludovic Rivallain’s post called Play with VM snapshots and linked-clones with ESXi command line tools
- Peter Den Hartog who wrote the original script file I used to begin with, along with oliverblock who updated it.
- Alessandro Pilotti, who has published a a stack of mind-bending string manipulation scripts on this github page
- VMware’s great knowledge base articles, including
If you’d like to see how I did this, read on. I’ll cover the following:
- The Background Theory
- The Process in Detail
- Task #1: Prepare your Directory Structure
- Task #2: Prepare your “Golden Master”
- Task #3: Create the
clone.shscript - Task #4: Run the
clone.shscript - Task #5: Check results
- Maintenance and a Warning
- Appendix #1: The
clone.shscript - Appendix #2: A
RemoveClones.shscript, just in case… - Appendix #3: Sample output from running the script
But first, a disclaimer.
Disclaimer: |
I am human, I may have made mistakes and omitted safeguards in the scripts described in this article. Make sure you operate ONLY on material that is securely backed up, and be warned that these scripts could inadvertently create or delete hundreds of VMs in a one fell swoop. Use with care. You have been warned. |
The Background Theory
You need to understand a bit about how VMware stores its VMs. If you browse a datastore or navigate to where a VM is stored on an ESXi host in the command line interface (typically cd /vmfs/volumes/data or similar) you should see that a VM consists of several files:
/vmfs/volumes/57<snip>ed/Golden Masters/GNS3WB88-master # ls -lh
total 42210320
-rw-------    1 root     root       40.0G Mar 18 08:37 GNS3WB88-master-flat.vmdk
-rw-------    1 root     root        8.5K Mar 18 08:37 GNS3WB88-master.nvram
-rw-------    1 root     root         502 Mar 18 08:37 GNS3WB88-master.vmdk
-rw-------    1 root     root           0 Mar 18 08:06 GNS3WB88-master.vmsd
-rw-------    1 root     root        3.3K Mar 18 08:06 GNS3WB88-master.vmx
-rw-------    1 root     root        3.3K Mar 18 08:06 GNS3WB88-master.vmxf
-rw-------    1 root     root        8.5K Mar 18 08:37 nvram
Note particularly the .vmdk and .vmx files. The *flat.vmdk file is your disk image and the .vmx file is the descriptor file that tells the hypervisor exactly what is what in relation to your VM, including the location of the virtual disk files that make up your VM, and the snapshot status of your VM. Take a look at the .vmx file, especially the line that shows you where your disk file lives. The command cat *.vmx | grep vmdk should show you:
/vmfs/volumes/57<snip>ed/Golden Masters/GNS3WB88-master # cat *.vmx | grep vmdk
scsi0:0.fileName = "GNS3WB88-master.vmdk"
And if you check the .vmdk file described in the scsi0:0.fileName = section, you will see the reference to the actual disk file image (the “flat” file):
/vmfs/volumes/57<snip>ed/Golden Masters/GNS3WB88-master # cat *master.vmdk | grep vmdk
RW 83886080 VMFS "GNS3WB88-master-flat.vmdk"
| Note: |
If you browse the files using the vSphere file browser, you will not see the separation of the two .vmdk files – the file browser hides the “flat” .vmdk file, and shows the descriptor file as the large file. |
After you create a snapshot of your VM, the structure changes a little:
/vmfs/volumes/57<snip>ed/Golden Masters/GNS3WB88-master # ls -lh
total 42210320
-rw-------    1 root     root      256.1M Mar 19 09:25 GNS3WB88-master-000001-delta.vmdk
-rw-------    1 root     root         333 Mar 19 08:55 GNS3WB88-master-000001.vmdk
-rw-------    1 root     root       31.2K Mar 18 09:32 GNS3WB88-master-Snapshot1.vmsn
-rw-------    1 root     root       40.0G Mar 18 18:38 GNS3WB88-master-flat.vmdk
-rw-------    1 root     root        8.5K Mar 18 06:49 GNS3WB88-master.nvram
-rw-------    1 root     root         525 Mar 18 19:15 GNS3WB88-master.vmdk
-rw-------    1 root     root         476 Mar 18 09:32 GNS3WB88-master.vmsd
-rw-------    1 root     root        3.3K Mar 19 09:25 GNS3WB88-master.vmx
-rw-------    1 root     root        3.3K Mar 18 06:52 GNS3WB88-master.vmxf
-rw-------    1 root     root        8.5K Mar 19 09:25 nvram
-rw-------    1 root     root      164.3K Mar 19 09:25 vmware.log
Note that there is now a *-000001.vmdk file and a *-000001-delta.vmdk file as well as a *-Snapshot1.vmsn file. If you check the *.vmx file again, you will see:
/vmfs/volumes/57<snip>ed/Golden Masters/GNS3WB88-master # cat *master.vmx | grep vmdk
RW 83886080 VMFS "GNS3WB88-master-000001.vmdk"
And if you take a look at that file, you will see the snapshot information:
vmfs/volumes/57<snip>ed/Golden Master/GNS3WB88-master # cat GNS3WB88-master-000001.vmdk
# Disk DescriptorFile
version=1
encoding="UTF-8"
CID=c9801963
parentCID=e0de4476
isNativeSnapshot="no"
createType="vmfsSparse"
parentFileNameHint="GNS3WB88-master.vmdk"
# Extent description
RW 83886080 VMFSSPARSE "GNS3WB88-master-000001-delta.vmdk"

# The Disk Data Base
#DDB

ddb.longContentID = "c7ddda7740d46041620b9dc5c9801963"
Armed with all this detail, you have enough information to create a linked clone. All you need to do is copy the files Snapshot files and descriptor file (leaving the main base .vmdk files) from the Golden Masker image to another directory and edit the .vmx file to point to the parent’s base files! The new clone will store any changes to the original disk image in its own copy of the *-000001-delta.vmdk and keep access int the original *-flat.vmdk image for any static information.
And creating those copies and manipulating the .vmx files is exactly what my script does. Here’s how you use it.
The Process in Detail
In the first task you will ensure your directory structure is compatible with my script, then you will prepare your “Golden Master” image from which you will make the clones. In the third task you will create a script on your ESXi host (by copying and pasting mine). Naturally, the next task is to run the script, and finally you will check your results.
Task #1: Prepare your Directory Structure
Firstly, to run my script in its published format, you need to have the directory structure right. My script expects that your ESXi host will have a directory where you keep the Golden Masters, and each Golden Master will live in a folder that ends with the characters -master. After the script has run, it will create another directory where the clones will reside. In other words, your structure should be something like this:
- /
| - Golden Masters
|   | + FirstVM-master
|   | + SecondVM-master
|   | + ThirdVM-master
|- AnotherVM
|- AndAnotherVM
After you have run the script for say the FirstVM, and SecondVM, the structure will change to:
- /
| - Golden Masters
|   | + FirstVM-master
|   | + SecondVM-master
|   | + ThirdVM-master
|- FirstVM
|   | + FirstVM-#01
|   | + FirstVM-#02
|   | + FirstVM-#03
|   | + FirstVM-#04
|- SecondVM
|   | + SecondVM-#01
|   | + SecondVM-#02
|   | + SecondVM-#03
|   | + SecondVM-#04
|- AnotherVM
|- AndAnotherVM
If necessary, use the Datastore Browser to organise your directory structure, or if you have a different structure, you could of course modify the script to match your structure. To get to the Datastore Browser in ESXi, start with the vSphere Client. In the vSphere Client, select the ESXi host, click the Configuration tab, click Storage in the Hardware section, then right-click on your storage device where you can select Browse Datastore

In the Datastore Browser, you will find all the tools you need to create folders and move VMs – just be aware that after you have moved a VM, it will have to be added to the Inventory again. Which is why you get this warning when you move a VM:

Assuming you now have the VM from which you wish to create your “Golden Master” in a sub-directory off the main data storage, and have registered that VM in the vSphere Client, you are ready to prepare your “Golden Master”.
Task #2: Prepare your “Golden Master”
In the vSphere client, locate the VM that you need to create linked clones for. This will be your “Golden Master” VM.

Remember, to run my script in its published format, your “Golden Master” MUST live in a folder that ends with the characters -master – and if you have recently moved the VM, it will need to be re-registered in vSphere.
So if not already in the correct format, rename (Right Click on the VM: Rename) your VM so that it ends with -master
Next, make sure the VM is powered down, then make sure that this VM has no snapshots already – (Right Click on the VM: Snapshot | Snapshot Manager…)
If there are snapshots, delete all of them to consolidate to the version you want to be the “Golden Master”. You want this VM to be as clean as you can get it.

If you browse the datastore where the file is located (Select VM; click Summary Tab; Resources section; select storage volume; right-click: Browse Datastore… then navigate to your VM’s folder) you should see something similar to this:

Note that the big file is the .vmdk file, and there are no snapshot files.
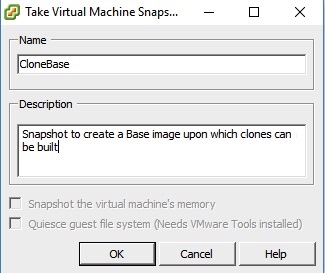
Next, take a snapshot of the VM. (Right-click: Snapshot | Take Snapshot…). I named mine CloneBase, then clicked OK.
And if you browse the datastore again, you should see something like this:

Note the snapshot file has now been created and a small additional -00001.vmdk file has been created. This .vmdk file will be the the log journal that records the changes in the snapshot leaving the original .vmdk file intact and read-only.
The next challenge is to create a script file to turn your snapshot into a set of linked clones.
Task #3: Create the clone.sh script
| Note: |
This task requires you to ssh to your ESXi host. If ssh is NOT enabled on your ESXi host, this step will fail. This kb article explains how to enable ssh if necessary. |
Firstly, select all the code in the Appendix #1 below, and copy it to your PC’s copy buffer.
Next, start a ssh session to your ESXi host from a PC that supports copy and paste, then navigate to the parent directory of your “Golden Master” folder – the folder that ends in -master. This is where the script expects to run from, and will create clones that are linked back to the .vmdk file in your -master folder.
~ # cd /vmfs/volumes/data/Golden\ Masters/
/vmfs/volumes/57<snip>ed/Golden Masters # ls -lh
drwxr-xr-x    1 root     root        1.6K Mar 18 19:15 GNS3WB88-master
drwxr-xr-x    1 root     root        1.1K May 25  2016 TCPIP Linux Server-master
Open vi using the command vi clone.sh
Tip:
|
In vi, start by entering the command set noautoindent – your paste in the next step will look much nicer. Do this by pressing the following sequence, including the colon
:set noautoindent |

Press i to enter insert mode in vi, then paste the contents of the code in the Appendix #1 below.
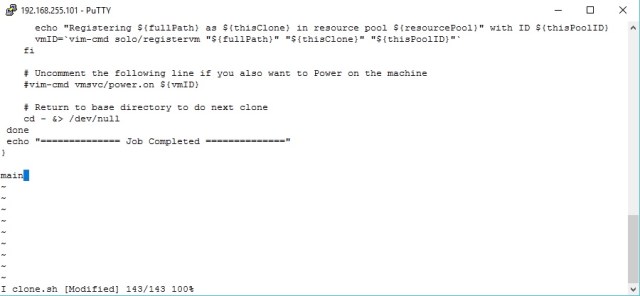
In vi, press <Esc>:wq to write your file and quit.
Make your script executable with the command chmod +x clone.sh
/vmfs/volumes/57<snip>ed/Golden Masters # chmod +x clone.sh
Check that the file is executable by issuing a ls -lh command and looking for the x attribute
/vmfs/volumes/57<snip>ed/Golden Masters # ls -lh clone.sh
-rwxr-xr-x 1 root root 4.0K Mar 17 04:19 clone.sh
Note that the clone.sh file is listed as executable. You are now ready to run the script.
Task #4: Run the clone.sh script
At last you are ready to run your script. If you run the script with no parameters, it will give you a list of expected parameters
/vmfs/volumes/57<snip>ed/Golden Masters # ./clone.sh

clone.sh version 1.2
USAGE: ./clone.sh base_image_folder-master no_of_copies [starting_number] [vnc_base_port]
base_image_folder-master MUST end with the string '-master'
Clones will have names of base_image_folder-#01, base_image_folder-#02 etc
If starting_number is specified, clones will start numbering from that number
Maximum cloneID=9999; maximum number of clones=99
If vnc_base_port is given, first clone will use vnc port vnc_base_port+1, default 5900
So to make twelve linked clones of say the GNS3WB88-master image, enter the command:
./clone.sh GNS3WB88-master 12
You can check through the output to look for any errors – at this stage my error checking is minimal, but I’ve put plenty progress statements in the script to help you work out where there is a problem should one arise. There is a sample output from running the command above in Appendix #3, but it is in the vSphere client where you will want to check your results first.
Task #5: Check results
Once the script has run, you should be able to see your results in vSphere. Note that there is a resource group created to hold your set of linked clones, and the clones are numbered sequentially – you are ready to start powering on the clones – oh by the way, there is a line in the script that you can “uncomment” to automatically power on each clone as it is built.

That’s it – your clones are ready, but there is a little more you need to be careful of, especially if these clones have a limited life and you want to replace them later, so make sure you read the following section on Maintenance.
Maintenance and a Warning
Firstly the warning. You must understand that that you have created linked clones – so each clone depends on the disk image that belongs in the Golden Master, so:
| WARNING: |
Don’t ever delete (as in Delete from Disk) a clone from the vSphere client – if you do, it will delete you master .vmdk and none of the clones past or future nor even your Golden Master will ever work again. Restore your backup if you do. You have been warned. (Don’t ask how I found out, but I’m glad I waited for the backup to complete). |

The corollary from the warning is that should you ever wish to remove a clone, use the Remove from Inventory option rather than Delete from Disk.
And now the boring maintenance tips…
When you run the script for the first time, it creates the structure needed to hold the clones. When you run it a second or subsequent time it will unceremoniously delete any previous linked clone with the same number. This works out ideal if you are say running classes and need a fresh set of clones each time you run the class, but there are a couple of things to note.
Firstly, if you say create 12 clones on the first run, then create only 10 clones on the second run, clones #11 and #12 from the first run will still exist – if you don’t want them to hang around, use the Remove from Inventory option rather than Delete from Disk in vSphere as explained above.
Similarly, if on the first run you created clones numbered 20-29 (using the command ./clone.sh my-master 10 20) and next time you create clones 01-10 from the same master, you will have a resource group with clones 01-10 and 20-29 in it. So be careful.
Deleting clones that you created can be a pain, especially if you created many more than you needed. So I have included a copy of another script I wrote to remove clones – use with caution, but if you need it, you’ll find the script in Appendix #2
Enjoy your cloning!
RedNectar
Appendix #1: The clone.sh script
# Adapted From: https://github.com/oliverbock/esxi-linked-clone/blob/master/clone.sh
# v1.2 2017-03-25 Chris Welsh

version=1.2

readonly noOfArgs=$#
#Remove trailing / of path if it has one
readonly inFolder=${1%/}
if [ "$3" = "" ] ; then
  startingNo="01"
  noOfCopies=$2
  lastCopyNo=$2
else
  startingNo=$3
  noOfCopies=$2
  lastCopyNo=$(( $2 + $3 - 1 ))
fi

if [ "$4" = "" ] ; then
  VNCstartPort=5900
else
  VNCstartPort=$4
fi

usage() {
  echo ""
  echo "clone.sh version $version"
  echo "USAGE: ./clone.sh base_image_folder-master no_of_copies [starting_number] [vnc_base_port]"
  echo "base_image_folder-master MUST end with the string '-master'"
  echo "Clones will have names of base_image_folder-#01, base_image_folder-#02 etc"
  echo "If starting_number is specified, clones will start numbering from that number"
  echo "Maximum cloneID=9999; maximum number of clones=99"
  echo "If vnc_base_port is given, first clone will use vnc port vnc_base_port+1, default 5900"
  echo ""
  }

makeandcopy() {
  if [ ! -d "${outFolder}" ] ; then
    echo "Creating ${outFolder}"
    local escapedOutFolder=$(echo "${outFolder}" | sed -e 's/[\/&]/\\&/g' | sed 's/ /\\ /g')
    mkdir "${outFolder}"
  else
    echo "Removing contents of old "${outFolder}
    ls -lh "${outFolder}"/*
    rm "${outFolder}"/*
  fi
  cp "${inFolder}"/*-000001* "${outFolder}/"
  cp "${inFolder}"/*.vmx "${outFolder}/${thisClone}.vmx"

}

main() {

  if [  ${noOfArgs} -eq 0 ] ; then
    usage
    exit 1
  fi

  if [  ${noOfArgs} -eq 1 ] ; then
    echo ""
    echo "ERROR--Insufficient arguments"
    usage
    exit 1
  fi

  if [ ${noOfCopies} -ge 100 ] ; then
    # Clone copy count arbitarily set to 99 - I don't want anyone to have to accidently create hundreds of clones
    echo ""
    echo "ERROR--Clone copy count exceeds 99"
    usage
    exit 1
  fi

  if [ ${lastCopyNo} -ge 10000 ] ; then
    # Maximum clone copy number arbitarily set to 9999 - could actually be set as high as 59635 before VNC TCP Port numbers exceed 65535
    echo ""
    echo "ERROR--Clone sequence exceeds 9999 (last copy would be ${lastCopyNo})"
    usage
    exit 1
  fi

  echo "${inFolder}" | grep -q "\-master$"
  if [[ $? -ne 0 ]] ; then
    # Input filename in wrong format
    echo ""
    echo "ERROR--input folder MUST end with -master. You entered"
    echo "${inFolder}"
    usage
    exit 1
  fi

  echo "============== Beginning Job =============="
  local fullBasePath=$(readlink -f "${inFolder}")/
  local escapedPath=$(echo "${fullBasePath}" | sed -e 's/[\/&]/\\&/g' | sed 's/ /\\ /g')

  outFolderBase=../${inFolder/-master/\/}
  echo "Output folder BasePath is ${outFolderBase}"
  if [ ! -d "${outFolderBase}" ] ; then
    echo "Creating ${outFolderBase}"
    mkdir "${outFolderBase}"
  fi

  resourcePool=${inFolder/-master/}
  # Thanks to Alessandro Pilotti for putting this on github
  # https://github.com/cloudbase/unattended-setup-scripts/blob/master/esxi/create-esxi-resource-pool.sh

  thisPoolID=`sed -rn 'N; s/\ +<name>'"${resourcePool}"'<\/name>\n\ +<objID>(.+)<\/objID>/\1/p' /etc/vmware/hostd/pools.xml`
  if [ -z "${thisPoolID}" ]; then
    echo "Creating resource pool :${resourcePool}:"
    thisPoolID=`vim-cmd hostsvc/rsrc/create --cpu-min-expandable=true --cpu-shares=normal --mem-min-expandable=true --mem-shares=normal ha-root-pool "${resourcePool}" | sed -rn "s/'vim.ResourcePool:(.+)'/\1/p"`
  fi

#-------------------- Main Loop begins here ---------------#

  for i in $(seq -w ${startingNo} ${lastCopyNo}) ; do

    thisClone=${inFolder/master/#${i}}
    outFolder=${outFolderBase}${inFolder/master/#${i}}
    VNCport=`expr $VNCstartPort + $i`

    echo "=============================================================================="
    echo "Cloning Clone#${i} named ${thisClone} using VNCport=${VNCport} to ${outFolder}"

    makeandcopy

    cd "${outFolder}"/
    echo "================ Processing .vmx file ================"
    echo "Delete Swap File line, will be auto recreated"
    sed -i '/sched.swap.derivedName/d' ./*.vmx
    echo "Change Display Name to ${thisClone}"
    sed -i -e '/^displayName =/ s/= .*"/= "'"${thisClone}"'\"/' ./*.vmx
    echo "Change VNC Port Value to ${VNCport}"
    sed -i -e '/RemoteDisplay.vnc.port =/ s/= .*"/= "'"${VNCport}"'\"/' ./*.vmx
    echo "Change Parent Disk Path"
    sed -i -e '/parentFileNameHint=/ s/="/="'"${escapedPath}"'/' ./*-000001.vmdk

    # Forces generation of new MAC + DHCP
    echo "Forcing change of MAC addresses for up to two NICs"
    sed -i '/ethernet0.generatedAddress/d' ./*.vmx
    sed -i '/ethernet0.addressType/d' ./*.vmx
    sed -i '/ethernet1.generatedAddress/d' ./*.vmx
    sed -i '/ethernet1.addressType/d' ./*.vmx

    # Forces creation of a fresh UUID for the VM.
    echo "Forcing creation of a fresh UUID for the VM."
    sed -i '/uuid.location/d' ./*.vmx
    sed -i '/uuid.bios/d' ./*.vmx
    echo "============== Done processing .vmx file =============="

    # Register the machine so that it appears in vSphere.
    fullPath=`pwd`/${thisClone}.vmx
    #echo "fullPath:"$fullPath"==="
    #echo "fullBasePath:"$fullBasePath"==="
    #echo "{escapedPath}:"${escapedPath}"==="
    local escapedfullpath=$(echo "${fullPath}" | sed -e 's/[\/&]/\\&/g' | sed 's/ /\\ /g')
    #echo "escapedfullpath:"$escapedfullpath"==="
    vmID=`/bin/vim-cmd vmsvc/getallvms | egrep "${thisClone}" | awk '{print $1}'`
    if [ ! -z "${vmID}" ] ; then  #We found the VM was registered, so unregister it first
      echo "VM ${thisClone} already registered, checking which pool"
      echo "Too damned hard to determine which pool, assume if registered, it it the correct pool."
      #if it is not the correct pool; then
          # vim-cmd vmsvc/unregister "${vmID}"
          #echo "thisPoolID:${thisPoolID}==="
      #fi
    else
      echo "Registering ${fullPath} as ${thisClone} in resource pool ${resourcePool}" with ID ${thisPoolID}
      vmID=`vim-cmd solo/registervm "${fullPath}" "${thisClone}" "${thisPoolID}"`
    fi

    # Power on the machine if required - uncomment the following
    #vim-cmd vmsvc/power.on ${vmID}

    # Return to base directory to do next clone
    cd - &> /dev/null
 done
 echo "============== Job Completed =============="
}

main
Appendix #2: A removeClone.sh script, just in case…
Be VERY careful using this! Like the clone.sh script, it needs to be run with the -master directory name as the parameter. I could have tidied this, but I needed it quickly, so simply modified what I had. Useful if you accidentally create a hundred clones you want to remove just as quickly.
# V1.0 2017-03-18 Chris Welsh

readonly noOfArgs=$#
#Remove trailing / of path if it has one
readonly inFolder=${1%/}
if [ "$3" = "" ] ; then
  startingNo="01"
  noOfCopies=$2
  lastCopyNo=$2
else
  startingNo=$3
  noOfCopies=$2
  lastCopyNo=$(( $2 + $3 - 1 ))
fi

usage() {
  echo ""
  echo "USAGE: ./removeClone.sh base_image_folder-master no_of_copies [starting_number]"
  echo "base_image_folder-master MUST end with the string '-master'"
  echo "Clones are assumed to have names of base_image_folder-#01, base_image_folder-#02 etc"
  echo "If starting_number is specified, clones will start numbering from that number"
  echo "Maximum cloneID=9999; maximum number of clones=99"
  }

deleteAndDestroy() {
  local escapedOutFolder=$(echo "${outFolder}" | sed -e 's/[\/&]/\\&/g' | sed 's/ /\\ /g')
  if [ -d "${escapedOutFolder}" ] ; then
    echo "${outFolder} doesn't exist - skipping"
  else
    echo "Removing contents of old "${outFolder}
    ls -lh "${outFolder}"/*
    rm "${outFolder}"/*
    echo "Removing directory '${outFolder}'"
    rmdir "${outFolder}"
  fi

}

main() {
  if [  ${noOfArgs} -le 1 ] ; then
    echo "ERROR--Insufficient arguments"
    usage
    exit 1
  fi

  if [ ${noOfCopies} -ge 100 ] ; then
    # Clone copy count arbitarily set to 99 - I don't want anyone to have to accidently create hundreds of clones
    echo "ERROR--Clone copy count exceeds 99"
    usage
    exit 1
  fi

  if [ ${lastCopyNo} -ge 10000 ] ; then
    # Maximum clone copy number arbitarily set to 9999 - could actually be set as high as 59635 before VNC TCP Port numbers exceed 65535
    echo "ERROR--Clone sequence exceeds 9999 (last copy would be ${lastCopyNo})"
    usage
    exit 1
  fi

  echo "${inFolder}" | grep -q "\-master$"
  if [[ $? -ne 0 ]] ; then
    # Input filename in wrong format
    echo "ERROR--input folder MUST end with -master. You entered"
    echo "${inFolder}"
    usage
    exit 1
  fi

  echo "============== Beginning Job =============="
  local fullBasePath=$(readlink -f "${inFolder}")/
  local escapedPath=$(echo "${fullBasePath}" | sed -e 's/[\/&]/\\&/g' | sed 's/ /\\ /g')

  outFolderBase=../${inFolder/-master/\/}
  echo "Clone folder BasePath is ${outFolderBase}"
  resourcePool=${inFolder/-master/}
  thisPoolID=`sed -rn 'N; s/\ +<name>'"${resourcePool}"'<\/name>\n\ +<objID>(.+)<\/objID>/\1/p' /etc/vmware/hostd/pools.xml`

#------------------- Main Loop begins here ---------------#

  for i in $(seq -w ${startingNo} ${lastCopyNo}) ; do

    thisClone=${inFolder/master/#${i}}
    outFolder=${outFolderBase}${inFolder/master/#${i}}

    echo "=============================================================================="
    echo "Removing Clone#${i} named ${thisClone} from ${outFolder}"
    escapedClone=$(echo "${thisClone}" | sed -e 's/[\/&]/\\&/g' | sed 's/ /\\ /g')
#    vmID=`/bin/vim-cmd vmsvc/getallvms | awk -vvmname="${thisClone}" '{if ($2 == vmname) print $1}'`
     vmID=`/bin/vim-cmd vmsvc/getallvms | egrep "${thisClone}" | awk '{print $1}'`

    if [ ! -z "${vmID}" ] ; then  #We found the VM was registered, so unregister it
      echo "Powering down and unregistering vm with ID $vmID"
       # Power off the machine if required
       vim-cmd vmsvc/power.off ${vmID}
       vim-cmd vmsvc/unregister "${vmID}"
    else
      echo "No vmID found for $thisClone"
    fi

    deleteAndDestroy #Remove files and directory

  done

#------------------- Main Loop ends here ---------------#

  echo "Resource pool is ${resourcePool} with ID :${thisPoolID}:"
  if [ ! -z "${thisPoolID}" ]; then
    echo "Removing resource pool ${resourcePool}"
    vim-cmd hostsvc/rsrc/destroy "${thisPoolID}"
  else
    echo "There is no resource pool called ${resourcePool}"
  fi

  echo  "Clones removed, attempting to remove parent folder (will fail if you didn't delete all clones)"
  rmdir "${outFolderBase}"

  echo "============== Job Completed =============="
}

main
Appendix #3: Sample output from running the clone.sh script
/vmfs/volumes/573201c2-529afdbe-5824-6805ca1ca2ed/Master - Copy # <em><strong>./clone.sh GNS3WB88-master 12</strong></em>
============== Beginning Job ==============
Output folder BasePath is ../GNS3WB88/
Creating ../GNS3WB88/
Creating resource pool :GNS3WB88:
==============================================================================
Cloning Clone#01 named GNS3WB88-#01 using VNCport=5901 to ../GNS3WB88/GNS3WB88-#01
Creating ../GNS3WB88/GNS3WB88-#01
================ Processing .vmx file ================
Delete Swap File line, will be auto recreated
Change Display Name to GNS3WB88-#01
Change VNC Port Value to 5901
Change Parent Disk Path
Forcing change of MAC addresses for up to two NICs
Forcing creation of a fresh UUID for the VM.
============== Done processing .vmx file ==============
Registering /vmfs/volumes/data/GNS3WB88/GNS3WB88-#01/GNS3WB88-#01.vmx as GNS3WB88-#01 in resource pool GNS3WB88 with ID pool0
==============================================================================

<...output omitted for next 10 clones ...>

==============================================================================
Cloning Clone#12 named GNS3WB88-#12 using VNCport=5912 to ../GNS3WB88/GNS3WB88-#12
Creating ../GNS3WB88/GNS3WB88-#12
================ Processing .vmx file ================
Delete Swap File line, will be auto recreated
Change Display Name to GNS3WB88-#12
Change VNC Port Value to 5912
Change Parent Disk Path
Forcing change of MAC addresses for up to two NICs
Forcing creation of a fresh UUID for the VM.
============== Done processing .vmx file ==============
Registering /vmfs/volumes/data/GNS3WB88/GNS3WB88-#12/GNS3WB88-#12.vmx as GNS3WB88-#12 in resource pool GNS3WB88 with ID pool0
============== Job Completed ==============
