
Building a new GNS3 WorkBench lab
[Note: The procedures described in this post are dependant on the reader
having a copy of GNS3 WorkBench Virtual Machine v8.7 or later]
GNS3 WorkBench comes with lots of labs, but building a new lab – with
instructions snapshots and prepared configurations is not a trivial
task. However, I’ve added some scripts that help me create a new
lab. If you think you’d like to build your own labs, then follow me
as I build a new lab.
Step 1: Build the topology and final configuration
I’ll start by creating a new project in GNS3 (in the GNS3 WorkBench Linux
Virtual Machine – the scripts I use are not going to run on
Windows). The project I’m creating is called ‘ICND1
Readiness Test‘. This will be an
ICND1 level exercise, so I want to create this project in the /home/user/GNS3/WorkBench/Projects/ICND1
Exercises directory, therefore I change the Project
Directory too. And this project will have an Etherswitch
router and crypto keys, so I’ll check the Save nvrams including
EtherSwitch VLANs and crypto keys option.

Next I’ll build the topology that I want, and configure the routers as I
want them in the final configuration. During this process, I keep a
copy of BlueGriffon
opened where I create the page which will later become the snapshot0.html
instructions page for the project. When I’ve got the topology
finished, I’ll also create a script file called check-answer.vpc
for the Virtual PC Simulator (VPCS) which can be used to test most of the
configurations, but I’ll discuss that in a separate section – but if you
see references to check-answer.vpc then keep in mind the purpose
of this file.

Step 2: Put the WorkBench template files in place
Once I am happy with the project, I save the project making sure that I
have the GNS3 option to [x] Include a screenshot when saving a
project checked in Edit | Preferences <-General –
[General Settings] – this makes sure I get a topology.png
file created which is used in several places. IN fact, it is worth
spending some time to get the topology looking just right on the screen
before you save.
I then quit GNS3 and start using a set of scripts that are found in the /home/user/GNS3/WorkBench/Scripts/WBDev
directory. They are:
addPWDToPATH.sh
changeIcon.py
labPreparer.sh
labRenamer.sh
replacer.sh
Tip: |
The main scripts are labPreparer.sh and labRenamer.sh, but I’ll want to run these scripts from a command window, and I don’t want to have to be writing commands like /GNS3/WorkBench/Scripts/WBDev/labPreparer.sh all the time, so I run the addPWDToPATH.sh script from this directory to begin with. That puts the /GNS3/WorkBench/Scripts/WBDev directory in my path, but I do have to log out and log in again after running it. Note, that I only ever have to do this one on any one VM, and then you are good forever after that. |
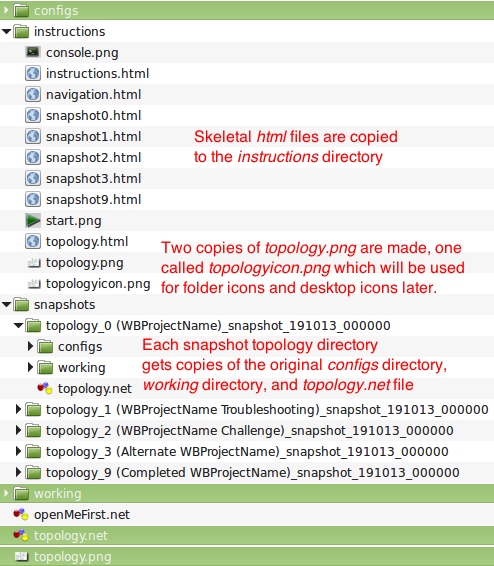
From the /home/user/GNS3/WorkBench/Projects/ICND1 Exercises/ICND1
Readiness Test directory, I run the labPreparer.sh script.
This Script that takes a GNS3 project (in this case the ICND1 Readiness
Test), and copies a bunch of skeletal files to the project – basic
help files (instructions), some snapshot directories and an openMeFirst.net
topology file which will replace topology.net later. It also
copies the current configs and working directories to
the new snapshot directories. After running this script, my
project directory looked like this (The selected files/folders are the
original files/directories):
The problem is, all of these template files use the word WBProjectName
both in the naming of the files, and in the files within the help
system. Ideally, we would rather have WBProjectName
replaced by the name of the project. That is where the next script
comes in.
Step 3: Rename files and replace text
To tidy up the copied template files, I next run the labRenamer.sh
script. If I run the labRenamer.sh script, all
occurrences of WBProjectName in any file or filename, will
be replaced by the name of the GNS3 project as indicated by the current
directory name – in this case ICND1 Readiness Test.
| Tip: |
The labRenamer.sh script can also be run with a parameter if you need to rename a project.A command like labRenamer.sh “ICND1 Challenge” would take all occurrences of the current directory name (in this case ICND1 Readiness Test) found in any instructions files associated with this project, and change them to ICND1 Challenge – including any filenames, directory names and even the current directory. Which, by the way, will leave the script in a state of limbo when it exits because the current directory has been renamed. You will be prompted to issue a cd . command in this case to get your bash shell to workout what the current directory is. |
The labRenamer.sh script exits with a message:
Done - ready to edit instructions.
which takes me to the next step, with the project folder now looking like:

Step 4: Edit instructions
Looking now inside the instructions folder off my project I will
find the .html skeleton files for my project. In this example, off
the /home/user/GNS3/WorkBench/Projects/ICND1 Exercises/ICND1 Readiness
Test/instructions/ directory. They are:
console.png
instructions.html
navigation.html
snapshot0.html
snapshot1.html
snapshot2.html
snapshot3.html
snapshot9.html
snapshotHelp.html
start.png
topology.html
topologyicon.png
topology.png
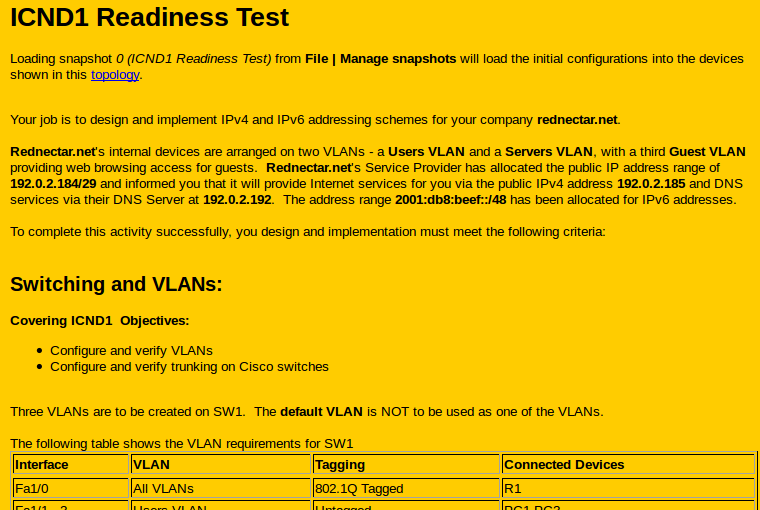
Opening the instructions.html file in my browser shows
me the general layout of these files in the system:

What I will have to do now is edit these html files in the instructions
directory to suit your project. I could do this by hand using a text
editor, but I’m going to use the BlueGriffon
html editor. The files I’ll have to edit are:
| File | Purpose |
| snapshot0.html | This is the default content that is shown when the project is opened or the user chooses Help | Instructions. It describes the main scenario, and should always include a link to the topology.html file that will display the topology. It should describe the exercise. |
| snapshot1.html | Once the final configurations are worked out, it is a relatively simple task to create a troubleshooting exercise based on the same configurations. I typically use snapshot1 as the troubleshooting exercise, but it could be set up as another exercise based on the same configuration. |
| snapshot2.html snapshot3.html
…etc |
It is possible of course keep adding as many variations and exercises as needed. If the original exercise had some routers already configured, I often make a challenge exercise where the user has to configure all the routers from scratch.By default, you get templates for snapshot2.html and snapshot3.html. If you want to use a 4th or more snapshots, you will have to create them yourself by copying one of these, as well as edit navigation.html (see below) |
| snapshot9.html | If I make a set of solution configurations, I’ll make them available as snapshot 9 (Completed WBProjectName exercise). If there are two different solutions, I’ll make the second solution available as snapshot 8 (Completed Alternate WBProjectName exercise) etc. snapshot9.html will probably only need minimal editing – I usually find that the default setup is just fine. |
| navigation.html | If I plan on having any more or less than four snapshots plus a solution, then I will have to edit the navigation.html file to add/remove links to the other snapshot instructions.Also, if my project requires special pages, I can add links to them here. |
| topology.html | I probably won’t need to edit this file, because it is automatically set up to display your saved topology.png, but if I needed to add more topology detail, I could add it here. |
I’ll start by opening snapshot.0.html as an individual file in
BlueGriffon.
Pretty soon, it begins to look like:

or in Wyswyg view:
I make sure I get the instructions for snapshot0 quite polished
before I try any of the other variations. But by this stage I have
to be careful, because I’ve already created my base snapshots (not by
using the File | Manage snapshots option in GNS3, but by
copying files in the GNS3 snapshot format). My final configurations
are actually living in the snapshot folder called topology_9
(Completed ICND1 Readiness Test)_snapshot_191013_000000, so it is
the topology.net file in this directory that I’ll have to work
with from now on if I need to make any further changes to the final
configurations!

Step 5: Create the snapshot scenarios
Recall back in Step 2, there were three snapshot scenarios copied
created, based on the current configuration at the time you ran the labPreparer.sh
script. This gave your project five snapshots/scenarios which are
virtually identical. It is time to sort them out.
For this exercise, I’ll only want the basic topology_0, topology_1
(Troubleshooting) and topology_9 (Completed) snapshots,
so I’ll delete the other snapshot folders (topology_2* and topology_3*).
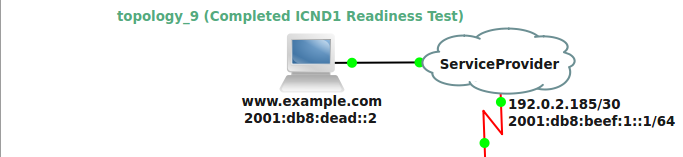
I leave topology_9 as the “solution” to the exercise, so it is
almost already prepared. The configs directory with the
prepared router configurations and startup.vpc file is
ready. The only other change I make is that I open the topology in
GNS3 and add a textual comment to remind me that this is the final
configuration. Now, if I ever forget which snapshot I have restored,
I have my message to remind me:
Next, I will re-visit the base snapshot topology – topology_0.
Again, I’ll do this by directly working with the files within the snapshots
directory, rather than via GNS3’s File | Mange snapshots.
Since topology_0 (ICND1 Readiness Test) is the initial
configuration, all I need to do is to delete the configs for the routers
that need to be configured for the exercise – but one of these routers is
actually a EhterSwitch router, so I’ll need to do
something special about the working directory.
Firstly, I’ll look inside the topology_0 snapshot:

I have four tasks I need to do here.
- Firstly, I need to open the topology.net file and add my
comment to identify this as topology_0 as I did with topology_9
above.

- Next, I need to edit R1.cfg, R2.cfg and SW1.cfg
files. The ServiceProvider.cfg file needs to be kept
intact, so no changes there. One option would be to actually
delete these files, but that would mean that users would then start with
partially configured routers (based on the baseconfig.txt file
for the IOS being used). So instead, I edit the router configs to
say simply:
do setup
but the SW1.cfg file is a bit more tricky, because it need to
keep some of the basic config (in particular, the duplex and speed
settings for the interface range fa1/0 – 15) so for this file I change the
config to:
interface FastEthernet0/0
 description *** Unused for Layer2 SW ***
!
interface FastEthernet0/1
 description *** Unused for Layer2 SW ***
!
interface range FastEthernet1/0 - 15
 duplex full
 speed 100
!
do setup
- However, that is not quite enough to completely erase the config on
the switch – because there were VLANs and crypto keys created. To
deal with them, I have to remove all the files in the working
directory, or at least the three files that have SW1
in their names:
c3725_SW1_rom
c3725_SW1_slot0
c3725_SW1_slot1
In actual fact, I remove all the files in the snapshot’s working
directory, because I also want to remove the crypto keys for the other
routers too.
- The final task is to edit the startup.vpc file.
Configuring the VPCS is one of the tasks that will be required in this
exercise, but the Virtual PC representing http://www.example.com
will need to have its configuration preserved. Also, I like to add
a few extra messages to the startup.vpc file, so that it will
look like this:
# The startup file of VPCS
#
9
set pcname www
ip 93.184.216.119 93.184.216.1 24
ip 2001:db8:dead::2/64
1
show ip all
echo
echo When you have completed the exercise, check your answer by issuing the following command:
echo load check-answer.vpc
echo
I will now repeat this process more or less as appropriate for topology_1,
except that if I’m doing a troubleshooting exercise I will leave the
configs intact apart from one or two changes, and probably leave the working
directory alone. And if I wanted a second troubleshooting exercise,
I’d just make a copy of topology_1 snapshot, rename it and
adjust.
Of course there is one more thing that I need to do to complete the
troubleshooting snapshot – I will have to edit the snapshot1.html
file in the instructions directory to describe the nature of the
troubleshooting exercise that I want. And of course repeat for as
many snapshots that I want to appear in the list.
I will also have to edit the navigaion.html file in the instructions
directory to add new links or remove unwanted links to snapshots.

Step 6: Create the check-answer.vpc script (optional)
In actual fact, I normally do this step as part of Step 1, but since it
is optional, I didn’t want to get too deep too early. The whole idea
of a check-answer.vpc is to give the user a way of checking the
connectivity aspects of the exercise. VPCS is especially good at
checking access control lists (ACLs), so in the exercise I’m building
here, it is essential that I have a good script.
| Note: | Since I’m creating the script after setting up the skeleton snapshots, I’ll have to copy the completed check-answer.vpc to the configs directory within each snapshot when I’m finished. |
This script has to created by hand in a text editor, and the way I start
is actually with the text of the snapshot0.html file – because
that is where I will find descriptions of the tasks that have to be
carried out. I want to be sure that I echo messages to the console
as the tests are taken. I won’t be able to check every detail, but I’ll
check the ones that I can. Here is the first section of check-answer.vpc
that I created for the ICND1 Readiness Test project:
set echo off
echo ***************************************************************************
echo This is the check-answer.vpc script for the ICND1 Readiness Test.
echo It will NOT test all completion criteria, you will have to assess some
echo items by yourself.
echo
echo ***************************************************************************
echo Press <ctrl+c> (multiple times) to stop, <enter> to continue.
sleep 0
echo ***************************************************************************
echo Checking dhcp address assignment for VPCS 1. You should see output similar to:
echo DDORA IP x.x.x.x/xx GW x.x.x.x
1
ip dhcp
echo Checking DNS and DOMAIN NAME assignments:  You should see the lines:
echo DNS         : 192.0.2.192
echo DOMAIN NAME : rednectar.net
echo in the output of the following 'show ip' command
set echo on
show ip
set echo off
echo ***************************************************************************
echo Press <Ctrl+c> (multiple times) to stop, <enter> to continue to obtain the
echo dhcp addresses for VPCS 2-5
sleep 0
set echo on
echo Checking dhcp address assignment for VPCS 2.
echo
2
ip dhcp
echo ***************************************************************************
echo Checking dhcp address assignment for VPCS 3.
echo
3
ip dhcp
echo Checking dhcp address assignment for VPCS 4.
echo
4
ip dhcp
echo ***************************************************************************
echo Checking dhcp address assignment for VPCS 5.
echo
5
ip dhcp
echo Checking DNS and DOMAIN NAME assignments:  You should see the lines:
echo DNS         : 192.0.2.192
echo DOMAIN NAME : rednectar.net
echo in the output of the following 'show ip' command
show ip
set echo off
echo ***************************************************************************
echo Now would be a really great time to check your DHCP server and issue a
echo 'show ip dhcp bindings' command on R2
echo Press Press <Ctrl+c> (multiple times) to stop, <enter> to continue testing NAT
sleep 0
As you can see, creating a thorough VPCS script can take some time.
To give your VPCS devices access to the script, it must be saved in the configs
directory of the appropriate snapshot(s).
Step 7: Tidy up
There are four things remaining before the project becomes a
fully-fledged GNS3 WorkBench Project. I have to:
- Setup the folder icon for the ~/GNS3/WorkBench/Projects/ICND1
Exercises/ICND1 Readiness Test directory - Create script files in the ~/GNS3/WorkBench/Projects/ICND1
Exercises/ICND1 Readiness Test directory to run each of the
snapshots. These scripts are used by the shortcuts on the GNS3
WorkBench desktop - Create the above mentioned desktop shortcut for the new project
- Clear the development configuration so the first-time user is forced
to load a snapshot if they open the project from within GNS3 or by
double-clicking the topology.net file.
And of course, there are scripts to do all of the above:
Task 1: Setup the folder icon for the project’s base directory
I’ll start by opening a command prompt in the project’s base directory ~/GNS3/WorkBench/Projects/ICND1
Exercises/ICND1 Readiness Test. From here I run the command:
changeIcon.py . instructions/topologyicon.png
Note carefully the period (.) character in the middle of that command –
it tells the script to update the icon of the current directory.
I could have of course typed the command as:
~/GNS3/WorkBench/Scripts/WBDev/changeIcon.py ~/GNS3/WorkBench/Projects/ICND1\ Exercises/ICND1\ Readiness\ Test ~/GNS3/WorkBench/Projects/ICND1\ Exercises/ICND1\ Readiness\ Test/instructions/topologyicon.png
| Tip: |
Alternatively I could have run the updateIcons.sh script found in the ~/GNS3/WorkBench/Scripts/Administrative directory – which would have done the same job – but would have also updated EVERY other icon in the GNS3 WorkBench system. |
This script changes the folder icon from looking like this:

to this:

Task 2: Create script files in the project’s base directory
Each project gets a series of script files created in the project’s base
directory that, when run, copy the contents of one of the snapshots into
the base directory, including the configs and working
directories and then runs GNS3. The purpose of these scripts is
twofold. One is to make it easy for users to load a snapshot from
the command line or the file browser, the other is to make it possible to
create shortcuts on the desktop that achieve the same purpose.
From the command prompt in the project’s base directory ~/GNS3/WorkBench/Projects/ICND1
Exercises/ICND1 Readiness Test I run the command:
createRunSnapshotLaunchers.sh
This script actually copies a template script once for every snapshot, so
if I have three snapshots called:
0 (ICND1 Readiness Test)
1 (ICND1 Readiness Test Troubleshooting)
9 (Completed ICND1 Readiness Test)
then the script will create launchers called:
runSnapshot.0 (ICND1 Readiness Test)
runSnapshot.1 (ICND1 Readiness Test Troubleshooting)
runSnapshot.9 (Completed ICND1 Readiness Test)
| Tip: | The createRunSnapshotLaunchers.sh script can be run with a -all option, which will create ‘runSnapshot.x….‘ scripts for the entire GNS3 WorkBench and GNS3 Vault structure. |
Task 3: Create a shortcut on the Desktop
Now that I have created a new IDND1 WorkBench Project, I’ll want it to
appear in the ICND1 Exercises (Shorcuts) folder on the Desktop.
The script to create the Desktop shortcuts will actually re-create all
the Desktop shortcuts, and must be run from the ~/GNS3/WorkBench/Scripts/Administrative
directory like this:
cd ~/GNS3/WorkBench/Scripts/Administrative
updateIcons.sh
This script examines all of the project directories under the base GNS3
WorkBench directory (~/GNS3/WorkBench/Projects) and searches
first for a directory on the Desktop with a similar name to one
of the directories under ~/GNS3/WorkBench/Projects. If it
finds a folder that hasn’t got the equivalent shortcut folder on the
desktop, it offers to create it. Next, is searches for a ‘runSnapshot.0...’
script in each project directory, which would have been created by the ‘createRunSnapshotLaunchers.sh‘
script I ran earlier. Each time it finds a ‘runSnapshot.0…‘
script, it creates a desktop shortcut to run that script, or if there is
none, it will offer to create a shortcut to a ‘runSnapshot.continue‘
script. It also updates the icons for the folders on the Desktop.
Having run the script, I now see the shortcut when I open the Desktop
folder called ICND1 Exercises (Shortcuts)

Task 4: Clear the development configuration
The final step is to save confusion if the exercise is loaded the first time
from within GNS3 or by opening topology.net from the file
browser. I want to force the user to load one of the snapshots, so I
have a special copy of topology.net that I use for that purpose. It
was copied to the project directory back in Step 2 and is called openMeFirst.net.
To make sure this topology is indeed opened first, I copy it over the
original topology.net like so:
cd ~/GNS3/WorkBench/Projects/ICND1 Exercises/ICND1\ Readiness\ Test
cp openMeFirst.net topology.net
Now if anyone opens the topology.net file before a
snapshot has been restored will see:

And like most of the other tasks, I have a script that will repeat this
job for all projects if I want to refresh the system ready for a new
user. The script file is found in the ~/GNS3/WorkBench/Scripts
directory and is called prepForNewuser.sh. When you run
this script, it will not only copy over all the primary topology.net
files in every project’s base directory, but will also wipe out any files
in any configs directory working directory
or qemu-flash-drives directory ready for fresh files to be
copied into these directories whenever a snapshot is restored. Here
is a sample of the output of prepForNewuser.sh
user@GNS3WB86 ~/GNS3/WorkBench/Scripts $ ./prepForNewUser.sh
********************************************************************************
              Copying base topologies to GNS3 WorkBench Projects.
This script prepares a GNS3 WorkBench environment for a new user by:
a) deleting any configurations saved by the current user, and
b) copying /home/user/GNS3/WorkBench/Scripts/Templates/openMeFirst.net
to be the base topology.net for all GNS3 WorkBench projects, and by copying
/home/user/GNS3/WorkBench/Scripts/Templates/openMeFirst.vault.net.
to be the base topology.net for all GNS3 Vault projects so that users know that
they need to load a snapshot before commencing.
It will destroy any topology.net files saved in the GNS3 WorkBench/GNS3 Vault
directory structure as well as deleting any saved configurations
********************************************************************************


Do you want to continue? Y/N [y] y
Updating GNS3 WorkBench topology.net files
Updating GNS3 Vault topology.net files
Step 8: Enjoy and distribute
If anyone would like to create their own exercises and distribute them,
complete the step up till the end of Step 6. Then you can compress
your project file and submit it – either send it to me,
or submit it on the GNS3
Forum. Either way, I’m sure there will be some folk who will
appreciate your efforts.
RedNectar
