
If you are new to VMWare and the concept of Virtual Machines, or even if you have been working with them for a while but don’t quite understand how the Virtual Machine accesses the network through your host machine, then this article is for you. If you want to take it one step further, and start using virtual devices (such as the virtual interfaces in GNS3) in your virtual machine, I’ll take you there too in a future article. If you just want the bare-bones, then this article should do the trick.
Assumptions
But let’s begin with the basics. I will assume that you have installed some version of VMWare for this article – and in particular VMWare Player and that your host machine is a WindowsPC of some vintage. If you use a Macintosh, I’ll try and write an equivalent article sometime. The principles hold true for all versions of VMWare, and similar concepts apply for other virtualization platforms.
I’ll also assume you understand the concept of a Host Machine (that’s your PC) and a Guest Operating System (that’s the OS that’s running on your Virtual Machine). Finally, I’ll assume your Host PC obtains its IP address and settings via DHCP.
Your Host PC
When you installed VWMare Player, your Host PC gained two virtual interfaces. You will see these interfaces turn up in several different places; on your host machine, in your VMWare Configuration and possibly linked to any Guest OS you run.
On your host machine, you can see them when you run the ipconfig command, or (for the GUI junkies) in your Network Settings wherever that lives in whichever version of Windows you are running (I’m using Windows Vista on the host machine). These new interfaces will be called VMnet1 and VMNet8. Your regular adapter is known as Local Area Connection.
C:\>ipconfig /all

Windows IP Configuration

<several sections have been selectively snipped below>

Ethernet adapter VMware Network Adapter VMnet1:

Description . . . . . . . . . . . : VMware Virtual Ethernet Adapter for VMnet1
<snip>
DHCP Enabled. . . . . . . . . . . : No
IPv4 Address. . . . . . . . . . . : 192.168.80.1(Preferred)
Subnet Mask . . . . . . . . . . . : 255.255.255.0
Default Gateway . . . . . . . . . :

Ethernet adapter VMware Network Adapter VMnet8:

Description . . . . . . . . . . . : VMware Virtual Ethernet Adapter for VMnet8
<snip>
DHCP Enabled. . . . . . . . . . . : No
IPv4 Address. . . . . . . . . . . : 172.16.101.1(Preferred)
Subnet Mask . . . . . . . . . . . : 255.255.255.0
Default Gateway . . . . . . . . . :

Ethernet adapter Local Area Connection:

Connection-specific DNS Suffix . : nnk.com.au
Description . . . . . . . . . . . : Intel(R) Wireless WiFi Link 4965AGN
DHCP Enabled. . . . . . . . . . . : Yes
IPv4 Address. . . . . . . . . . . : 192.168.1.105(Preferred)
Subnet Mask . . . . . . . . . . . : 255.255.255.0
Lease Obtained. . . . . . . . . . : Tuesday, 19 July 2011 10:14:59 PM
Lease Expires . . . . . . . . . . : Wednesday, 20 July 2011 4:14:58 PM
Default Gateway . . . . . . . . . : 192.168.1.1
DHCP Server . . . . . . . . . . . : 192.168.1.12
DNS Servers . . . . . . . . . . . : 192.168.1.12
Note that both VMnet1 or VMnet8 have NO default gateway, are NOT DHCP enabled and have NO DNS server configured. These interfaces are set up by VMware Player, and we will explore them in more detail later. The Local Area Connection for this Host PC does have DHCP configured, has been told the DNS server is at 192.168.1.12 and been assigned a default gateway of 192.168.1.1.
 |
Key Point #1 – Your host PC has some extra interfaces known as VMware Network Adapter VMnet1 and VMware Network Adapter VMnet8. I’ll refer to them as VMnet1 & VMnet8 from now on. Note that these adapters have IP addresses already. I’ll show you later where those came from. |
Next, look at VMWare Player. So that we are all playing the same game, I’ll suggest you begin to create a new Virtual Machine (VM) for this exercise.
To create your VM in VMware Player, Click File->Create a New Virtual Machine; Select “I will install the operating system later“; click Next; Choose a guest operating system (I choose Linux/Ubuntu) and click Next; Name your Virtual Machine and click Next; allocate a small amount of space for the Disk Capacity (I used 2GB) and Click Next; then finally click Finish.
Now from the main VMware Player Window, select your new (or existing) VM and select Edit virtual machine settings; and in the Hardware list, select your Network Adapter. You will see three choices on the right hand side:
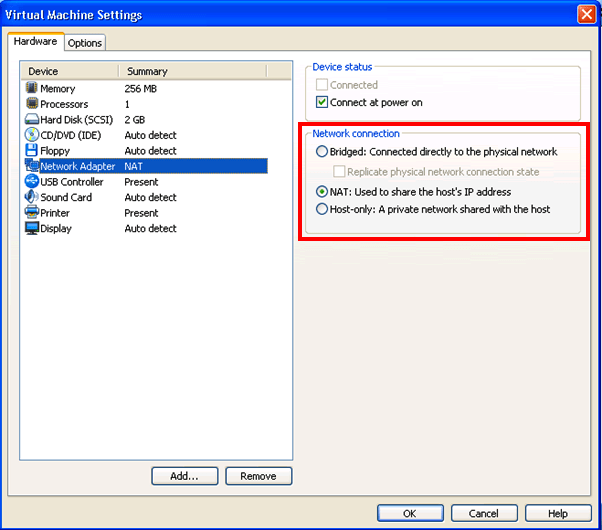
It is the Network connection section that I want you to look at.
Here you see three options that correspond directly to the output of the ipconfig command you issued earlier on your PC; Bridged, NAT and Host-only.
Bridged Network connection
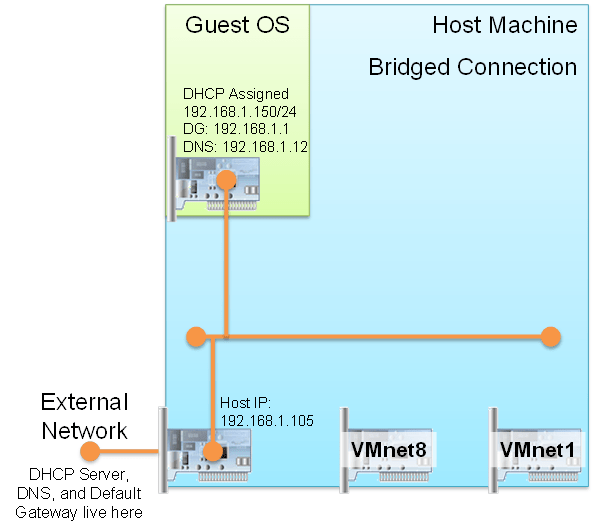
The Bridged networking option is the easiest to understand. If you choose to link your guest OS’s Network Adapter in Bridged mode, it will share the network interface with the Host. If your guest OS automatically obtains an IP address it will be on the same subnet as the host, the host will be able to ping the guest, and the guest will be able to ping the host and any other devices on that subnet directly. Other devices on this subnet will see the guest as another PC on the network with its own IP address and own MAC address.
Here is the resulting configuration on an XP guest running on the Vista host referred to above:
C:\>ipconfig /all

Windows IP Configuration

Host Name . . . . . . . . . . . . : PC
Primary Dns Suffix . . . . . . . :
Node Type . . . . . . . . . . . . : Hybrid
IP Routing Enabled. . . . . . . . : No
WINS Proxy Enabled. . . . . . . . : No
DNS Suffix Search List. . . . . . : nnk.com.au

Ethernet adapter Local Area Connection:

Connection-specific DNS Suffix . : nnk.com.au
Description . . . . . . . . . . . : VMware Accelerated AMD PCNet Adapter
Physical Address. . . . . . . . . : 00-0C-29-D4-43-68
Dhcp Enabled. . . . . . . . . . . : Yes
Autoconfiguration Enabled . . . . : Yes
IP Address. . . . . . . . . . . . : 192.168.1.150
Subnet Mask . . . . . . . . . . . : 255.255.255.0
Default Gateway . . . . . . . . . : 192.168.1.1
DHCP Server . . . . . . . . . . . : 192.168.1.12
DNS Servers . . . . . . . . . . . : 192.168.1.12
Lease Obtained. . . . . . . . . . : Wednesday, July 20, 2011 8:24:48 AM
Lease Expires . . . . . . . . . . : Wednesday, July 20, 2011 8:24:48 PM
Four things to note:
- The DHCP assigned IP address, 192.168.1.150 with Subnet Mask 255.255.255.0 is on the same subnet as the Local Area Connection interface of the host PC (192.168.1.105)
- The IP address of the DCHP server (192.168.1.12) is the same DHCP server that allocated the Host PC’s address
- The IP address of the DNS server (192.168.1.12) is the same DNS server that the Host PC uses
- The IP address of the Default Gateway (192.168.1.1) is the same Default Gateway that the Host PC uses
This is illustrated in the following diagram:
Host only Network connection.
The NAT and Host-only network connections are a little harder to understand than a Bridged connection, and these link to the VMnet8 and VMnet1 network adapters that you see on your host machine respectively. I’ll deal with the Host only link to VMnet1 first.
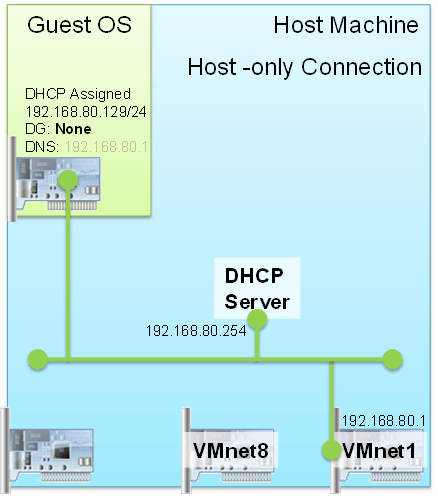
When VMware created the VMnet1 interface, it also created a process that acts as a DHCP server for VMnet1. So if you link your guest’s network interface to the host-only option, you will find that it will automatically be allocated an IP address by the host on the same subnet as VMnet1. Here is an example of an IP address configuration given to a XP PC when its Network Interface was set to Host only:
C:\>ipconfig /all

Windows IP Configuration

Host Name . . . . . . . . . . . . : PC
Primary Dns Suffix . . . . . . . :
Node Type . . . . . . . . . . . . : Hybrid
IP Routing Enabled. . . . . . . . : No
WINS Proxy Enabled. . . . . . . . : No
DNS Suffix Search List. . . . . . : nnk.com.au

Ethernet adapter Local Area Connection:

Connection-specific DNS Suffix . : localdomain
Description . . . . . . . . . . . : VMware Accelerated AMD PCNet Adapter
Physical Address. . . . . . . . . : 00-0C-29-D4-43-68
Dhcp Enabled. . . . . . . . . . . : Yes
Autoconfiguration Enabled . . . . : Yes
IP Address. . . . . . . . . . . . : 192.168.80.129
Subnet Mask . . . . . . . . . . . : 255.255.255.0
Default Gateway . . . . . . . . . :
DHCP Server . . . . . . . . . . . : 192.168.80.254
DNS Servers . . . . . . . . . . . : 192.168.80.1
Lease Obtained. . . . . . . . . . : Wednesday, July 20, 2011 9:08:55 AM
Lease Expires . . . . . . . . . . : Wednesday, July 20, 2011 9:38:55 AM
Four things to note:
- The DHCP assigned IP address, 192.168.80.129 with Subnet Mask 255.255.255.0 is on the same subnet as the VMnet1 interface of the host PC (192.168.80.1)
- The IP address of the DCHP server 192.168.80.254 (where did that come from?) is also on the same subnet as the VMnet8 interface of the host PC
- There is NO Default Gateway.
- The DNS server is the IP address of your host’s VMnet1 interface, although in actual fact it won’t resolve names for you at all anyway.
The purpose of the host only interface is to allow you to set up a virtual machine that can only be seen by your host machine (and any other guest virtual machines it is hosting). It is a network-in-a-box. Your box – ie your host PC. The DHCP server component has its own IP address (192.168.80.254 above), and the VMnet1 interface provides a virtual shared Ethernet segment between your host and the guest virtual machine(s). No packets on this network will ever leave your host PC or be seen by anyone monitoring your host NIC. It is therefore inherently secure and gives you a great way to test applications in a secure environment. Note however that if your host is hosting multiple guest virtual machines, and those VMs are using the host-only networking connection, then ALL packets from ALL machines attached to the VMnet1 interface can be seen by EVERY virtual machine.
The following diagram summarises this:
NAT Network connection
Similar to VMnet1, when VMware created the VMnet8 interface, it also created a process that acts as a DHCP server, a DNS server, and a NAT router for VMnet8. You can see that VMnet8 does a lot more than VMnet1. Here is an example of an IP address configuration given to a XP PC when its Network Interface was set to NAT:
C:\>ipconfig /all

Windows IP Configuration

Host Name . . . . . . . . . . . . : PC
Primary Dns Suffix . . . . . . . :
Node Type . . . . . . . . . . . . : Hybrid
IP Routing Enabled. . . . . . . . : No
WINS Proxy Enabled. . . . . . . . : No
DNS Suffix Search List. . . . . . : localdomain

Ethernet adapter Local Area Connection:

Connection-specific DNS Suffix . : localdomain
Description . . . . . . . . . . . : VMware Accelerated AMD PCNet Adapter
Physical Address. . . . . . . . . : 00-0C-29-D4-43-68
Dhcp Enabled. . . . . . . . . . . : Yes
Autoconfiguration Enabled . . . . : Yes
IP Address. . . . . . . . . . . . : 172.16.101.128
Subnet Mask . . . . . . . . . . . : 255.255.255.0
Default Gateway . . . . . . . . . : 172.16.101.2
DHCP Server . . . . . . . . . . . : 172.16.101.254
DNS Servers . . . . . . . . . . . : 172.16.101.2
Lease Obtained. . . . . . . . . . : Tuesday, July 19, 2011 7:42:18 AM
Lease Expires . . . . . . . . . . : Tuesday, July 19, 2011 8:12:18 AM
Four things to note:
- The DHCP assigned IP address, 172.16.101.225with Subnet Mask 255.255.255.0 is on the same subnet as the VMnet8 interface of the host PC
- The IP address of the DCHP server 172.16.101.254 is also on the same subnet as the VMnet8 interface of the host PC
- You have a default gateway of 172.16.101.2 (again, where did that come from?)
- The DNS server is also 172.16.101.2.
The purpose of the NAT interface is to allow your VM access to external devices without using another IP address from the host’s subnet as required when using a Bridged networking connection. This is achieved by using a DHCP server function just like with the host-only connection to VMnet1, as well as giving the guest a DNS server and default gateway at yet another IP address which is equal to the VMnet8 interface IP address plus 1.
The following diagram illustrates this:

 |
Key Point #2 – Your guest PC’s network adapter is tied to one of three possibilities:
|
Where did those DHCP Servers and DNS come from?
As promised earlier, I’ll delve a little deeper into the VMware host configuration. To do this, you’ll have to run the vmnetcfg.exe utility that comes with VMware Player – but it’s not easy to find. See this post to learn how to extract the vmnetcfg.exe file from your VMware Player installer file.
Running vmnetcfg.exe on your host machine shows the following interface:
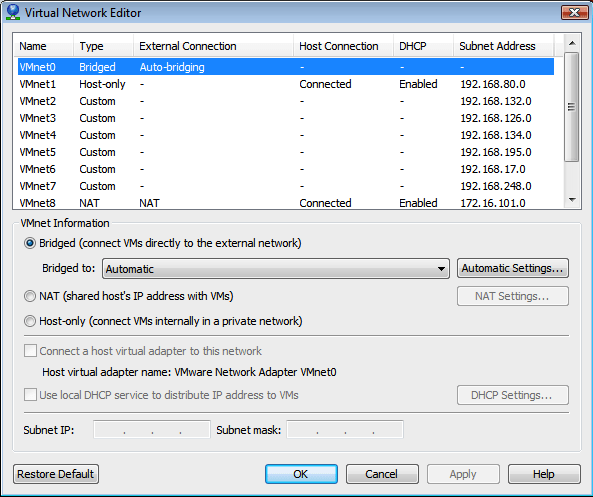
Here you see that there are actually ten virtual interfaces, named VMnet0 through to VMnet9. Note that you don’t see any reference to VMnet0 (or any other bridged interfaces) on your host machine’s IP config. That’s because a bridged interface gives a direct physical connection to a particular interface. If you have more than one physical interface, such as an Ethernet adapter AND a Wireless adapter, you can create custom bridged interfaces for each adapter. If your host PC supports VLANs (like my Macintosh) then you can even bridge virtual interfaces to VLAN interfaces on the Host PC.
If you take a look at the VMnet1 (Host-only) configuration, you can see that enabling the DHCP component is an option that can be turned on and off.
Clicking on the DHCP Settings button brings up the DHCP Settings, such as this:

As it turns out, the IP address of the DHCP server (as shown in your Guest IP config) will always be the LAST IP address of the range shown – in this case 192.168.80.254.
For a host-only configuration, there is no default gateway address, and no DNS address (even though the DHCP server allocates the VMnetn IP address as a DNS). Your VMnetn adapter on the host PC will always be allocated the first IP address available in the Subnet IP range defined. (Be careful it does not clash with the DHCP range of addresses or you will get Duplicate Address problems)
Finally, I’ll take you to look at the NAT connection configuration on VMnet8:

I won’t explore the DHCP settings, they are the same as the Host-only configuration, but if you click on the NAT Settings button, you will see that you can specify a gateway IP that will be allocated by the DHCP server. By default, it is the 2nd IP address on the subnet. From here you can see that there is also a DNS Settings button where you can actually specify the IP addresses of DNS servers that you would like to be given as part of the DHCP IP address allocation.
Multiple Adapters
If you want to, you can create additional adapters. These may be Bridged, NAT or Host-only.
Bridged adapters can be linked to any physical interface on your host PC, including logical VLAN interfaces, (if your Host PC supports VLANs). So you can link one Virtual Interface to say your Ethernet adapter, and another to your Wireless adapter. However, to do this you must first turn off Automatic Bridging on VMnet0. [Note: after turning OFF Automatic bridging on VMnet0, you can assign physical adapters to specific VMnet interfaces, then go back to VMnet0 and turn Automatic bridging back on!]. Automatic bridging is special, and will bridge itself to which ever physical interface gives it the best shot at getting to the internet, and is only possible on VMnet0. Your VMnet0 interface is set up for Automatic Bridging by default.
Also, you can only have one NAT interface, and again VMware will use whichever physical interface your Host PC uses to connect to the internet as the outside interface for your NAT.
By default, all VMNet interfaces are Host-only, but inactive. To activate a Host-only interface, all you have to do is check the Connect a host virtual adapter to this network option. Once you have done that and applied the configuration, you will see an additional adapter on you host PC, such as:
C:\>ipconfig

Ethernet adapter VMware Network Adapter VMnet5:

Connection-specific DNS Suffix  . :
Link-local IPv6 Address . . . . . : fe80::157c:3277:14c7:26c7%48
IPv4 Address. . . . . . . . . . . : 192.168.195.1
Subnet Mask . . . . . . . . . . . : 255.255.255.0
Default Gateway . . . . . . . . . :
Other Options
There are more advanced options as well, and some of them are covered here. But from me, I’ll finish with the key points for this section:
|
Key Point #3 – You can configure the settings of your host PC’s virtual adapters using the vmnetcfg.exe utility. Configuration options include changing the IP address ranges used for DHCP address allocation, DNS & NAT default gateway addressing. You can add additional bridged adapters and multiple host-only adapters if required to a maximum of 10 total virtual adapters. |
That’s the end of this lesson, in the next lesson I’ll show you how to use these multiple VMnet adapters in conjunction with GNS3!

Hi, quality explanations. I’m having a problem with an SNMP agent – not seeing the interfaces on the virtual machine (win2003) – host is Win7. Would you happen to know anything about this? I’ve googled around to no avail.
The SNMP agent normally works fine on a physical Win2003 install. AND it is seeing the virt machine and returning data concerning host MIBs (cpu/disk/mem usage etc.). However (on the VM) it does not even see the interfaces – let alone provide perf data for them. Net connection option is set to bridged.
I know it ‘s a very specific question, but I thought somebody might have some ideas.
David
David – can’t say I’ve tried anything like that. But I’ll post your comment and hope someone else can help.
Chris
The URL http://192.168.40.1:8080/apex/f?p=4550:11:420111498584400::NO::: does work from physical host….but I get a network timeout from within the VM guest….I think I will leave it for now…
Thank you very much for your time ….
Very good article!! So easy to understand…I was wondering if someone could guide me in my problem…I have a VM Guest with CentOS running Websphere Application Server…On the physical host (Windows 7) I have Oracle 10g Database server running…what kind of networking setup should I do to allow the Database server URL be visible from inside the VM Guest….basically I want to know if it is possible for me to hook up the Application Server on the VM
to be able to communicate with the Db Server on the physical host? Appreciate any kind of help…
Ankur,
You shouldn’t have any problem so long as you use the right IP addresses.
On your Win 7 host, issue the ipconfig command, and note the addresses shown for:
Local Area Connection
vnmet1
vmnet8
Now check your VM Guest with the ifconfig command, and you should see that it either has:
a) an IP address on one of the vmnet”x” subnets you see above, in which case you should be able to ping the corresponding Win 7 host address (and therefore use this address to communicate with the Db Server on the physical host)
b) an IP address on the Local Area Connection subnet you see above, in which case you should be able to ping the corresponding Win 7 host address (and therefore use this address to communicate with the Db Server on the physical host)
c) a 169.254.x.x address, which means you don’t have a dhcp server on your local area connection – configure a static IP address on your CentOS on the same subnet as your host’s Local Area Connection, then use your hosts Local Area Connection IP to communicate.
d) No address at all, which means you need to set up Centos for dhco, or configure a static address.
HTH
Thank you very much for your response…
Running ipconfig on the Physical host gives me 3 IP Addresses
Ethernet adapter Local Area Connection:
Link-local IPv6 Address . . . . . : fe80::f16f:bbab:6945:300f%11
IPv4 Address. . . . . . . . . . . : 192.168.1.2
Subnet Mask . . . . . . . . . . . : 255.255.255.0
Default Gateway . . . . . . . . . : 192.168.1.1
Ethernet adapter VMware Network Adapter VMnet1:
Link-local IPv6 Address . . . . . : fe80::46f:1029:30b:9ce7%13
IPv4 Address. . . . . . . . . . . : 192.168.217.1
Subnet Mask . . . . . . . . . . . : 255.255.255.0
Ethernet adapter VMware Network Adapter VMnet8:
Link-local IPv6 Address . . . . . : fe80::5818:7bff:4d5a:f73d%15
IPv4 Address. . . . . . . . . . . : 192.168.40.1
Subnet Mask . . . . . . . . . . . : 255.255.255.0
On the VM Guest
[bhatan00@localhost ~]$ ifconfig
eth0 Link encap:Ethernet HWaddr 00:0C:29:37:6F:7C
inet addr:192.168.40.128 Bcast:192.168.40.255 Mask:255.255.255.0
inet6 addr: fe80::20c:29ff:fe37:6f7c/64 Scope:Link
UP BROADCAST RUNNING MULTICAST MTU:1500 Metric:1
RX packets:116 errors:0 dropped:0 overruns:0 frame:0
TX packets:149 errors:0 dropped:0 overruns:0 carrier:0
collisions:0 txqueuelen:1000
RX bytes:26749 (26.1 KiB) TX bytes:20029 (19.5 KiB)
Interrupt:67 Base address:0x2024
lo Link encap:Local Loopback
inet addr:127.0.0.1 Mask:255.0.0.0
inet6 addr: ::1/128 Scope:Host
UP LOOPBACK RUNNING MTU:16436 Metric:1
RX packets:1724 errors:0 dropped:0 overruns:0 frame:0
TX packets:1724 errors:0 dropped:0 overruns:0 carrier:0
collisions:0 txqueuelen:0
RX bytes:6223588 (5.9 MiB) TX bytes:6223588 (5.9 MiB)
So I can ping the host on 192.168.40.1 from the Vm guest.I can also ping the VM Guest from the host on 192.168.40.128.The network Adaptor setting mode is Nated IP.
From a NetStat on the host I can see that Oracle DB server is running on 127.0.0.1:8080. This DB Server URL works on the host http://127.0.0.1:8080/apex/f?p=4550:11:420111498584400::NO:::
But this does not work from the Vm guest http://192.168.49.1:8080/apex/f?p=4550:11:420111498584400::NO:::
Is this the problem? Do I need to make any changes on the DB server side to make it visible on the VMNet8 virtual network, so that the Vm Guest can hit it?
I’m guessing “http://192.168.49.1:8080/apex/f?p=4550:11:420111498584400::NO:::” is a typo, and should say “http://192.168.40.1:8080/apex/f?p=4550:11:420111498584400::NO:::”
If so, then it would seem that your OracleDB server may be set to only accept connectons from 127.0.0.1. You can test this by opening a browser on the Oracle DB machine and trying to browse to http://192.168.40.1:8080/apex/f?p=4550:11:420111498584400::NO:::
Changing settings for Oracle DB servers is WAAAY out of my knowledge set!
If on the other hand you CAN browse to http://192.168.40.1:8080/apex/f?p=4550:11:420111498584400::NO::: from the Oracle DB machine, then there is some other problem that escapes me.
Excellent article!. I Spent so much time Googling on this topic and here it is,written in plain English for anyone to understand.
I have a guest OS, Windows 8 running in VMWare Workstation. My Host machine is running windows XP. I am on a corporate network. My Host is setup to obtain IP from DHCP server. I have done the same setup on my Guest. My VmWare is using VMNet0(Bridged) setup. Our corporate network happily leases IP to my Host(xp) when I log into my laptop, but it refuses to allocate an IP to my Guest OS(windows 8) when I bring up the guest.
Whole point of doing this is to connect my Guest to our corporate domain, like I have connected the Host to the corporate domain(Without any issues).
Is this achievable?
Any thoughts on this appreciated.
Thanks
Suresh,
Not sure why you don’t get an IP from your corporate network, unless there’s some firewall on your host. Probably a safer (and probably just as good) is to set up your guest to connect to vnnet8 (NAT)
HTH
Thanks so much, Red, that really helped alot !!
I have Windows 7 computer (HOST) on which I installed VMWare Player 4. I installed Windows Server 2008 OS in VMWare (GUEST). I also have SQL Server 2005 running on the GUEST OS.
I want to connect to the SQL Server in the GUEST from the HOST.
I setup VMWare Network Adaptor to Bridged.
WHen I do IPCONFIG on HOST, I can see the VMNet1 and VMNet8 adapators. I can ping both of their IP addresses from the HOST.
If I understand correctly, I should now be able to connect to the SQL Server on the GUEST from the HOST by pointing to the IP address for VMNet1 as the server name in a connection script. Eg for example, if I create an ODBC connection on HOST, I select SQL Server and the servername is VMNet1 IP address. Is this true?
It doesn’t work. So perhaps I need to open ports on GUEST to allow connection to SQL Server on GUEST? They are 1433 and 1434. So, I did this. but still no joy, no connection is working.
Am I missing something? Appreciate any help!
You bridged your adapter, so VMNet1 and VMNet8 are not part of the picture.
Go to your SQL Host. USe the ipconfig command to find out its address – make sure it on the same subnet as your HOST and connect to that address.
HTH
I enjoy your way of writing really enjoying this web page.
Thanks!
Hi, i believe we saw you discovered my site so i
arrive at “return the benefit”.
Simpy the best. Thank you so much for sharing this.
Thanks.
Thanks You So much
Ahtasham
Ahtasham,
Glad it helped. Remember, every time someone gives this article a good rating, or shares it on social media, it pushes it higher in the list when people search, so if you want to make it easier for others to find you know what you have to do.
sure sir! i already shared it with my Social facebook address .
but however em still facing some misunderstanding regarding How to simulate GNS3 with Vmware and multiple Machines .
Ahtasham,
Thanks – and good luck with your GNS3 integration. If you need help with a a specific problem, please ask or ask on the GNS3 forum
Chris
Very good tutorial and one I been looking for, But I need some help in linux guest ubuntu, That hoping Chris or someone else here can help me with, I know how to connect my host *Windows vista* to the guest *Ubuntu* and share the connection with each other using NAT, But what I want to and need to do, Is have the guest ubuntu to become a router? or something someone told me, and give the connection I am getting from my guest being online *using a usb modem i connect the guest online, the same modem i use for windows, I have one other modem inside my laptop that came with the system* There should be away to share the internet connection with the host, like you do with the guest, and I been working on it for a good week or longer, Just cant figure it out, so if anyone out there can help and give me step by step i will be more then greatful
If only all tutorials could be this good! Well done.
Thanks! Hope it helped!
Your explanation is detail.. It\’s helping me to understand easily…
Many thanks Chris..
Chris this is just brilliant. Thanks for the info.
Glad you liked it. Don’t forget, you make it easier for others to find it when you vote (click the star rating) for an article, or share it on fb, twitter etc. (by clicking the Share button)
TOTALLY AWESOME !!!
Pretty clear article, although I need to read it more than one times to get the points…
By the way, I’ve just set up a VMware server on my Windows 2003 machine.
The guest OS I am using is Linux. And the network type I choose is Bridge.
However, when I go to my guest OS through vmware remote console, and checking what is the IP address of my guest OS with “ifconfig” command, it’s just show me this thing:
eth0      Link encap:Ethernet  HWaddr 00:0C:59:29:0C:76
          BROADCAST MULTICAST  MTU:1500  Metric:1
          RX packets:0 errors:0 dropped:0 overruns:0 frame:0
          TX packets:0 errors:0 dropped:0 overruns:0 carrier:0
          collisions:0 txqueuelen:1000
          RX bytes:0  TX bytes:0
What I need to know is, what’s wrong?
Or my Guest eth0 interface is just down or what?
I am not good in english.
and I know a little in Linux.
And I have some confusion, if I need to change my guest OS IP address, what the best way to do this? From the guest OS (using ‘ifconfig’ if guest is linux or using network properties if windows), OR from host network properties and change it manually, OR just using vmware network configuration utility?
Thank you.
Nice to read a clear, well presented explanation of this subject. Still I am having trouble with my disconnected network in my Ubuntu 12.04 lts guest. Probably not directly related to this but I am working out every angle. I followed your article and the first thing that is not a mtach is them DHCP status. When I run ipconfig in the prompt it´s disabled for both VMnet 1 and 8 while it is connected in the Virtual Network Editor. Other problem with the Editor is that I cannot add Bridged networks. The error goes something like this: “blah-blah…there are no un-bridged host network adapters”. Maybe I should look into my LAN properties…but right now just a NAT connection will do to have the internet running in Ubuntu.
Great job nevertheless!
On the HOST PC (where VMnet1 & VMnet8 live), you should not expect to see DHCP enabled. Your HOST PC actually becomes a DHCP server – it is the guest OS (Ubuntu in your case) that you should be looking to see DHCP addresses allocated to.
As far as the Virtual Network Editor goes, again you are probably seeing the correct behaviour. Each physical interface on your HOST PC can only be mapped to ONE Virtual Network Adapter. What you might find though is that that physical adapter may not be linked to an adapter on your guest OS. Check firstly in VMware Player VM->Attached Devices->Interfaces and make sure the VMnet interface that is bridged to your physical adapter is connected.
Finally, on Ubuntu, check that there is an interface that picks up the physical adapter – it may be eth0, eth1 or some other ethx. If necessary, you may have to do a sudo ifdown ethx (replace x with the correct digit) followed by sudo ifup ethx
Hope this gets you going.
CW
I didn’t really get everything you explained, but the basic part and the diff. between NAT, bridged and host-only was just enough to be sure that this article deserves an AAA…
Thanks…
By the way I’m running Win7, on it I have a VMPlayer and Ubuntu as a gust OS…I am using my ubuntu as a LAMP machine… By default is using NAT configuration. I need to assign a static IP to my Ubuntu in order to avoid changing the IP when I’m reaching it with SSH, MySql Qorkbench etc…
Would someone give me a hint where should I change this? Should I change NAT to Bridge? Do I change networking/interfaces on my Ubuntu or there’s something else to it???
Thanks,Luka
If you want devices other than other VMs running on the same Host to be able to see your LAMP server, then you will need to use a bridged interface – which of course is linked to a physical adapter. This physical adapter will have to be “up” even for the host machine to be able to talk to the guest OS (Shameful admission: Before I understood Host only and NAT interfaces, I made myself an RJ45 plug with the Tx pair looped to the Rx pair. When traveling, I used to plug this doctored RJ45 into my laptop’s Ethernet adapter to bring the interface “up” so I could get my Host OS to talk to my Guest OS!!)
Now it is quite easy to add an extra adapter to your Guest OS (you Ubuntu LAMP), so it is feasible to have one bridged interface, one NAT interface and one Host-only interface if you want. This is what I generally do, although occasionally I disable the NAT interface if the Bridged interface is up – because the guest OS gets confused about which should be its default gateway.
HTH
CW
Great blog entry, I have workstation and your description is 100 times better than the documentation it comes with.
I seem to have had a problem since upgrading to workstation 8 whereby my host does not see the guest OS. I allocated my own IP address range in the VMNet1 DHCP settings (192.168.110.x) and set a STATIC IP on one guest OS as I needed for some apps running on it. However my Host cannot route to the 192.168.110.100 I allocated. (DHCP range starts at .128)
Had the problem where VMNet1 & 8 were in the unidentified network section of windows 7 but I used the powershell script that updates the registry to fix that. Still cant see my guest from host. Preventing me running tests 😦
Simon, Hopefully someone can help you. I can’t run Workstation 8 on my Mac, so I can’t test your problem.
From you wording, I’m assuming:
1. You don’t have a problems with VMs that get their IP address via DHCP
2. You don’t have a problem with the static address with Workstation 7
Are these assumptions correct?
CW
Had googled till I was blue in the face, trying to find a “VMnet for Dummies” that would finally clear up the fog around all these nets, bridges, servers, IPs, etc. and then finally ran across your blog. Simple, clear and specific! Thank you. I finally understand.
Thanks for the kind comments. Don’t forget – if you “Rate“, “Share” and “Like” the articles then they become easier for others to find. (The “Rate” button is at the top of the article, the “Share” and “Like” buttons are at the end of the article (that’s just the way my worpress theme does it!))
After fumbling through this and figuring out how this worked, I found this great information. Thanks for posting.
Glad it was useful!
Pingback: VMware Workstation installed « samtechramblings
Thanks so much. This is the stuff that i’ve been loogking for indeed!!!.
Again. Thanks for the great tutorial!
I need some help for Bridge. I am using a dedicated server which have its own Public Live IP statically configured now I have installed VMware Workstation in this Server and Installed new OS in VMware. Now I want You to guide me how to assign another Public IP to my VMware OS and to access this remotely. Any help will be appreciated.
Dawood – your problem may be more of a routing issue rather than a VMWare issue. There is no technical difficulty in assigning a public IP address to a guest OS on a bridged interface. You simply give the host PC and the guest OS the same mask, same default gateway, same DNS and your router should be able to handle it. For example: Assume the IP address range you have been given is a /29 – lets say x.y.z.0/29. Assume that your service provider is using x.y.z.1 as the upstream router’s address. You assign x.y.z.2 mask 255.255.255.248, gateway x.y.z.1 to the host PC and assign x.y.z.3 mask 255.255.255.248, gateway x.y.z.1 to the guest OS.
Thanks Slack – good proofreaders are so hard to find 😉
Those of you reading this after 2011/11/25 are reading the corrected version after acting on the comment above!
Great stuff. A couple things you might want to look at…
– In the “Four things to note” section, and paragraph below that, of the Host-only section, I think you should replace every occurrence of “VMnet8” with “VMnet1”.
– In the “Four things to note” section of the NAT section, I think you should replace every occurrence of “VMnet1” with “VMnet8”.
Pingback: My Important Links to Follow « Rezwan's Blog
Pingback: Linking your Host PC and Guest OS to devices in GNS3 WorkBench | RedNectar's Blog
Pingback: Linking your Virtual Machine’s adapters to your Host PC using GNS3-WorkBench | RedNectar's Blog