
After avoiding iTunes for eleven years, I was finally convinced (partly by reading this article) that the ability to use AirPlay made it worthwhile ripping my CD/music collection to iTunes. What followed was a tale of frustration and hair pulling, so I’ve written down what I wished I knew BEFORE I started. This is the second of a series of articles and deals just with moving existing music files to iTunes. I have a couple of supplementary tips that you might also like to check out: How to successfully rip an album/CD to iTunes; and How to name albums and songs in iTunes.
In this post I’ll cover:
Step 1: Forget the Mac – use a PC
Step 2: Check your settings. (iTunes-Preferences)
Step 3: Add the files to your library
Method 1: Add file to library
Method 2: Use the “Automatically add to iTunes” Folder
Step 4: Sorting out your albums
Case 1: Single or multiple albums, songs by one main artist with supporting artists
IMPORTANT NOTE FOR MULTIPLE ALBUM SETS
Case 2: Single or multiple albums, songs by different artists
Step 5: Get the Album Art
If you find this article helpful, you can make it easier for others to find simply by rating it and/or sharing/liking it.
Step 1: Forget the Mac – use a PC
This is really only important if you have tunes that were ripped in .wma format. For some reason, iTunes on a PC will happily import .wma files and convert them to .mp3 (or whatever is your preference) but iTunes for the Mac will not. So there! And as it turned out, I found my old 2007 PC was able to rip CDs about three times as fast as my (almost brand new) 2011 iMac anyway. Go figure!
Another reason to use a PC is that you might find that if you can’t find track names or artwork in iTunes, you can let Windows Media Player have a look at retrieving names for an album or CD – you might find that WMP can find the names of your tracks while iTunes can’t (I did!)
Step 2: Check your settings. (iTunes-Preferences)
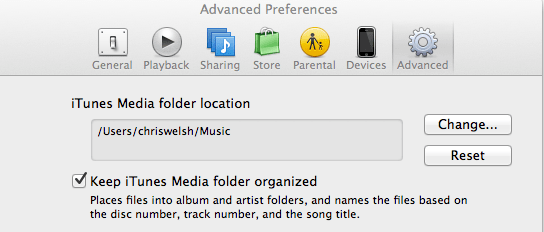
- Go to the [Advanced] tab, and make sure the [x] Keep iTunes Media folder organized option is selected. You may wish to change the default folder so that your music is easier to find on your hard disk too – by default, you have a Music folder – why not make that the default location for importing files?
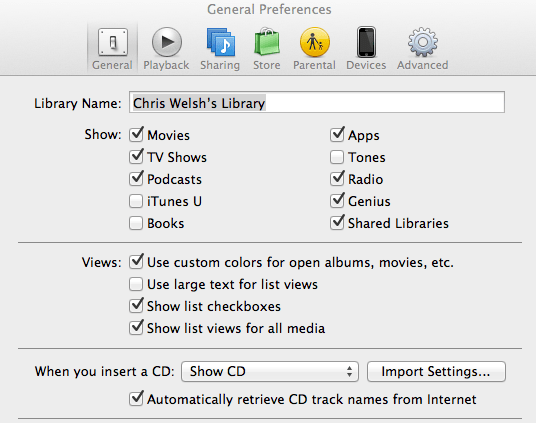
- Go to the [General] tab and make sure iTunes is NOT set to rip CDs automatically as they are inserted. I choose [Show CD] for the When you insert a CD: option.
- Check that the option [x] Automatically retrieve CD track names from Internet is selected.
- Click on [Import settings] and check the
Import Using: and
Setting: options
- If you ever want to move your music to another device, you may wish to change the Import Using: setting to [MP3 Encoder]. By default, Apple sets this to ACC Encoder, which should give slightly better quality, but is not as widely supported as MP3.
- If you want the best quality playback for your MP3 encoded music and you are not too concerned about disk space, choose the Setting: option of [Higher quality (192 kbps)] – although honestly, you probably won’t be able to tell the difference between 128bit/160bit or 192 bit encoding.

Step 3: Add the files to your library
There are two ways of doing this, and both a subject to the famous “iTunes track scatter” effect, where you suddenly find all the songs from an album scattered across multiple albums, all with the same name. Read the Gotchas – How to fix the scattered album listing problem section of my How to successfully rip an album/CD to iTunes posting to see how to fix this.
Method 1: Add file to library
If you only have one or two albums to add, then this method works well enough. You simply go to the almost-impossible-to-find menu button, and choose Add File to Library – or use the Ctrl+o shortcut (on a Mac, go to the File menu and choose Add to Library or use the cmd+o shortcut), and find the folder you want to add. Unfortunately, you can’t just add a whole folder, you have to individually select the files you want to add and let iTunes move/copy them to your library. However, be warned – iTunes may NOT group them all in the same album/folder after processing them, even if Windows Media player did!
The advantage of this method is that it forces you to add albums one at a time, and therefore you can fix up iTunes stuff-ups as you go, and even rescue your album art from Windows media player when iTunes refuses to find it.
The disadvantage of this method is that if you have a lot of albums to transfer, it will take a long time.
Method 2: Use the “Automatically add to iTunes” Folder
If you look at your iTunes – Preferences on the [Advanced] tab, you will see your “iTunes Media folder” location. Now if you use Windows File Explorer (or Macintosh Finder) to locate that folder, you will see there is a folder in it called “Automatically add to iTunes“.
All you have to do is drag all your existing albums into this folder, be they .mp3, .wma or whatever else is supported. iTunes will process the lot. AND if you are lucky enough to have all your albums attributed each to single artists, you will be happy. Otherwise, you will suffer the dreaded scattered tracks problem – and since you added so many files all at once, it is going to be one massive headache sorting them out again whilst you chant “I hate iTunes”. If you take this approach, you will find another folder inside your Automatically add to iTunes folder called Not Added where copies of your original .wma files, plus probably some album artwork will end up. You will need to delete all this manually once you have completed your transfers.
The advantage of this method is that you can drag in a whole tree of folders if you like, and all files will be processed an either sorted beautifully or scattered asunder, depending on whether the whole album was under a single artist’s name or not.
The disadvantage of this method is that if you have more than a couple of albums that are compilations of multiple albums, or albums with multiple artists, you can end up with a huge mess. And what’s more, if you accidentally mess it up even more whilst trying to fix it, iTunes REMEMBERS your mess ups, so simply deleting files and re-adding them doesn’t help. I lost count of how many times I deleted the whole iTunes library and restarted during my saga.
As a matter of interest, I did find that if I was dumping parts of another iTunes collection from another PC in this way, iTunes got it spot on on the second computer – right down to the artwork I had scanned for one particular album (my original cover had been signed by the artist, so I didn’t want the stock image). And no track scattering either.
Step 4: Sorting out your albums
Once you have your music in iTunes, you will want to make sure that all the albums have all their tracks and that you don’t have too many albums under the artist called “Various Artists“. I suggest you go to album view in iTunes, and then check each album one at a time. If you find an album with a track missing, then go to the search function and type in the name of the album. Chances are, the missing track is there, but stored under a different album name.
From this point, you can re-unite your files into a single album by one of two methods, depending on whether it is an album principally by one artist, or wether it is a compilation of many different artists.
Case 1: Single or multiple albums, songs by one main artist with supporting artists.
Start by searching for the album name – this should find all fragments of your album. In this case, I found the tracks of “The Lion King” scattered over seven artists.

Next, select all fragments (I use the shortcut key of Command+a [Mac] or Ctrl+a [PC] to do this). Now right-click on one the tracks of the listing and choose Get info. The field you are interested in is the Album Artist. Click in the album artist field and type in the name of the artist, then click OK. In this Case, since the score was composed by Hans Zimmer, I entered Hans Zimmer as the Album Artist and hey presto – all songs are under the one album.

IMPORTANT NOTE FOR MULTIPLE ALBUM SETS
If your album is part of a CD set, search for each disk separately, and make sure the Disc Number is correct for the set, and that EVERY DISC IN THE SET has the exact same Album Artist name and exact same Album name – this means that if the disk number is part of the name (it is likely to be) then REMOVE the Disk Number part from the Album Name
Case 2: Single or multiple albums, songs by different artists.
In other words, you are dealing with a compilation album.
Again, start by searching for the album name and selecting all fragments. Now right-click on one the tracks of the listing and choose Get info. The field you are interested in is this time is found under the [Options] tab of the Multiple Item Information dialogue. If you are dealing with a single album, just change the value of the Part of a compilation field to Yes, then click OK. If you are dealing with a set of albums, you will have to do this process carefully, making sure you search for the fragments of each album in turn, and at the same time as you mark the Disc Number under the Info tab, and edit the Album name to NOT include the disk number.
Step 5: Get the Album Art
If you now go to your Albums collection, you should see your new Album, and with a bit of luck, it will already have a picture of its cover right there. If not, you can try right clicking on the coverless album and selecting Get Album Artwork. If that doesn’t work, I’d suggest first opening a copy of Windows Media Player (if you have a PC or a Windows Virtual Machine running) and letting it have a go at getting the album art. Here is how my listings for the Lion King now look in Windows Media Player and in iTunes.

As you can see, Windows Media Player has done a much better job of getting the artwork than iTunes. The question is, how do you get the album art from WMP into iTunes?
If you haven’t already done so, you will need to change your setting for Winows Explorer to allow you to see hidden system files. Go to Folder Options (by whichever way is appropriate for your version of Windows) and make sure the Hide protected operating system files is UNCHECKED. Use the illustration below to guide you.

Once this is done and applied, you will be able to see the album art in the same directory as the original .wma files. All you need to do now is copy the large album art image and paste it into iTunes.
Failing this, you will have to do your best to find the artwork yourself using say Google Images or your favourite search engine. If you can find a copy of your album cover on http://www.allmusic.com, then it will be a good one (Also a great site for getting correct names if you don’t feel like typing them yourself). If you find something suitable, copy the image to the clipboard, then back in iTunes, right click on your album and select Get Info and in the Info tab, paste the image in the Artwork space.
Remember, if you find this article helpful, you can make it easier for others to find simply by rating it and/or sharing/liking it.

Very good write-down. Agree, iTunes 11 is a much nicer version to use and finally started using it as older releases are very user unfriendly. The sort/ display options from iTunes are still rather off this world. Myself I use MediaMonkey to organize my music and maintain my DB in MM completely and import by using import folders. In order to become iTunes organized have reloaded the iTunes DB already 10 to 15 times, just to get it right.
One final note: Still silly apple does not play FLAC format!!!!
Thanks for your comment. I’ve seen a bit of flack about iTunes 11 – but I never used iTunes before that so I don’t care. I decided to skip MM and other alternatives because iTunes “just works” with AirPlay. Maybe the others will catch up soon.
Pingback: How to successfully rip an album/CD to iTunes | RedNectar's Blog
Pingback: How to name albums and songs in iTunes | RedNectar's Blog