
After avoiding iTunes for eleven years, I was finally convinced (partly by reading this article) that the ability to use AirPlay made it worthwhile ripping my CD/music collection to iTunes. What followed was a tale of frustration and hair pulling, so I’ve written down what I wished I knew BEFORE I started. This is the first of a series of articles and deals just with ripping CDs. I have a couple of supplementary tips that you might also like to check out: How to transfer existing ripped music to iTunes; and How to name albums and songs in iTunes
In this post I’ll cover:
Step 1: Check your settings. (iTunes-Preferences)
Step 2: Insert the CD
Case 1: Single CD, all songs by the same artist
Case 2: Single CD or multiple CDs, songs by different artists
IMPORTANT NOTE FOR MULTIPLE CD SETS
Case 3: Single CD or multiple CDs, songs by one main artist with supporting artists
Step 3: Get the Album Art
Gotchas – The Multiple matches problem
Gotchas – How to fix the scattered album listing problem
If you find this article helpful, you can make it easier for others to find simply by rating it and/or sharing/liking it.
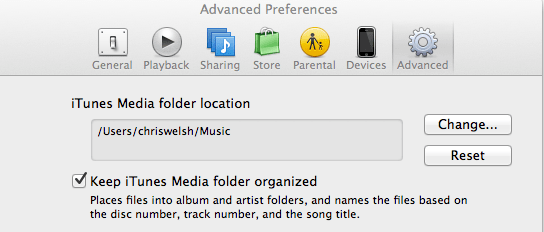
Step 1: Check your settings. (iTunes-Preferences)
- Go to the [Advanced] tab, and make sure the [x] Keep iTunes Media folder organized option is selected. You may wish to change the default folder so that your music is easier to find on your hard disk too – by default, you have a Music folder – why not make that the default location for importing files?
- Go to the [General] tab and make sure iTunes is NOT set to rip CDs automatically as they are inserted. I choose [Show CD] for the When you insert a CD: option.
- Check that the option [x] Automatically retrieve CD track names from Internet is selected.
- Click on [Import settings] and check the
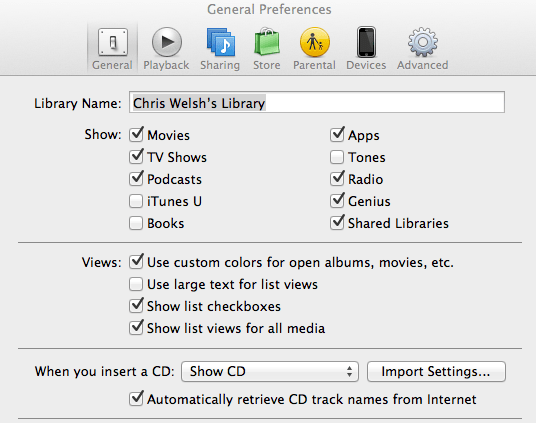
Import Using: and
Setting: options
- If you ever want to move your music to another device, you may wish to change the Import Using: setting to [MP3 Encoder]. By default, Apple sets this to ACC Encoder, which should give slightly better quality, but is not as widely supported as MP3.
- If you want the best quality playback for your MP3 encoded music and you are not too concerned about disk space, choose the Setting: option of [Higher quality (192 kbps)] – although honestly, you probably won’t be able to tell the difference between 128bit/160bit or 192 bit encoding.

Step 2: Insert the CD
Case 1: Single CD, all songs by the same artist
When the CD is inserted, you should see a list of tracks, showing the Artist and Album for each track, something like this: [Note: if you see a message like “Multiple matches found” – jump to the Gotchas – The Multiple matches problem section below.]
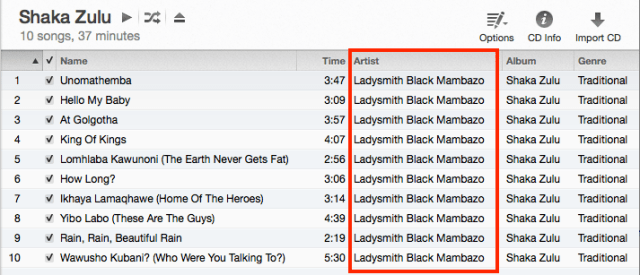
Look at the Artist column. If every song is by the same artist, you are good to go – Click on the Import CD option. Another dialogue should appear showing the Import Settings we visited earlier. If you need to adjust these before importing the CD, do so before clicking [OK]. In fact, if it is a spoken word CD or audiobook, then you should go for a setting of Stereo Bit Rate: [128kbps] and change the Channels: setting to [Mono] – this will take half as much space on your audio device as recording two channels (stereo).
If iTunes was not able to locate your CD via the Gracenote database, (unlikely) or you find that the list of titles is not quite right (very likely), then you should read the third article in this series: How to name albums and songs in iTunes and check out this and this
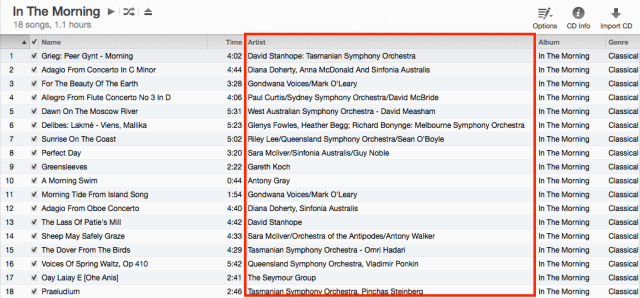
Case 2: Single CD or multiple CDs, songs by different artists
If, when the CD is inserted, you see a list of tracks, showing the Artist and Album for each track, and where there are many artists like this, then you will need to add a step:
Before you choose Import CD, click on the CD Info option. It is essential that you do this step before importing the CD, and what you need to do is check that the CD has been seen as a Compilation CD and the Compilation CD option is checked like this:
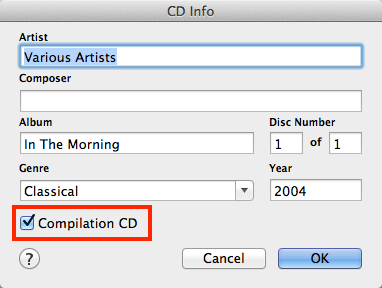
If you fail to do this step and import the CD, you will find that there will be (in my example) 18 albums imported, each called “In the Morning” and stored under each of the 18 artists names (David Stanhope: Tasmanian Symphony Orchestra; Diana Doherty, Anna McDonald And Sinfonia Australis; etc)
IMPORTANT NOTE FOR MULTIPLE CD SETS
Further, if this is part of a CD set, make sure the Disc Number is correct for the set, and that EVERY DISC IN THE SET has the exact same Artist name and exact same Album name – in particular watch out for Multiple CD sets with [Disk #] in the Album name field – this is another frustrating feature of iTunes. Gracenote http://www.gracenote.com/about/faqs/ (the company that supplies the album and track names) recommends that you record the names of multiple disk sets with the disk number as part of the name in the format – eg:
Add “[Disc #]” after title 69 Love Songs [Disc 1]
BUT iTunes is too stupid to group [Disc 1] and [Disc 2] in the same compilation set, so if you are ripping Classic 100 Opera [Disc 1], you will want to change the Album name to simply Classic 100 Opera before ripping. And so on for disc 2, 3 etc. Otherwise, you will end up with (in this case) eight CDs called Classic 100 Opera [Disk #] which rather fills the iTunes album page view.
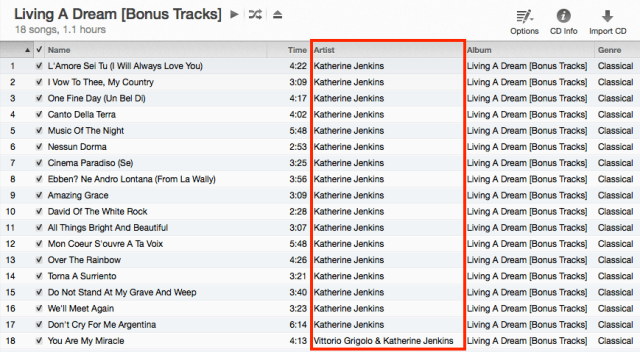
Case 3: Single CD or multiple CDs, songs by one main artist with supporting artists.
Take this example of Katherine Jenkins’ “Living a Dream” Album. Notice that the last song is by Vittorio Grigolo & Katherine Jenkins
Importing an album like this can be tricky – similar to the previous case, you can import this CD as a compilation, but if you do this, then the album will be stored under the artist name of “Various Artists” rather than Katherine Jenkins as you would expect. In fact, most solutions that you find on Google will tell you that this is the way to group these songs together – but there is a better way.
Before you import the CD, click on the CD Info option as before, but this time make sure the Compilation CD option is NOT checked – like so:

[As a sidenote – I also fixed the album name so that it no longer shows the words [Bonus Tracks] as part of the Album title – another example of a Gracenote stuff-up]
While you have this dialogue open, highlight and copy to the clipboard the Artist name – you will use it in the next step. Close this dialogue box.
Now comes the tricky bit. Start by selecting ALL the tracks in the window (I use the shortcut key of Command+a [Mac] or Ctrl+a [PC] to do this). Now right-click on one the tracks of the listing and choose Get info. The field you are interested in is the Album Artist.
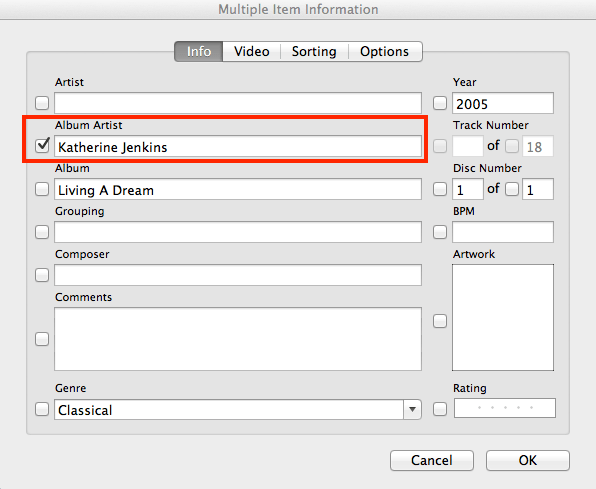
Click in the album artist field and paste in the name of the artist, then click OK.
[Sidenote: if you right-click->Get Info on just one of the tracks in this listing, you may find that Apple has managed to find out the Composer name for some or all of the tracks as well]
Now when you import the CD, it will be placed under the artist name “Katherine Jenkins” AND stored on your hard disk in the “Katherine Jenkins” folder rather than the “Compilations” folder.
If the CD is part of a multiple CD set, repeat the process for each CD, making sure that you set the correct CD numbering, and keep the same Album Artist name for each CD.
Footnote: If you actually do import the CD as a compilation CD and see it turn up under Various Artists, then right-click on the album, choose get info (it should open at the [Info] tab) and fill in the artist name for the Album Artist field, and it will be now filed under the artist’s name. At the same time (while the Multiple Item Information dialogue is still opened) go to the [Options] tab and you can toggle the Part of a compilation option to No – and iTunes will now physically move the location of the album on your hard disk out of the Compilations folder to the Album Artist’s folder. You may actually find it easier to import these types of CDs this way rather than the way I explained above.
Step 3: Get the Album Art
If you now go to your Albums collection, you should see your new Album, and with a bit of luck, it will already have a picture of its cover right there. If not, you can try right clicking on the coverless album and selecting Get Album Artwork. If that doesn’t work, I’d suggest first opening a copy of Windows Media Player (if you have a PC or a Windows Virtual Machine running) and letting it have a go at getting the album art. Failing this, you will have to do your best to find the artwork yourself using say Google Images or your favourite search engine. If you can find a copy of your album cover on http://www.allmusic.com/, then it will be a good one (Also a great site for getting correct names if you don’t feel like typing them yourself). If you find something suitable, copy the image to the clipboard, then back in iTunes, right click on your album and select Get Info and in the Info tab, paste the image in the Artwork space.
Gotchas – The Multiple matches problem
Sometimes when you put a CD in, you will be told “Multiple matches were found online for this CD. Please choose the correct one”. Something like this:

Now guessing which one is a lucky-dip, and once you have chosen one and found out that the listings are wrong or crap, you can’t change back easily (see my experience below). In this case I chose David Hirschfelder, because he indeed was the composer and orchestrator, rather than David Helfgott, who was a featured artist. This turned out to be a bad choice, because there are actually many artists on this album. The way I found this out was by going to another computer and prepared to rip it again. Now the way I fixed it (and it is messy in this case) is that after I ripped the CD, I right-clicked on the album and selected Get Track Names – which gave me the same dialogue as above, but this time I selected the second option – and landed in the quintessential iTunes trap of having the album scattered all over my library – in fourteen different locations! (It is at this point that you are quite legitimately allowed to yell at the top of your voice “I HATE iTunes”).
Gotchas – How to fix the scattered album listing problem
Now when a disaster like this happens, there is a way to fix it.
Firstly, search your library for the album title – in this case searching for “shine – original” was enough to find all fourteen pieces.
Now select all of these pieces, and right-click on one of them then select Get Info. To bring them all back to a single album, you have two options:
- Enter a name for the Album Artist – in this case I entered David Hirschfelder since he was composer/orchestrator
- Alternatively, click on the [Advanced] tab and toggle the Compilation CD: option to Yes
Remember, if you find this article helpful, you can make it easier for others to find simply by rating it and/or sharing/liking it.

Pingback: How to name albums and songs in iTunes | RedNectar's Blog
Pingback: How to transfer existing ripped music to iTunes | RedNectar's Blog
Thanks for putting this information together and I’ll be sure to share it. My own iTunes collection is a mess from years of the same problems that you addressed in the article. Luckily the iTunes search option works fairly well and I make heavy use of playlists.