
Have you clicked the new menu item – Help | Instructions on GNS3? This article explains how to make use of this feature, as well as point out some pitfalls along the way.
Getting Started
If you want a page of instructions to appear when you click Help | Instructions in GNS3, this is what you need to do.
- Build a topology and make sure you have saved it. Let’s assume you built a topology called Project_Name and saved it in the default location off you Projects directory.
- Create a new directory called instructions (case sensitive) off your Project_Name directory.
- In this directory, create a file beginning with the letters instructions (case sensitive) – it could be instructions.txt or instructions.doc or even just instructions – but for this example, let’s assume it is instructions.html. [Caveat: The file you create MUST have a default application that can open it on your operating system. If your OS can’t open .doc files, or files with no extension at all, there is no point naming your file instructions.doc or instructions – see Pitfall#2]
- Now you’ll have to write some instructions appropriate to your topology. If this is a profiling topology, you might want to include instructions on how to start the routers and what to check in the configurations. But if you want to create a professional looking web-page, you will probably use one of the following three methods:
Method 1: Keep it simple
There is no reason why you can’t put some simple plain text in the document. You don’t need to be an html guru to create some simple instructions. Just look at this example taken from the old version of GNS3 WorkBench.
******************************************************************************
* You should see another window where the GNS3 program is running.           *
* In that window, click on the green "Start" icon - looks like a "Play" icon.*
* When all the devices have started, click on the black "Console" icon (to   *
* left on the "Play" icon). Your terminal session(s) will start in tabs next *
* to this screen.                                                            *
******************************************************************************

This lab is designed to explore the features of the VPCs program.  You should
see the tab for the VPCs program next to this screen.

Click on that tab, and explore the options that are presented to you.

This configuration can be very useful for exploring other features too.R1 is set up as an IPv4 DHCP server and does IPv4 NAT
R2 is set up as a DNS server, and also does IPv4 NAT to the internet. For
this to work, your first adapter from the virtual machine running
GNS3 WorkBench must be connected to a DHCP server. (Assuming original
GNS3 WorkBench configuration)
Nothing here but plain text – but it will appear just fine in a web-page so long as you called it instructions.html – perhaps not with exactly the same font or character spacing – but for that you’ll need to explore Method 2: html text.
Method 2: html text
To ensure that your text is nicely formatted, you might want to pack the preceding page with some html tags – nothing fancy – the following would do. Just add some html tags around the text:
<html>
<head>
<pre>
******************************************************************************
* You should see another window where the GNS3 program is running.           *
* In that window, click on the green "Start" icon - looks like a "Play" icon.*
...<snip>
GNS3 WorkBench must be connected to a DHCP server. (Assuming original
GNS3 WorkBench configuration)
</pre>
</head>
</html>
There you go – just a few <xxx> </xxx> tags around your text and you have some html formatted text. Of course you already understand that multiple spaces are insignificant in html unless enclosed in a <pre>…</pre> block, but to make more significant pages, you will need to either become an html encoding expert, or use an html editor.
Method 3: html editor
There are hundreds of html editors around – you can even use MS Word as an html editor. But for my purposes of trying to create a simple and clean (=still decipherable in a text editor) web pages for GNS3 WorkBench, I used the free, html online editor at quackit.com, after starting with one of their free templates.
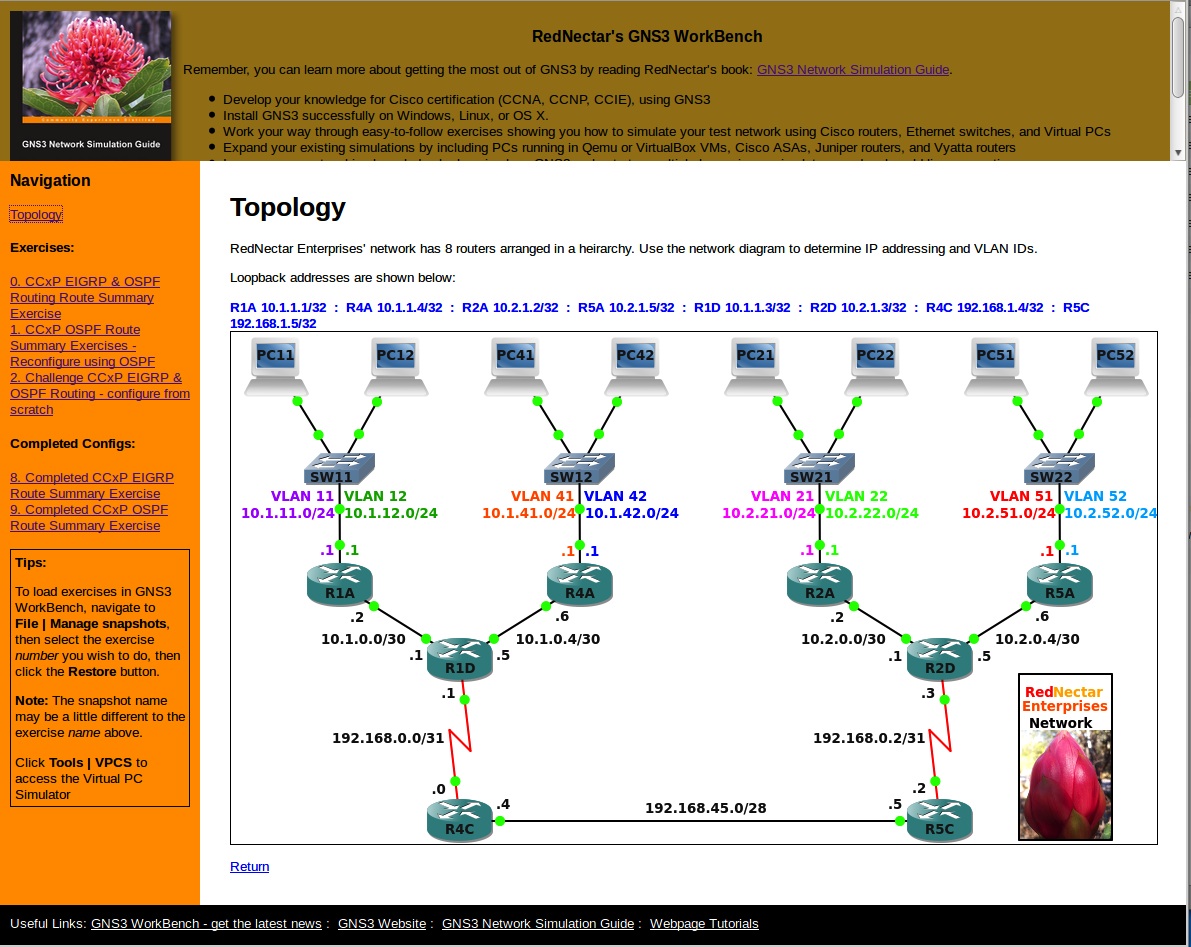
The template I chose used frames, and the website provides an excellent tutorial about frames, so it wasn’t hard to adapt the page to display a copy of the topology.png screenshot (that is automatically created when you save a GNS3 topology) into the instructions. Pretty soon (an hour or two) I had instructions pages that looked like this:

And I had built myself a template that I could use over and over for other exercises too.
But if editing html is not your cup of tea – you may prefer to create your instructions page on an external website, such as WordPress.com, then redirect the instructions page to your public online webpage(s).
Method 4:Redirect to a public webpage
For this example, I’ll show you how I make René Molenaar’s GNS3-Vault exercises appear when you load one of his exercises in GNS3 WorkBench. In this case, all I do is create the instructions.html document (as described above) and place the following text in the document – in this case, the exercise was the PPPoE exercise:
<html>
<head>
<meta http-equiv="REFRESH" content="0;url=http://gns3vault.com/HDLC-PPP/ppp-over-ethernet-pppoe.html">
</head>
</html>
Note that all I do is use the meta http-equiv expression to make the page re-direct to the appropriate gns3vault.com page. That’s it! Of course, you will have to then create you sexy webpage at the site you re-direct to, but at least your target site will probably give you the tools and templates you need to create a smashing help page for GNS3!
Pitfalls
There are a couple of things to watch out for when creating your glorious instructions.
Pitfall #1: Multiple files beginning with the letters instructions.
GNS3 (v.8.6) doesn’t actually look for files like instructions.doc or instructions.html. Instead it looks first in the Project_Name directory for a file beginning with instructions. (note the . is included in the name). So if you have both instructions.html and instructions.jpg in your Project_Name directory – you have a random chance of getting one or the other when you click on Help | Instructions.
If no files beginning with instructions. exist in your Project_Name directory, then GNS3 looks to see if you have a directory called instructions in your Project_Name directory. If you followed my instructions above, you should have. However, GNS3 now goes through the same process in the instructions directory, and again, if you have multiple files beginning with instructions. you will have the same problem.
I first discovered this pitfall when I was editing a file called instructions.html in Open Office. I dragged a graphic into the document which Open Office kindly reproduced for me in the same directory as instructions.html and called it instructions_some_random_number.jpg – and you can guess what happened when I clicked on Help | Instructions – I got the .jpg appearing, but NOT the file I wanted.
Moral #1: Always create a directory called instructions in which you place your instructions.html file, and make sure your .html file does not have any dependants/links to files beginning with instructions.
Pitfall #2: No default application for your instructions file
If you decide to call your instructions file simple instructions, then there is a good chance that your operating system can’t open the file, even if it exists – simply because Windows doesn’t like opening files without extensions. Similarly, if you call it instructions.doc and copy it to a system that does not understand what .doc files are, it will not open the file.
Moral #2: Always call your file instructions.html because there will always be a default application that will open .html files.
Pitfall #3: Your instructions file gets changed
Remember that if you decide to call your instructions file instructions.txt, then the default application to open this file is a text editor. So if you are creating the file to be used in a shared environment, then anyone who access Help | Instructions can change your file. If, of course you are using the feature to document your profiles topology, you might want to be able to edit the file, and perhaps no-one else has access, or you have password protected the file.

All this looks like FUN!!! 🙂