
The Covid #WorkingFromHome phenomenon has forced me to become re-aquainted with the Cisco Webex Training application. To get the best performance from WebEx Training, I’ve made a list of the shortcomings of the application that I must remember to overcome each time I use this dinosaur.
RedNectar Tip: If you have a choice, use any other Training Delivery program that’s available. Use WebEx Training as a last resort, or as in my case, because your customer insists. In early 2014 I described Webex Training as “an ancient online video collaboration tool”. The biggest change since 2014 with Webex Training is that it is now 6 years more ancient, so let me get to my list.
Tip #0: Run Webex Teams in parallel
Although Webex Teams shares branding with Webex Training, it as a FAR superior product than Webex Training except for one important area – real-time sharing. You can’t share your screen when more than one person is in the meeting, and voice/video quality sucks on Webex Teams, so you need to use the Training app for that.
However, it has a far better whiteboard than Webex Training, an infinitely superior chat session, and Webex Teams provides a convenint and easy way to share other content like files as well. What’s more, the space says around between sessions and after the training is finished so you can continue with follow up questions if required.
Webex Teams Setup Tips
Log into Webex Teams and create a Webex Teams Space. I use a convention of Course name followed by the training dates as the name of the Space. Add the Eurl bot at the same time.

Don’t add any real people here – there are a far easier ways as you will soon see.
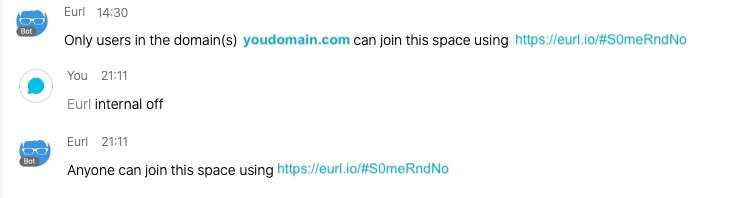
The Eurl bot should reply with a message like:
Only users in the yourdomain.com can join this space using https://eurl.io/#SomeRndNo
So the first thing to do is to tell Eurl to allow outside addresses using the @mention like this:
Tip: When you type @Eurl – make sure you select the Eurl graphic so the @Eurl changes to Eurl as seen in the graphic below.
@Eurl internal off
Now get a QR code so you can display it on a welcome screen. Use the @mention @Eurl qr

Great. Now you have to get the participants into your space. If you don’t have email address, you could display the QR code and https://eurl.io/#S0meRndNo link on the meeting start page.
But if you do have the particpants email, you of could email them the link, but there is an even better (although slightly big-brotehrish) way. If you have a list of email addresses, you can add them by pasting them in to a dialogue or uploading a CSV file using Webex Teams Power Pack. Just click the Invite option and you are away.

You do have to get the email address list into shape by either saving them as a .csv and uploading it, or simly pasting in a list with commas separating the email addresses.
That’s taken care of the Webex Teams part, but I’ll come back to it during the Webex Training setup.
Webex Training Setup Tips
Tip #1: Use multiple monitors
At least two. One to share with students and one to have your mail and other stuff you might want to do.
Tip #2: Plan to share your Primary Monitor
Ideally of course you’d want your secondary monitor to be the one shared because typically system messages appear on the primary monitor so your students will see every notification that pops up, which I feel is a) distracting, and b) not-professional.
However, one of the FEATURES of Webex Training is that you can only share your primary monitor (on macOS anyway), so plan your presentations to sit on your primary monitor. How foolish and embarrassing it was for me to think otherwise.
Tip #3: Run a non-default browser
On that screen that you plan to share, load up a browser window in case you wish to share some information in a browser. I use Canary, which is the Alpha build of the next Chrome browser. You might prefer Edge or Firefox.
A big advantage of this is if you display a webpage with a countdown timer like I do during breaks, it prevents wierd things appearing on the participant view when you open that email and click on the latest Dan Murphy’s beer special. How embarrasing to have it open on the participant’s screen as it would if you’d used your default browser.
I keep Canary completely free of plugins, bookmarks etc so no personal information that might be displayed in your everyday browser is seen. Like my bookmarks to those websites nobody wants to see. Makes a very professional look.
Tip #4: Prepare meeting preferences/templates
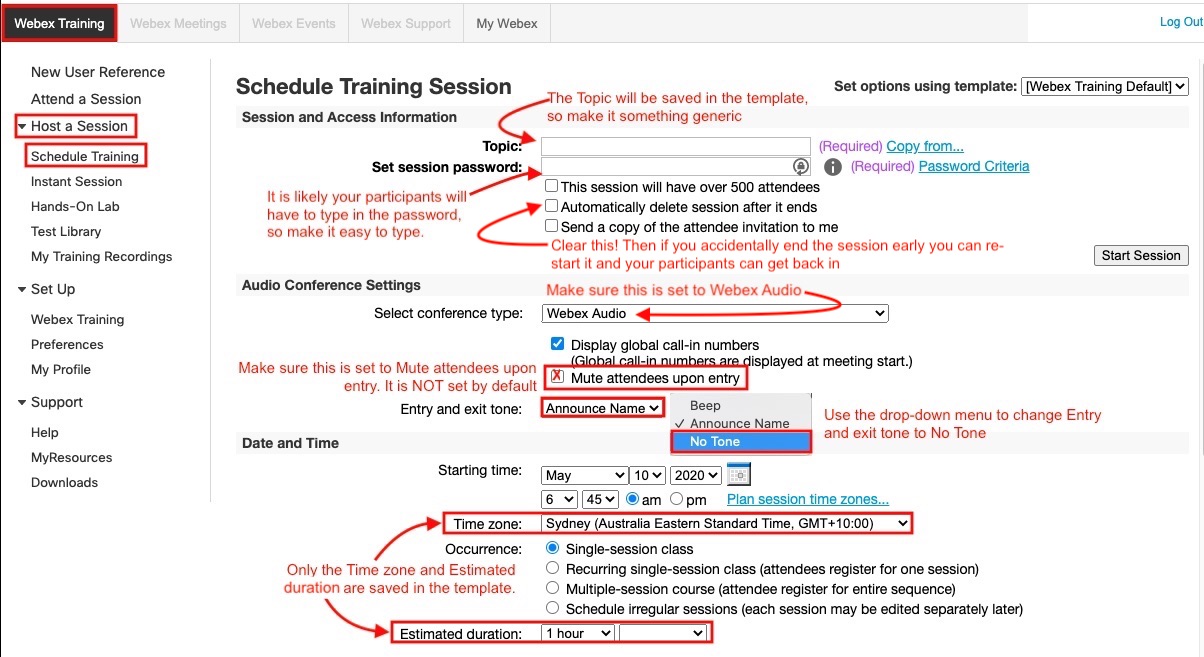
Log in to the Webex Training site and go to Webex Training > Host a Session > Schedule Training. Assuming you are starting with the [Webex Training Default] template, make the following changes and save the template.
Session and Access Information
Topic: The Topic will be saved in the template, but you will probably want to change it for every session, so make it something generic that won’t embarrass anyone. [Note to Chris – DON’T put the customer’s name in the Topic]
Password: It is likely your participants will have to type in the password, so make it easy to type. The reason participants will need to type in the password is because if they use their browser’s auto-fill to enter their email at the sart of the session, the password (pre-filled from the link supplied) will get over-written.
Important: Clear the [ ] Automatically delete session after it ends. That way, if you have the misfortune to accidently end the session before you are finished (and this can happpen easily) you will still have the meeting in the schedule and you can-restart it.
Audio Conference Settings
Select Conference Type: Make sure this is set to Webex Audio and the [x] Mute attendees upon entry is set. It is NOT set by default.
Entry and exit tone: Use the drop-down menu to change this to No Tone
Date and Time
Only the Time zone and Estimated duration are saved in the template. Don’t waste your time setting up templates for single-session classes, Recurring etc. IT WON’T GET SAVED.
Registration
Don’t touch any of these options. If you think that clicking Customize form is going to lead you anywhere useful where you might be able to create a customised webpage with logos etc – save yourself the trouble. Don’t click.
Attendees
Again, don’t waste time trying to add attendees here, there is NO facility to say paste a list of names or import a CSV. If you try this option, you will have a LOT of typing to do. Far easier to find the Meeting Link (not that that is easy) and eMail the attendees from your regular Mail application.
Presenters
Another rabbit-hole time-waster. You can’t invite presenters unless they have a Webex Training account. In my case, we instructors have to share accounts, so this is useless.
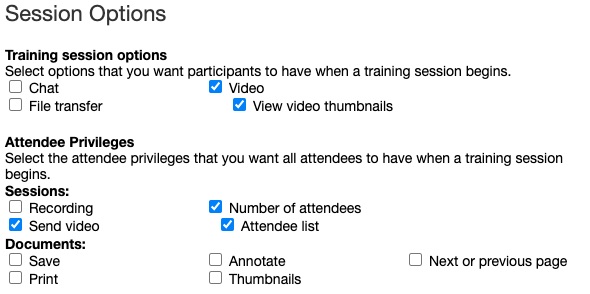
Session Options: IMPORTANT
Edit the available features to exclude the Chat function. I include ONLY the following:
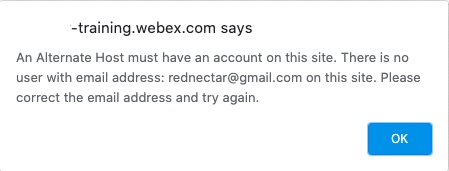
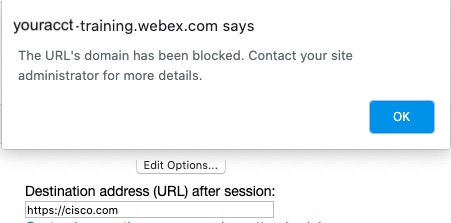
Don’t bother with the Destination address (URL) after session, like so much of Webex Training – it SIMPLY DOESN’T WORK. If you put something in there, you will get the following message when you try to schedule a meeting using this template:
Tip #5: Do EVERYTHING on your iPad/tablet [Optional]
This ties in with sharing your primary monitor. I use an app called Reflections to mirror my iPad to my primary screen, and bingo what people see is my iPad screen. If you use a touch-screen computer, this may not be so relevent.
Ideally, you should be able to swap between iPad/tablet and PC in a single session – but for that you’d need a modern application – decidedly NOT Webex Training. So, like my 2014 artice, I suggest using your iPad/tablet for the best results because it will allow you to DRAW using a pencil or stylus.
For me, I present all my Power Point slides from my iPad (so I can draw on them) and use an application called Concepts for a whiteboard, although MS Whiteboard is a pretty good 2nd best. However using a 3rd party whitebaord means you loose the one big advantage of using Webex Teams whiteboard which is that you can save the whiteboard right into the Webex teams chat. To do the same using a 3rd party app requires a bit of manipulation.
Tip #6: Stay Calm
One day Cisco may actually realise there is a need to create a decent online training delivery program and build it.
Until then, happy Webex-ing
RedNectar
