
I have seen a few requests for help about VPCS on the GNS3 forum lately, and some confusion about the VPCS multi-host option and how it is different to the regular GNS3 VPCS host. So if you are confused, or just want to know more about how you can use VPCS in your GNS3 topologies, read on.
Single instance VPCS
There are two ways you can run VPCS – by far the easiest is to add a VPCS host to your topology. By dragging one in from the End devices pane. Once you have added the host, you can start the VPCS process by selecting the VPCS device, then choosing Device | Start (the Device menu can be also accessed by right-clicking on a device).
Once started, a console session can be established with the Virtual PC by choosing Device | Console.
And from here, you can explore VPCS options using the ?
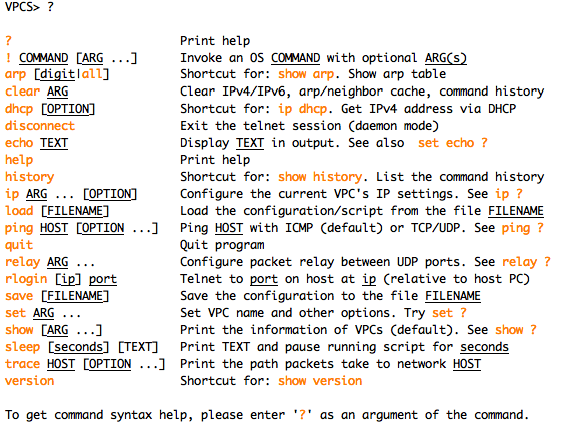
To get stated, you’ll need to set an IP address, like this
ip 192.168.10.10/24 192.168.10.1
…which will set the IP address for the VPC to 192.168.10.10 with a mask of 255.255.255,0 and a default gateway of 192.168.10.1
And the next most important command you’ll want to learn is:
save
…which will of course you MUST do before saving your project within GNS3 – GNS3 will NOT save your VPCS (or your Cisco router configs) for you if you forget.
From this point, you’ll want to explore the ping and trace commands. But there are other commands worth checking out like:
show ip
arp
and
set dump detail
…to see a summary of packets sent and received by this VPC. (Use set dump off to turn it off)
You can then add another Virtual PC and another – as many as you like.
But there is another way of using the Virtual PC Simulator that gives you even more options – you may have seen it on your Tools menu. VPCS multi-host
VPCS multi-host
Now VPCS multi-host is considerably harder to set up than the normal VPCS. In fact, you have to set it up the way VPCS used to have to be set up in GNS3 v0.x – using either the cloud or host device (both are essentially the same)
To set up a VPCS multi-host, drag either a cloud or host device onto your topology.
Next, select the device, and choose Device | Configure. This brings up the Node Configurator (hopefully soon this will change name to the Properties dialogue).
From here, choose the UDP tab.
Initially, the settings should be just perfect for VPCS[1] – with the Local port setting at 30000, the Remote host set to 127.0.0.1, and the Remote port set to 20000, so click the Add button, then click OK.
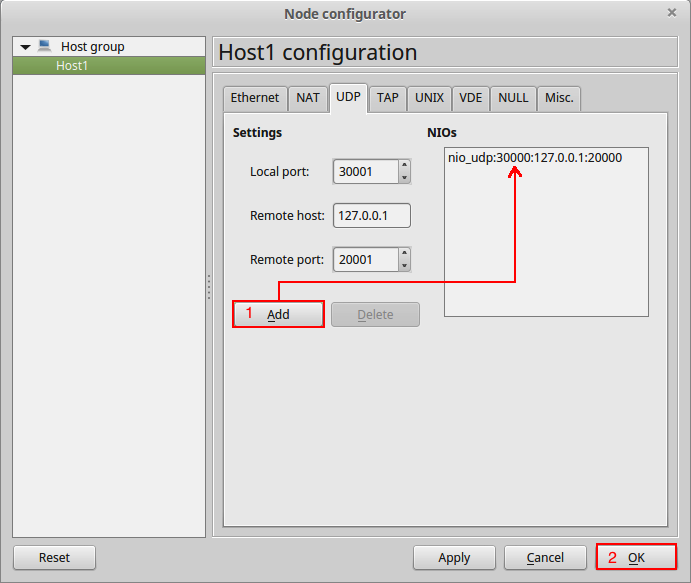
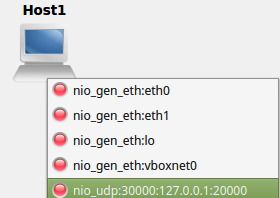
You can now use the connector tool to connect to this nio_udp:30000:127.0.0.02:20000 interface you have created to another device (make sure you select the nio_upd interface)
Now there isn’t much point using the VPCS multi-host option if you don’t want more than one host, but when you add your second host, you’ll have to be a little more careful at the step where you add the UDP settings under the UDP tab. For the second VPCS host, you need to use ports 20001 and 30001. And for the third VPCS host, ports 20002 and 30002 and so on. You can configure up to nine VPCS hosts in this way.
TIP: |
When configuring the UPD ports for the second and subsequent hosts, you might find it easier to click the Add button multiple times until the port number you need for that host number appears in the box. You can then delete the others, or leave them there until you have built your topology – GNS3 will prune any extra unused ports for you when you quit the project! |
Once you have got your VPCS hosts connected to your topology, you can choose the Tools | VPCS multi-host option to spawn a session with your hosts. And here is where the first big difference between the regular VPCS hosts and the VPCS multi-host option becomes apparent.
No matter how many VPCS multi-host you configured, only one window opens – and the prompt is slightly different; it will show:
VPC[1]
Now the commands for VPCS multi-host are exactly the same as they are for the regular VPCS, except that all of your Virtual PCs are in one window – to access Virtual PC #2, you will have to enter the digit 2 on a command line by itself and hit <Enter> The prompt will change to
VPCS[2]
You can navigate to any of the 9 Virtual PCs in the same way – press digit <Enter> – as explained in the now slightly expanded help screen.
What’s the point? Why go to all that trouble to set up VPCS multi-host?
There are some simple advantages:
- You only have to remember to save one file – a single save command saves the config of all your Virtual PCs (up to nine)
- When you want to ping the same IP address from different hosts, simply change focus to a different Virtual CP, and use the up-arrow key to retrieve commands in your command history.
- When you use the set dump command, you can see the results, even if the dump is for a different Virtual PC than the one in focus.
- A single window is easier to mange than multiple windows, especially if you are using a totally Windowed terminal application that doesn’t support tabs (Putty for example).
- Only a single instance of VPCS is spawned for all (nine) Virtual PCs, which means the amount of RAM and CPU required by VPCS is reduced by a factor of the number of single-instance VPCS you WOULD have used 🙂
But the most significant difference between Single instance VPCS and VPCS multi-host is possibly one you may never use, but incredibly powerful just the same.
With VPCS multi-host you can load a script file that tests your configuration from multiple points. There is no easier way to explain this than to show you a script checking one of my GNS3 WorkBench exercises. You’ll have to watch the video to see, but in it you’ll see multiple tests being carried out from multiple Virtual PCs, and the set dump feature used on a “remote” Virtual PC (the http://www.example.com host) to observe that IP addresses have been NATted to the correct IP address.
The exercise used in the demonstration above was my ICND1 Readiness Test, part of the GNS3 WorkBench.
So the choice is yours – use either the regular Single instance VPCS, or configure your hosts to run in a single VPCS multi-host instance – you might even get adventurous and start writing your own scripts.
For more information on how to run the VPCS multi-host, check out my VPCS Tutorial
RedNectar

Pingback: GNS3 Version 1.3: What’s new for Open-Source Routers | Open-Source Routing and Network Simulation
Chris great work as always
I am having issue with getting my ASA to start up correctly
Getting error saying i need to be root when i start the ASA and lots of errors and never getting the prompt
Any suggestions
Regards
Per
Perhaps its the version of QEMU – I certainly had lots of problems with Qemu version 2.0
If you are using GNS3 v0.8.7 then make sure you are using QEMU v 0.11.–gns3-linux
If you are using GNS3 v1.x then make sure you are using QEMU v 2.3.50 – note that the command to invoke the latest qemu is no longer just “qemu”