
You have Cisco Hyperflex installed, but not quite sure if there is anything you need to do differently now that want to deploy VMs on the Hyperflex Data Platform (HXDP)
Well, yes there are some things that you need to do differently, and some you should do differently, but most activities you’ve ever done with VMs and ESXi hosts will remain the same.
Here are the seven things you need to know to make Hyperflex perform optimally.
Create new users for the HX Connect GUI from vCenter (Must Do)
Create Datastores using the HXDP utilities, not vCenter standard Datastore creation (Must Do)
Create Snapshots using the HXDP utilities, not vCenter standard Snapshot function (Must Do)
Create multiple Clones using the HXDP utilities (Should Do)
Use HXDP Maintenance Mode, not vCenter standard Maintenance Mode (Must Do)
Upgrade ESXi software using HX Connect or Intersight, not vCenter (Must Do)
Create new VLANs using the HX Installer VM (Should Do)
Create new users for the HX Connect GUI from vCenter (Must Do)
There is a default admin user that can be used to log into the HX Connect GUI, but best practice is to use your vCenter username and password. If you want to add a read-only or another administrator user for Hyperflex, use the regular method for creating a user in vCenter.
Create a Datastore (Must Do)
Before you can even begin to use Hyperflex, you must create a Datastore on your HXDP. Since you will only do this rarely, it is an easy point to forget, which can lead to frustration if you try to do this using the normal Datastore creation method from vCenter, because vCenter will want to assign the Datastore to a single ESXi host, whereas the HX Datastore will be distributed across all HX ESXi storage nodes. In other words, you can’t create a Datastore on your HXDP using the normal Datastore creation method from vCenter. Creating a HX Datastore can only be done in one of two ways, using Hyperflex Connect (easy) or the vCenter plugin (just as easy).
Perhaps more importantly, you should know the following best practices about HyperFlex Datastores
- Create as few as possible Datastores to maximise the deduplicaton
- Use the 8K block size option unless creating a Datastore specifically for VDI use
Method #1: Using HX Connect:
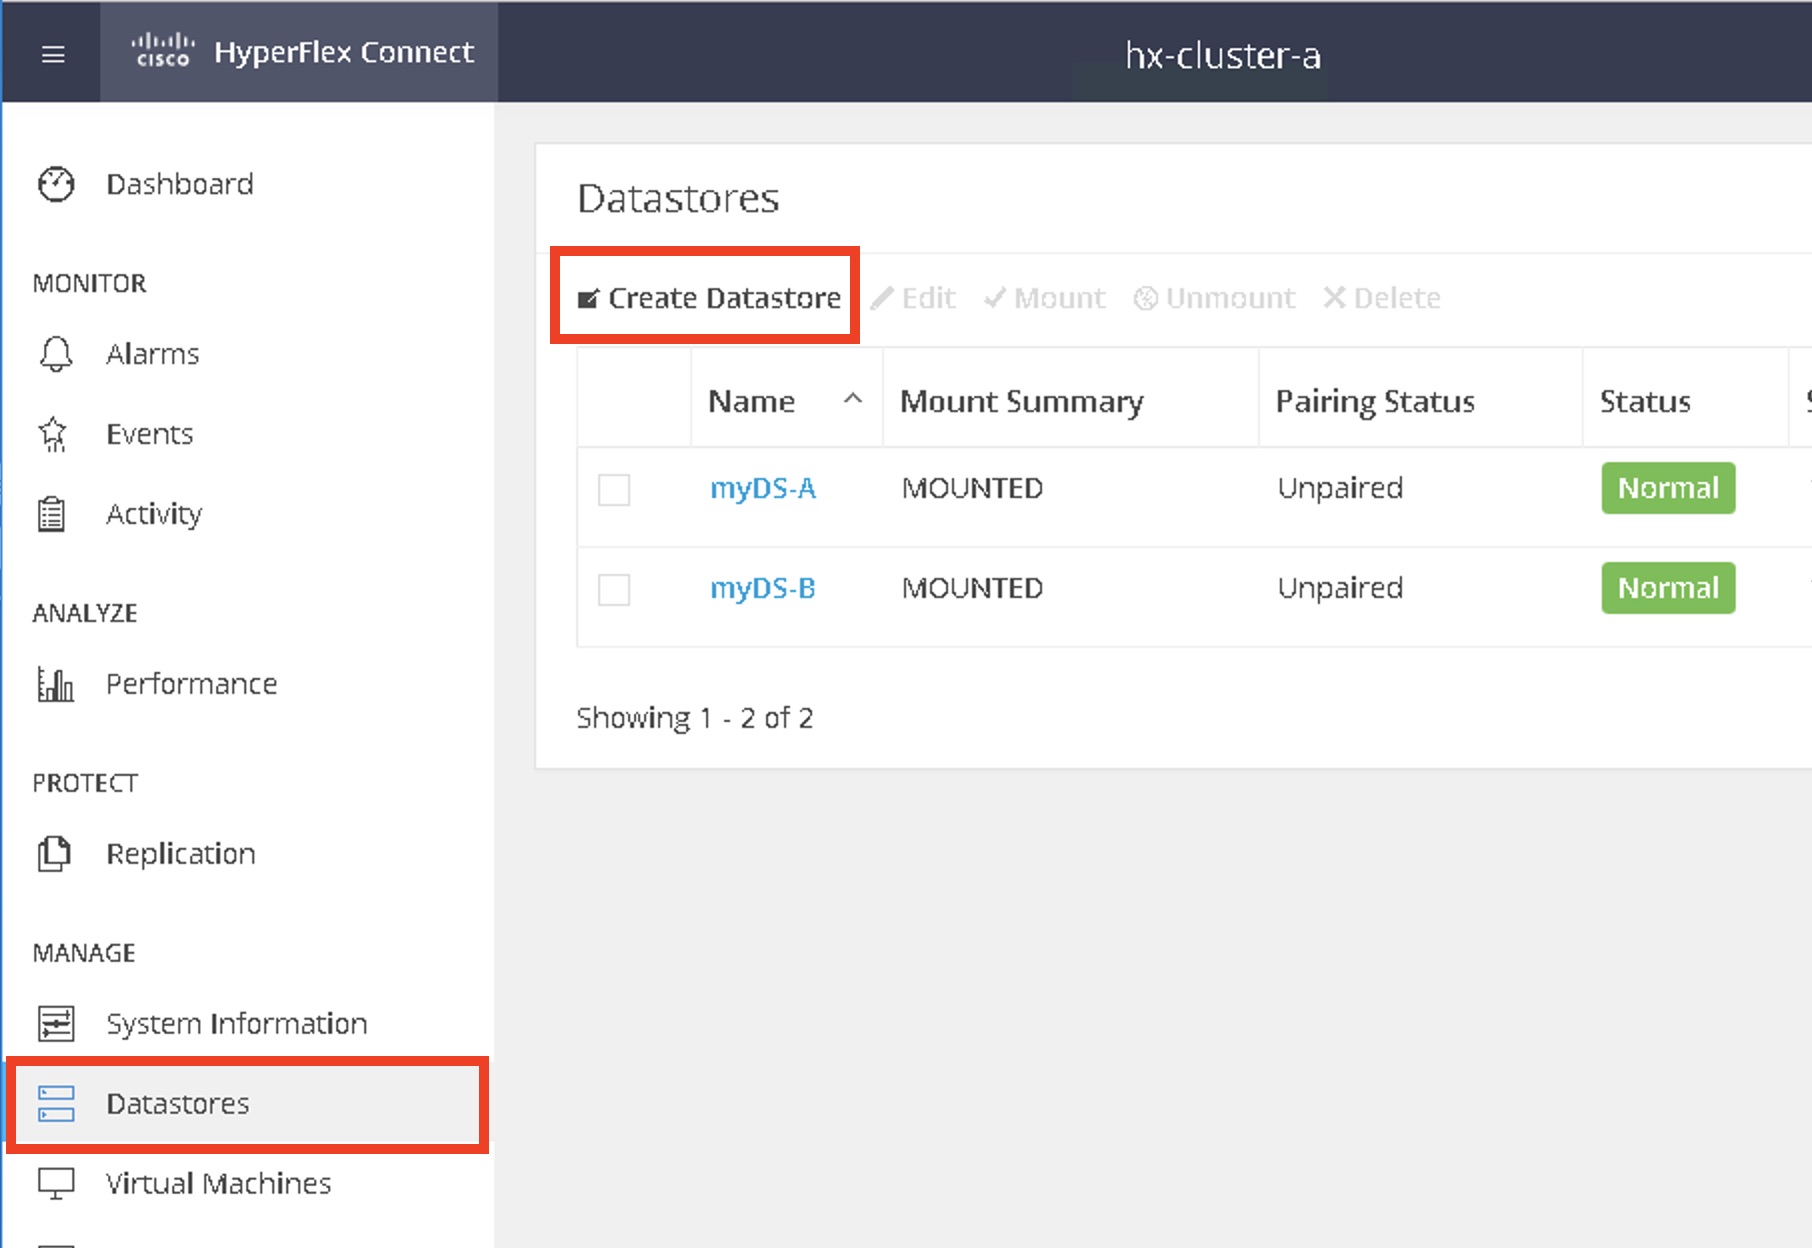
Click Datastores and then Create Datastore (I said it was easy)
Figure 1 Creating a Datastore in Hyperflex Connect is easy
Method #2: Using vCenter:
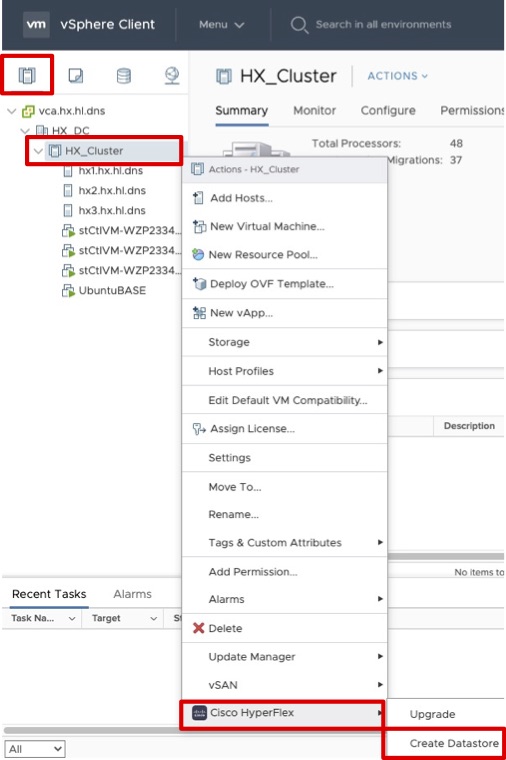
In the Hosts and CLusters view, cright-clik on a cluster and navigate to Cisco HyperFlex > Create Datastore.
- If this option is not present, you need to install the vCenter plugin for Hyperflex obtained from software.cisco.com
- If no HX Clusters appear in the list, Navigate to Menu > Cisco HyperFlex and click the Rescan option
Figure 2 Creating a Datastore in vCenter is just as easy
Create Snapshots using the HXDP utilities, not vCenter standard Snapshot function (Must Do)
This one is a bit tricky. When you create the first Snapshot in one of the two HXDP methods, a special SENTINEL snapshot is created. This ensures that any future snapshots can trace their pointer-based log-structured file system origins back to the original format. IF YOU CREATE THE FIRST SNAPSHOT using the VMware standard Snapshot functions, then you are stuck with the VMware Re-do snapshot system and will be stuck with the non-HX aware consolidation process should you wish to consolidate in the future.
The VMware Re-do snapshot system works like this: The first snapshot is made, and the .vmdk file for that VM is locked. A new .vmdk file is created to record any changes that are made after the original snapshot is made. Similarly, when the next snapshot is made, the second .vmdk file for that VM is locked and a new one created, and so on. The problem with this method is that not so much that no data is ever deleted, and the size of the snapshot re-do files may become far greater than the original, but that if you find that you need to reclaim the space, VMware now has to revert to the original snapshot and process the Re-do files. This process can take minutes, hours or even days depending on the size and complexity of the Re-do files – and there is a possibility that the process may exhaust your existing disk space before completion (after all, you are probably doing the consolidation to reclaim some space).
Hyperflex consolidation works like this: All the pointer-based snapshots are deleted in a matter of seconds, and the redundant chunks of data marked for deletion. Job done. In seconds. And no chance of running out of disk space.
Moral of this story: Use Hyperflex pointer-based snapshots for the first snapshot for all VMs. And to ensure this happens, why not take the approach of using Hyperflex pointer-based snapshots for all snapshots?
Here are the two ways of creating HXDP pointer-based snapshots:
Method #1: Using HX Connect:
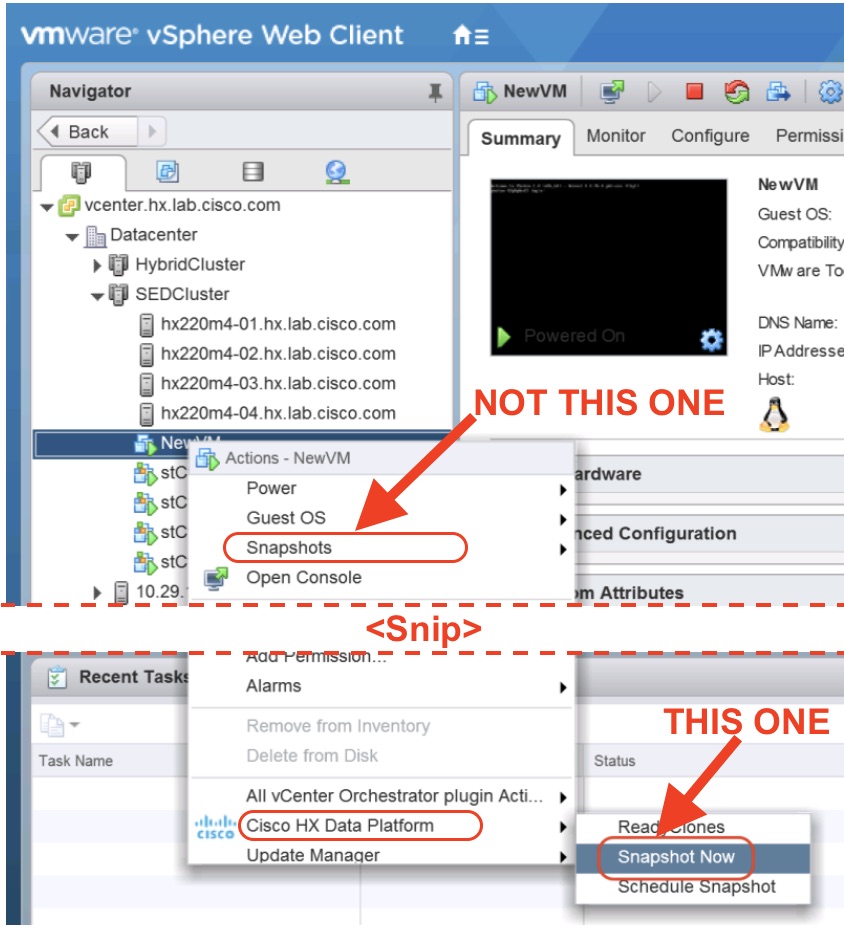
Click Virtual Machines and then from the Actions menu, select Snapshot Now
Figure 3 Creating Snapshots in Hyperflex Connect

Method #2: Using vCenter (must be Flash version of vCenter, not HTML):
Navigate to Global Inventory Lists > Cisco HX Data Platform. Next, select your cluster in the Navigator then click on the Manage tab. From here, click on the Datastores sub-tab where you will find an icon that will let you create a Datastore.
Figure 4 When creating HXDP Snapshots in vCenter you need to be careful
Create multiple Clones using the HXDP utilities (Should Do)
If you want to create one clone of a VM, it does not matter whether you use the standard VMware cloning option or the HXDP Ready Clones option. The main thing to remember is that to take advantage of the Hyperflex pointer-based log-structured file system’s inherent de-duplication, you must make sure that the VM you are cloning does not have any VMware Redo snapshots – only HXDP pointer-based snapshots. However, when you use the HXDP Ready Clones option, you’ll be able to create as many clones as you want without taking any extra disk space because of the Hyperflex pointer-based log-structured file system’s inherent de-duplication. One thing though, if you want to use Customisation Specifications or Resource Pools, you’ll have to have already created them in vCenter.
Figure 5 Creating HXDP Ready Clones in HC Connect
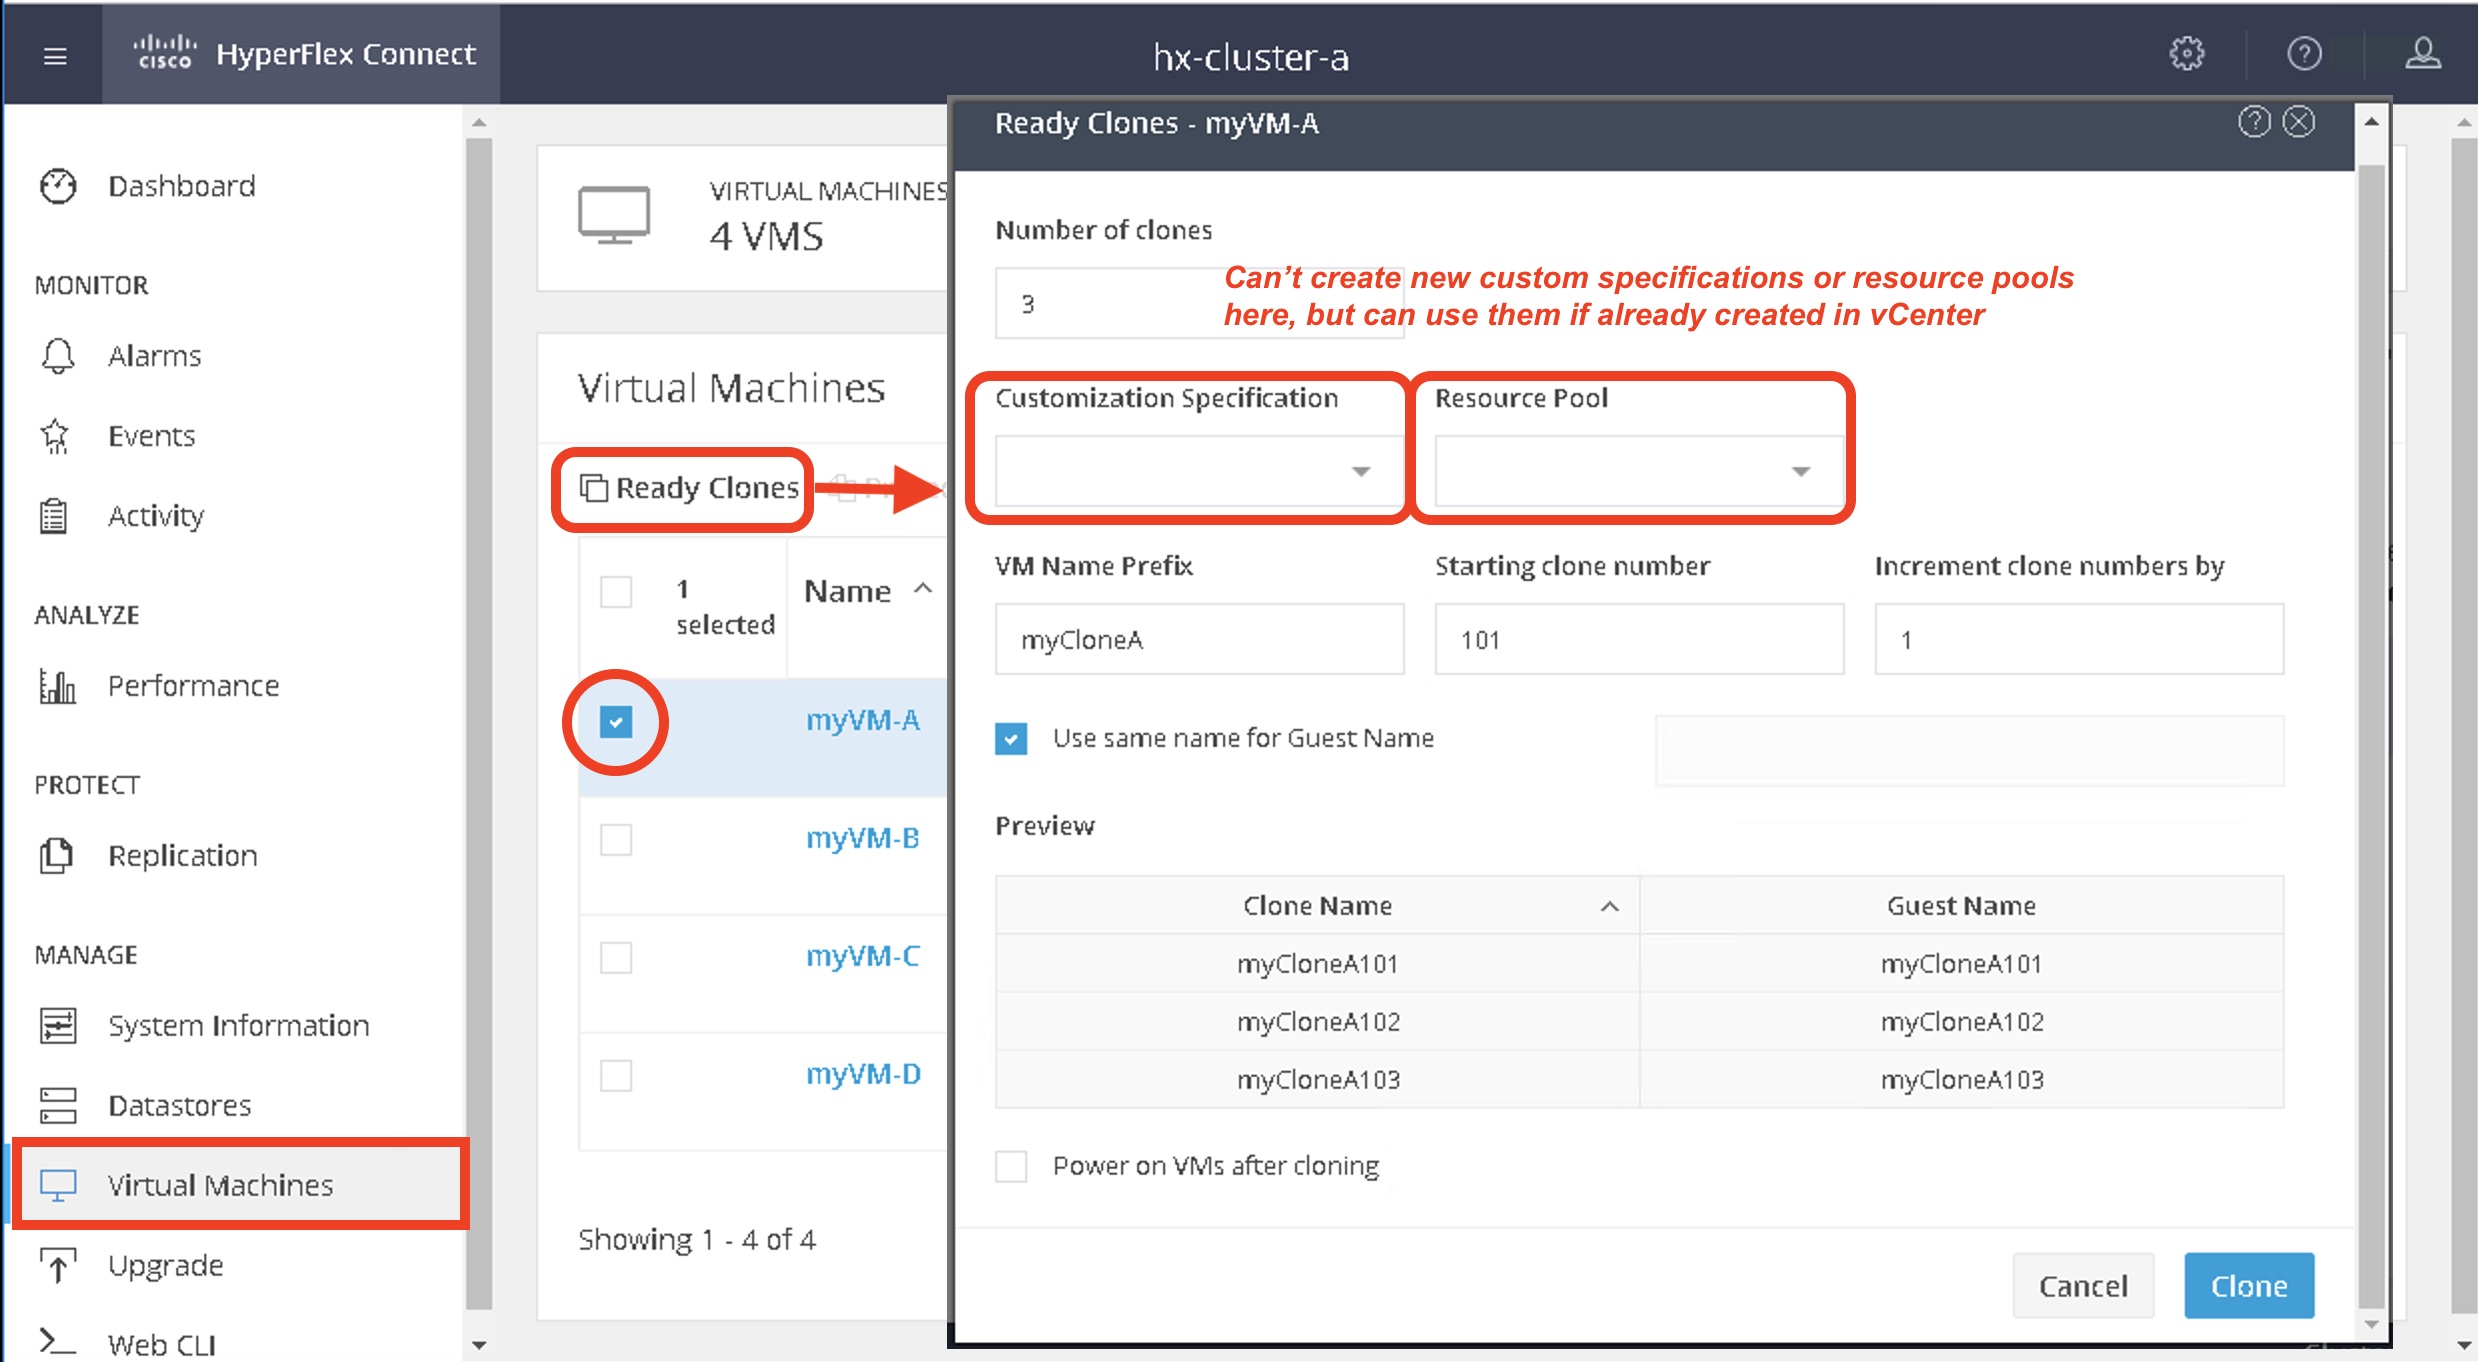
Figure 6 Creating HXDP Ready Clones in vCenter

Use HXDP Maintenance Mode, not vCenter standard Maintenance Mode (Must Do)
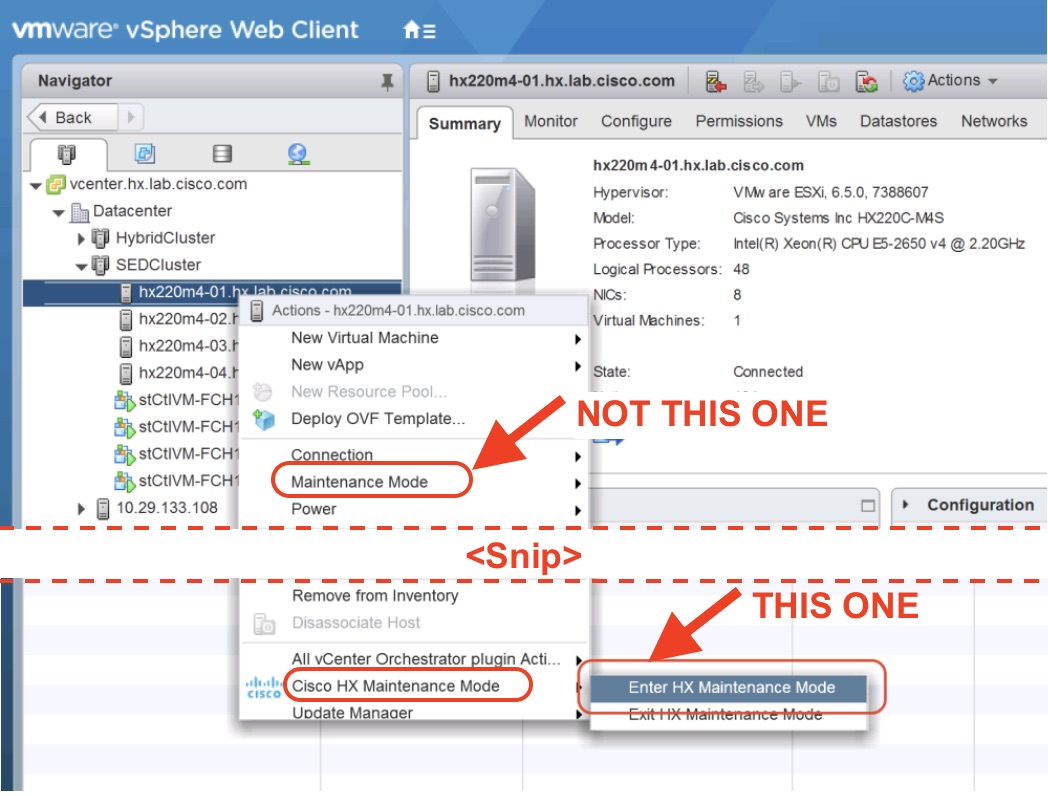
Should you ever need to shut down an ESXi storage host (and you will need to sometime), make sure you use the HXDP Maintenance Mode, not vCenter standard Maintenance Mode. The difference is this: When you shut down an ESXi storage host using the HXDP Maintenance Mode, the HXDP Controller VM will be shut down cleanly, and the other ESXi hosts will be informed that the HXDP Controller VM for that host is no longer available. To understand the re-percussions of this, you need to be aware of how the HX IOVisor works (which I hope will be the subject of a future blog post). When you use the standard VMware Maintenance mode, VMware doesn’t know that the HXDP Controller VM needs to be shut down gracefully and the other ESXi hosts need to be informed that the HXDP Controller VM for that host is no longer available, so shuts down the ESXi host regardless. Now, the HXDP will recover for this mis-hap in time (in most cases), but it is certainly NOT “best practice”
Figure 7 Entering HXDP Maintenance Mode using HX Connect
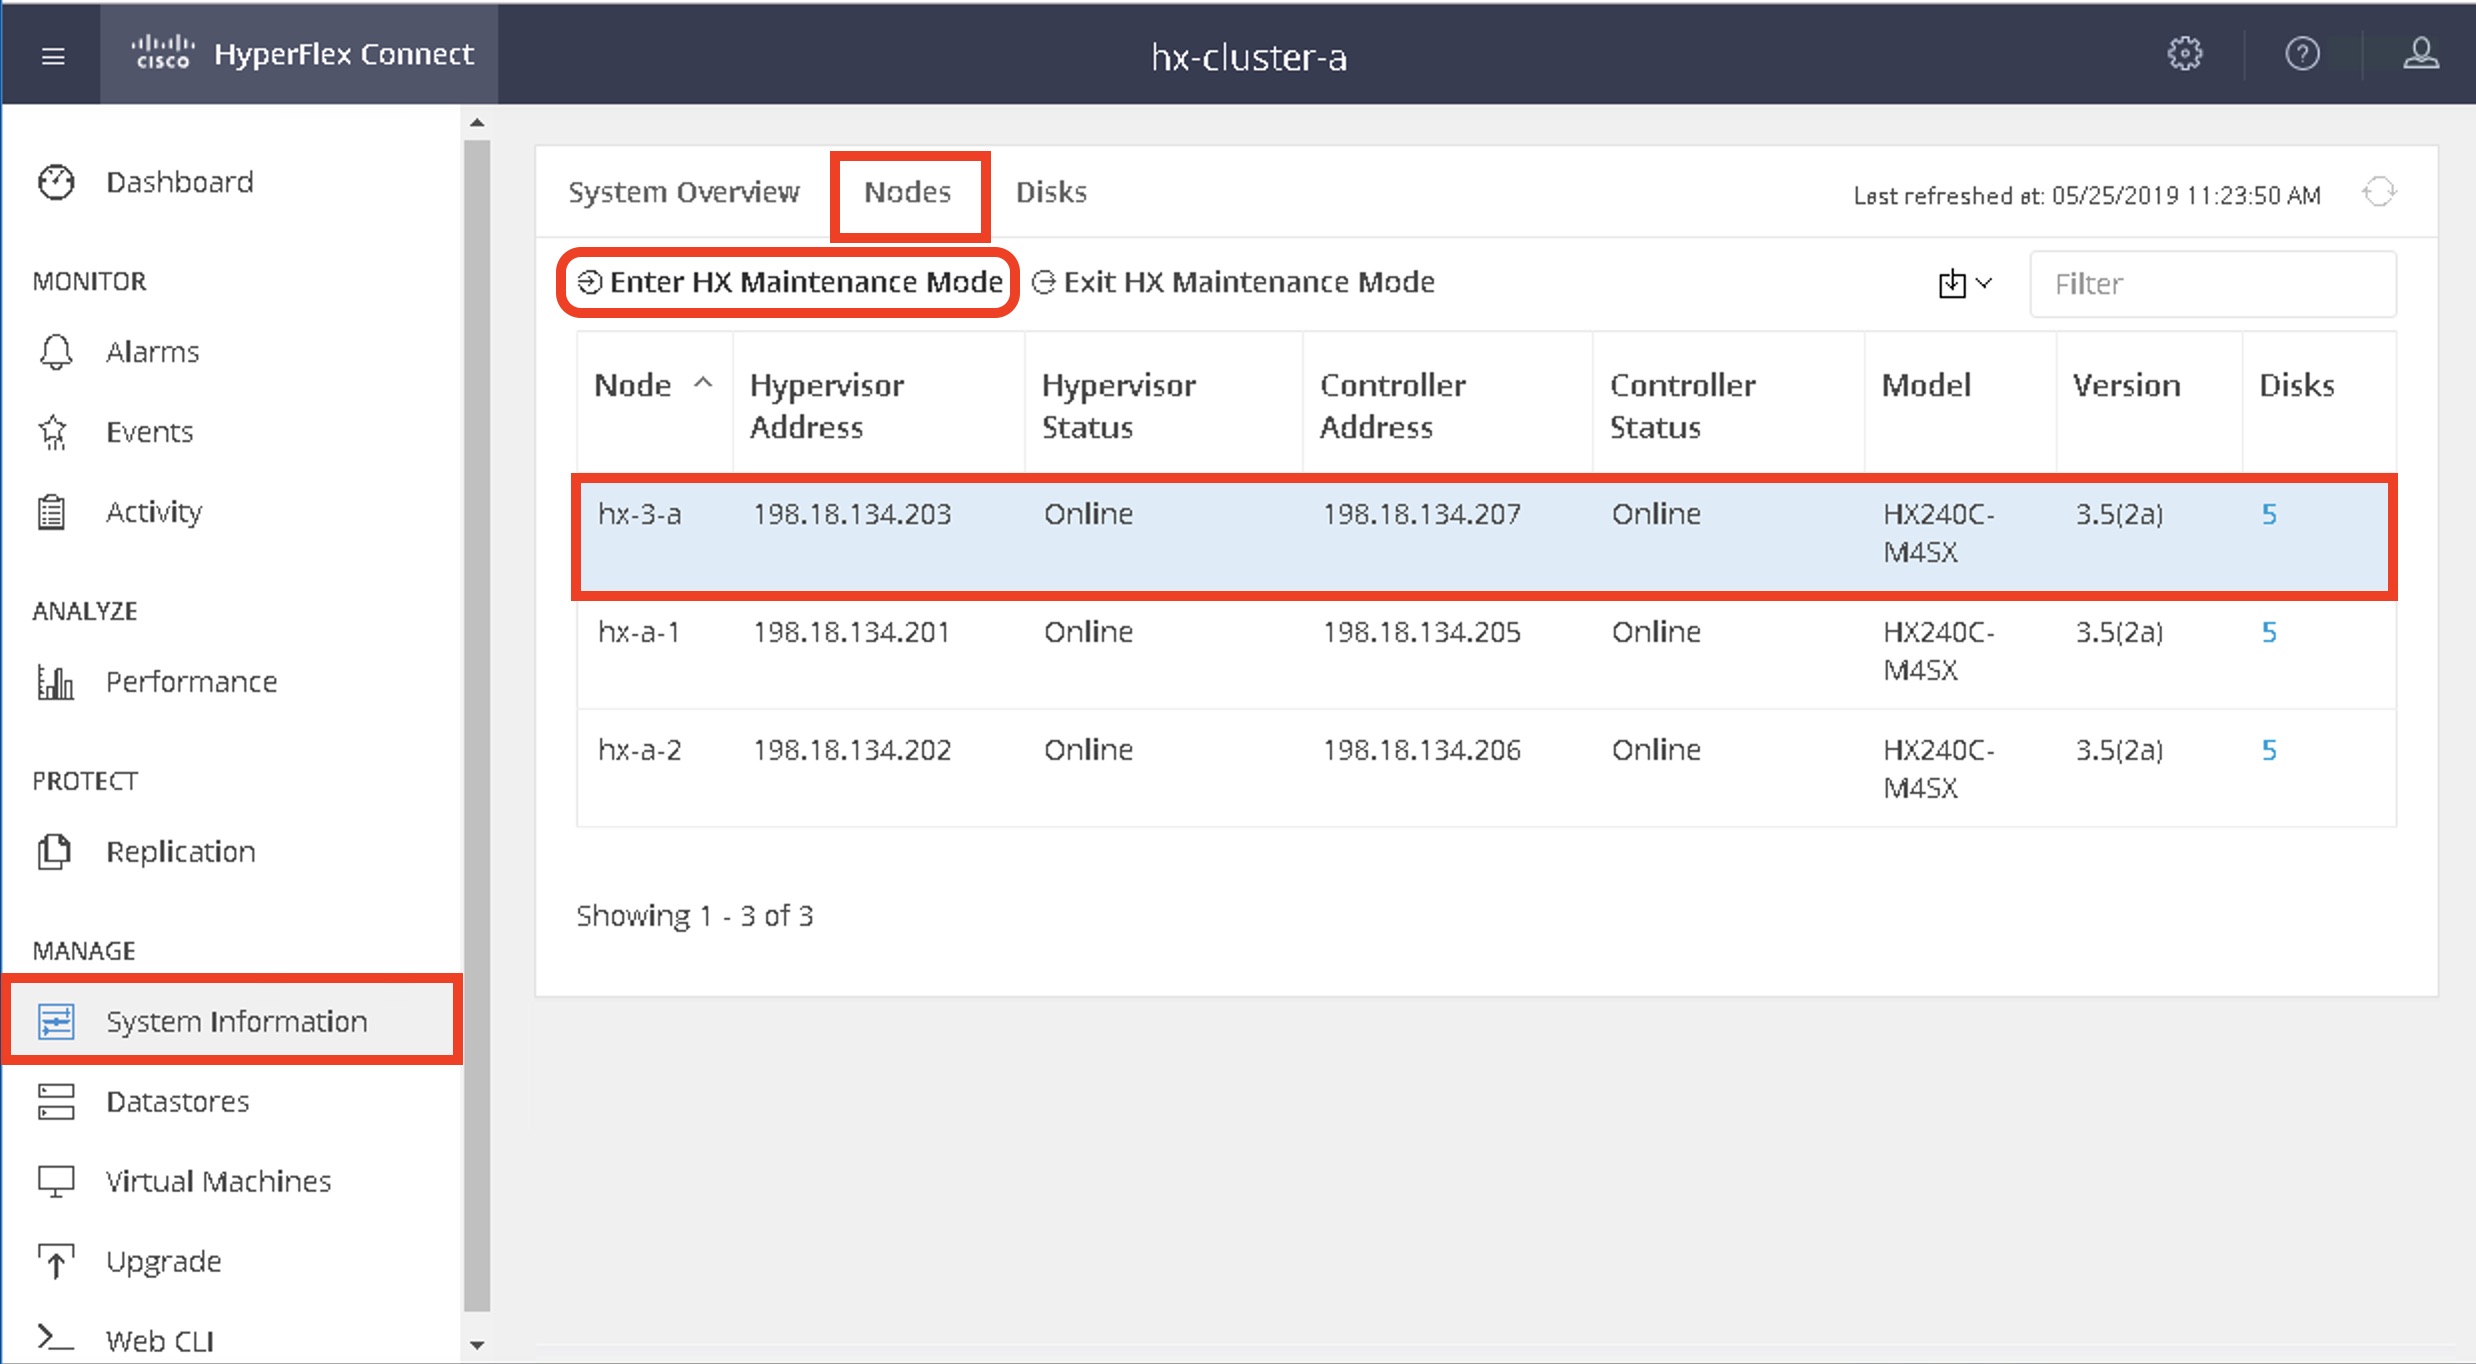
Figure 8 Entering HXDP Maintenance Mode using HXDP extensions in vCenter
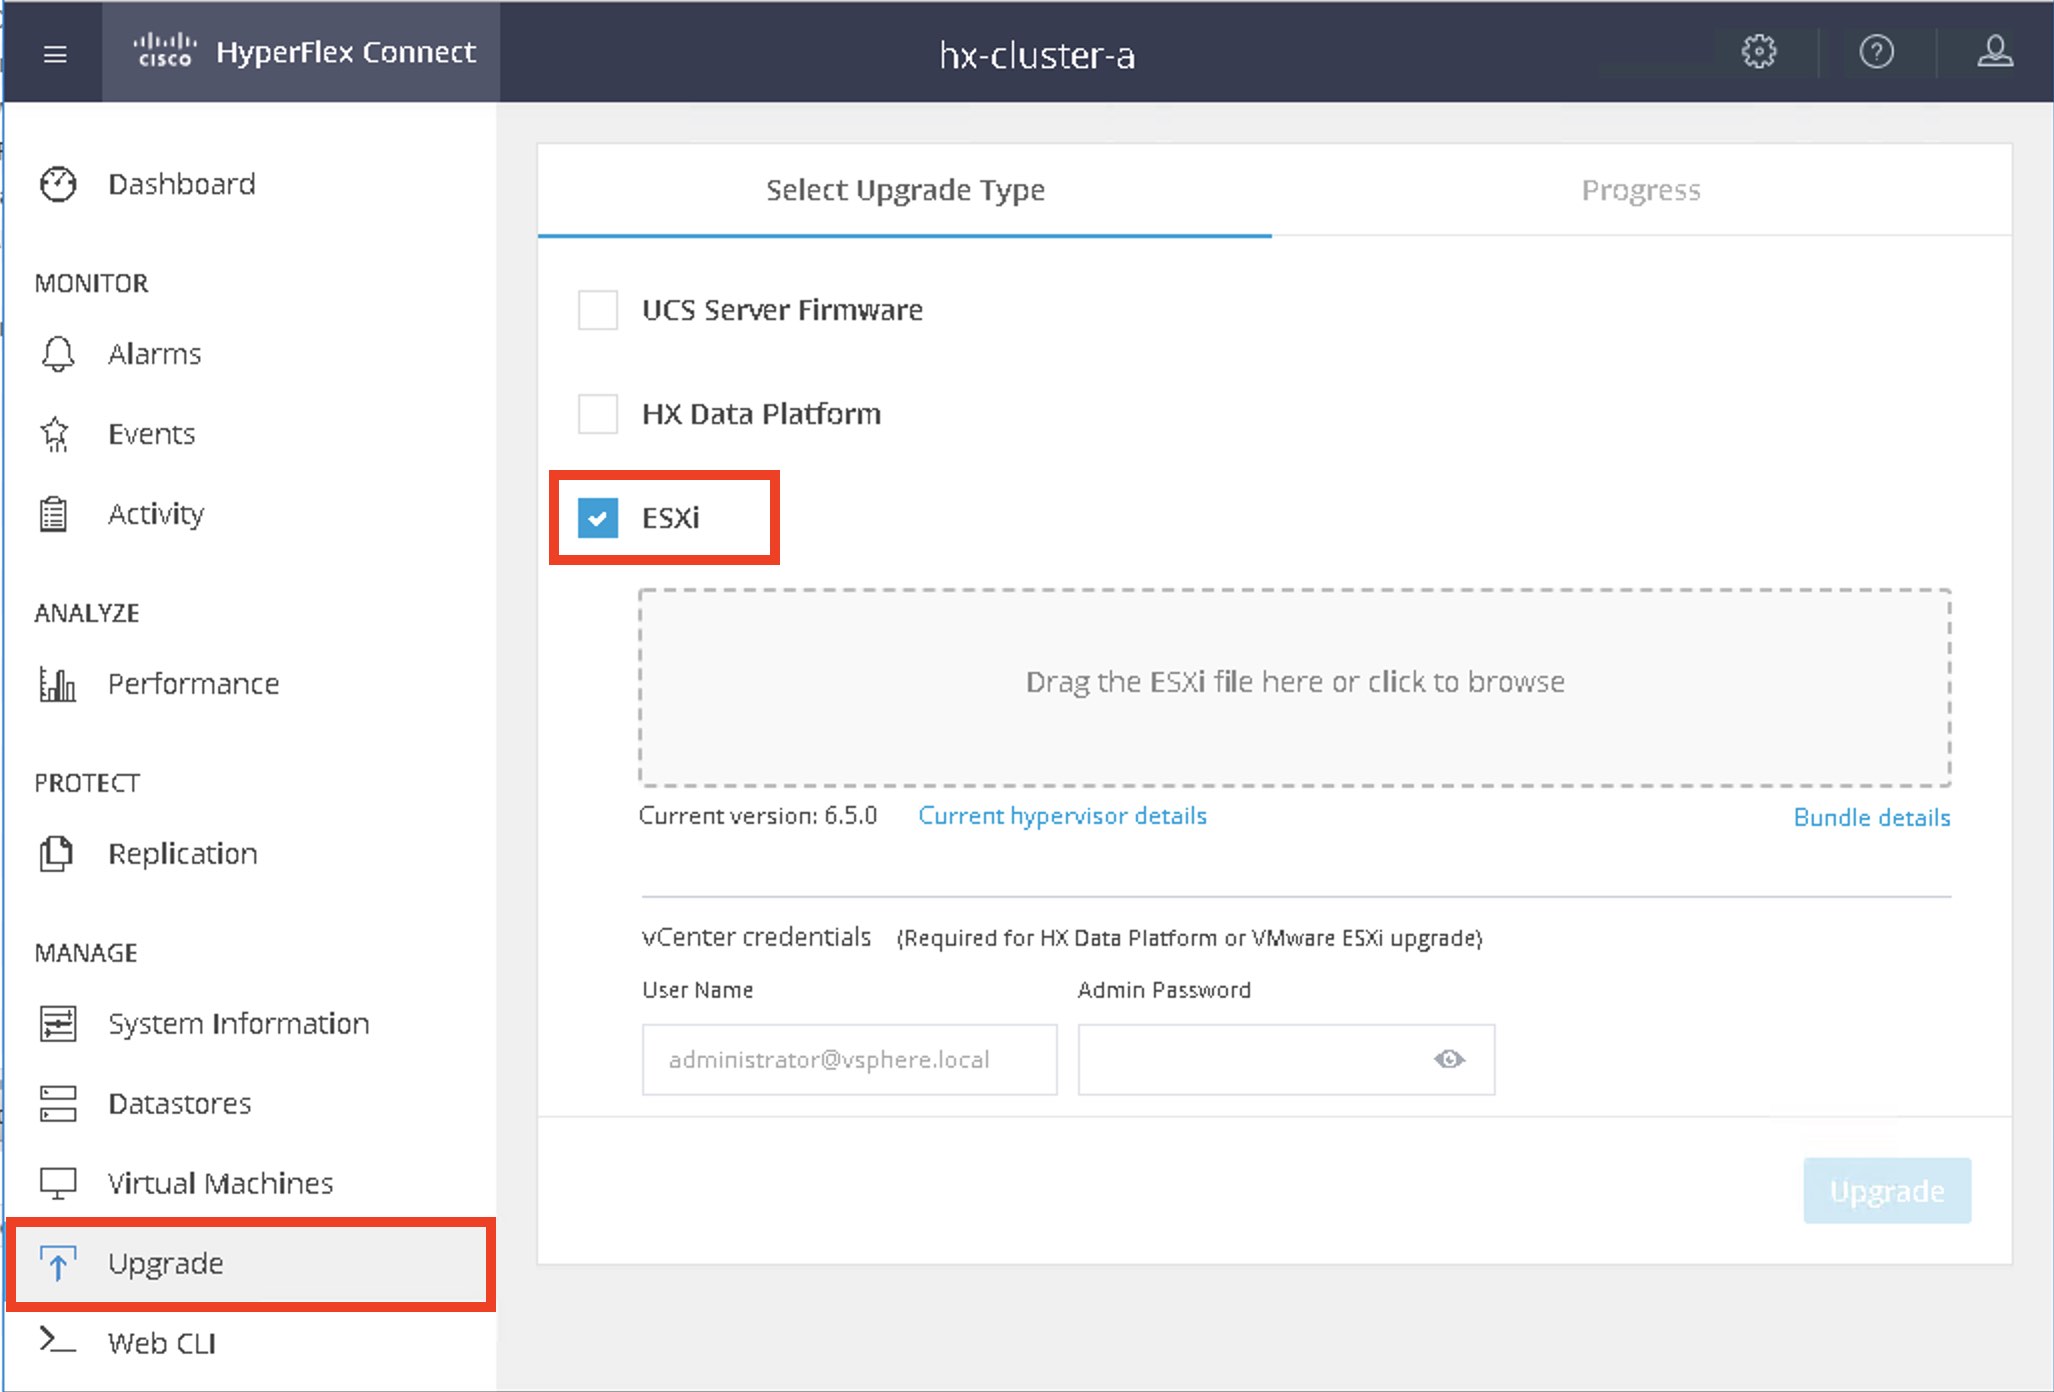
Upgrade ESXi software using HX Connect or Intersight, not vCenter (Must Do)
When the ESXi software needs to be upgraded, remember the ESXi software on your HXDP hosts has been modified by the addition of the IOVisor and the VAAI .vibs (VMware Installation Binaries), so upgrading the ESXi hosts is NOT a simple matter of upgrading using VMware’s released version – you need the ESXi versions released by Cisco with the appropriate .vibs installed. The simplest way to do this is to make sure you do the upgrades using Hyperflex Connect, or better still (if you have more than one site) Cisco’s Intersight SaaS platform (https://intersight.com) which can upgrade multiple HXDP sites in a single click! (Pause while I sip come more Kool-Aid). BTW, even if you have only one site, you should still connect your cluster to Intersight, but I’ll talk about that in a future post.
Figure 8 Upgrading using HX Connect
Create new VLANs using the HX Installer VM (Should Do)
If you even need a new VLAN on the HX data platform, you need to make sure that VLAN is available to each ESXi host and each Fabric Interconnect, and your upstream switches. Since Hyperflex was designed to run on ROBO versions of VMware and above, standard vSwitches are maintained in each ESXi host, so Cisco has provided a utility that allows you to quickly create a new VLAN on all hosts plus the Fabric Interconnects in one step, a task that is quite tedious if you are not using vSphere Distributed Switches. Of course, if you have a version of VMware that supports VMware VDS, you probably won’t want to use this feature (because it configures Standards vSwitches, not vSphere Distributed Switches). You’ll be prompted to enter usernames and passwords for UCSManager, vCenter and the ESXi Hosts, so it is a bit tedious, but simpler and safer than adding the VLANs manually to each ESXi host and the FIs. Here’s a sample session adding one VLAN – in this case it was a stretched cluster, so the VLANs were added to six hosts and four Fabric Interconnects in one hit!
root@HyperFlex-Installer:~# post_install --vlan
Logging in to controller 198.51.100.10
HX CVM admin password: **************
Getting ESX hosts from HX cluster...
vCenter URL: 198.51.100.100
Enter vCenter username (user@domain): administrator@vsphere.local
vCenter Password: **************
Found datacenter HX-DC
Found cluster HXCLUS01

post_install to be run for the following hosts:
 sitea-esxi01.mynet.local
 sitea-esxi02.mynet.local
 sitea-esxi03.mynet.local
 siteb-esxi01.mynet.local
 siteb-esxi02.mynet.local
 siteb-esxi03.mynet.local


 Enter ESX root password: **************
 Attempting to find UCSM IP
Site A - UCSM IP: 198.51.100.9
Site A - UCSM Username: admin
Site A - UCSM Password: **************
Site A - HX UCS Sub Organization: HX
Site B - UCSM IP: 198.51.100.109
Site B - UCSM Username: admin
Site B - UCSM Password: **************
Site B - HX UCS Sub Organization: HX
 Port Group Name to add (VLAN ID will be appended to the name): TestVLAN
 VLAN ID: (0-4096) 104
 Adding VLAN 104 to FI
 Adding VLAN 104 to vm-network-a VNIC template
 Adding VLAN 104 to FI
 Adding VLAN 104 to vm-network-a VNIC template
Adding TestVLAN-104 to sitea-esxi01.mynet.local
Adding TestVLAN-104 to sitea-esxi02.mynet.local
Adding TestVLAN-104 to sitea-esxi03.mynet.local
Adding TestVLAN-104 to siteb-esxi01.mynet.local
Adding TestVLAN-104 to siteb-esxi02.mynet.local
Adding TestVLAN-104 to siteb-esxi03.mynet.local
Add additional VM network VLANs? (y/n) n
Hi,
I see from one screenshot your HyperFlex is showing DNS rather than IP. I can’t seem to find a guide that references how to do this. Can you help?
I’m assuming yo uare referring to the screenshot of vCenter. Perhaps this paragraph from https://rednectar.net/2018/10/06/rednectars-hyperflex-pre-install-checklist-updated/ will explain
In other words, if you don’t have your server names and (reverse) IP addresses already configured in DNS BEFORE you do teh installation, vCenter adds the servers by IP address rather than name. To retro-fix, I imagine you’d have to go to vCenter, remove all teh ESXi hosts and add them back. [Untested – do so at your own risk]